

If you’re anything like me, you know that sometimes nothing hits the spot like a good old-fashioned casserole. The kind that wraps you in comfort, fills your belly, and leaves you with a sense of cozy satisfaction. That’s exactly what this Angel Chicken Rice Casserole does – it’s the perfect mix of creamy, cheesy, and downright delicious. Whether you’re feeding your family after a busy day or hosting a gathering, this dish is bound to become a favorite.
I first came across this recipe on a chilly night when I was craving something warm and filling. I was a little low on ingredients but had a rotisserie chicken hanging around, and a bag of rice in the pantry – I knew I was in business. After a bit of mixing and baking, I had a casserole that tasted like it came straight from the heavens, with a rich, creamy texture and the perfect balance of flavors. The beauty of this recipe is its simplicity. With just a few pantry staples, you can create a dish that feels indulgent but is incredibly easy to put together.
So, let’s dive in and get started on making this comforting casserole! I promise, it’s going to be a hit with everyone.
Ingredients: What You’ll Need
Here’s the list of ingredients you’ll need for this Angel Chicken Rice Casserole:
- 3 cups of cooked chicken (diced or shredded) – Rotisserie chicken works great, or use leftover chicken if you have it.
- 3 cups of cooked rice – This is a perfect recipe to use up any extra rice you have hanging around from the night before.
- ½ cup of butter (cubed and at room temperature) – The butter adds a creamy richness to the dish.
- 8 oz cream cheese (cubed and at room temperature) – This is where the magic happens. It makes the casserole ultra-creamy and dreamy.
- 10.5 oz can of cream of chicken soup – You can’t go wrong with this classic pantry staple. It gives the casserole a luscious texture and flavor.
- 3 cloves of garlic (minced) – Because, let’s face it, garlic makes everything better.
- 0.7 oz packet of Italian dressing mix (such as Good Seasons) – This packet adds the perfect amount of seasoning and a little tang.
- 1 cup of chicken stock – To help bring everything together and make the casserole nice and moist.
- 2 cups of shredded Colby Jack cheese (divided) – Who doesn’t love extra cheese? The first batch is mixed in for flavor, and the second one goes on top for that golden, melty goodness.
- Salt and pepper to taste – To make sure everything is seasoned just right.
- Fresh parsley (for garnish) – A little pop of green to make it look pretty and add a fresh finish.
Step 1: Preheat the Oven and Prepare Your Dish
The first thing you’ll want to do is preheat your oven to 350°F (175°C). While it’s heating up, grab a 9×13-inch casserole dish and lightly grease it with some non-stick cooking spray. This will ensure that your casserole doesn’t stick and comes out looking picture-perfect. Set the dish aside – we’ll be using it shortly.
Step 2: Soften the Butter and Cream Cheese
Next, let’s soften the butter and cream cheese. I love using the microwave for this part because it’s quick and easy. Just cube the butter and cream cheese and place them in a microwave-safe bowl. Microwave it for about 20-30 seconds. You’ll want the butter to be soft but not melted, and the cream cheese should be soft enough to mix in smoothly. After a quick whisk, you’ll have a luscious, creamy base to start the casserole filling.

Step 3: Prepare the Casserole Base
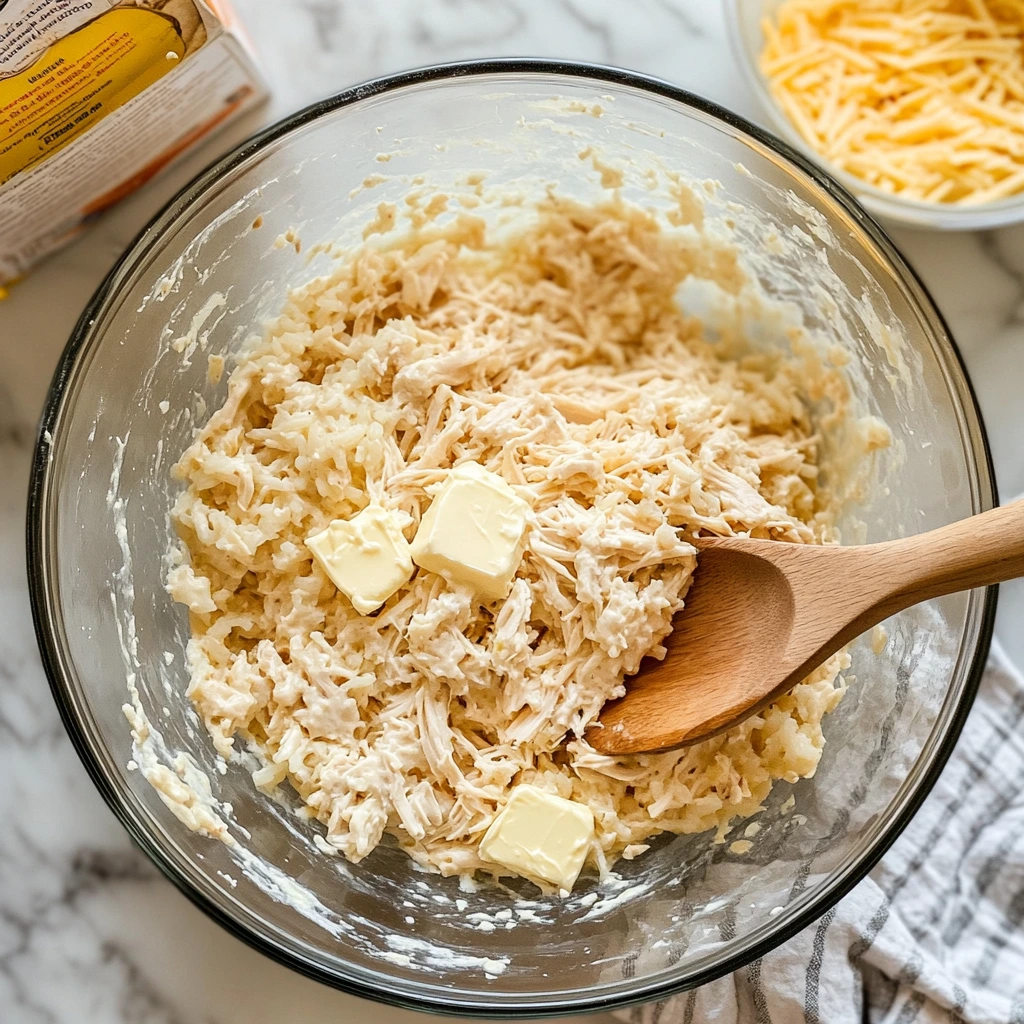
Now comes the fun part – combining everything! In a large mixing bowl, add in your cooked chicken and rice. The chicken can be diced or shredded, depending on what you have on hand or your personal preference. This is also a great recipe to use up leftover rotisserie chicken – just shred it up and you’re good to go!
To the chicken and rice, add the softened butter and cream cheese mixture, the cream of chicken soup, minced garlic, Italian dressing mix, and chicken stock. Season everything with salt and pepper to taste. Now, stir everything together until it’s well combined. This is the moment when you realize just how easy and quick this casserole is to make! The creamy soup and the butter-cream cheese mixture come together in perfect harmony, coating every grain of rice and chunk of chicken. Don’t forget to stir in half of your shredded Colby Jack cheese at this point – it adds to the creamy texture and gets mixed in beautifully.
Angel Chicken Rice Casserole: The Creamy, Cheesy Magic Continues
Welcome back! Now that we’ve got our casserole base all mixed together, it’s time to move on to the next steps and get this baby into the oven. This is where the magic truly happens – the cheese melts, the flavors meld, and you’re left with a dish that’s comforting, creamy, and totally irresistible.
Step 4: Transfer the Casserole to the Dish
At this point, everything should be looking wonderfully creamy and well combined. Grab your greased 9×13-inch casserole dish, and carefully pour the chicken and rice mixture into it. Use a spatula or a spoon to spread the mixture out evenly so that the casserole bakes uniformly. The texture will be thick and creamy, and that’s exactly what you want!
This is also a great moment to appreciate how simple and forgiving this recipe is. You don’t need to worry about layers or perfect presentation – just spread it out and trust that it will come together beautifully when baked.
Step 5: Top with Cheese
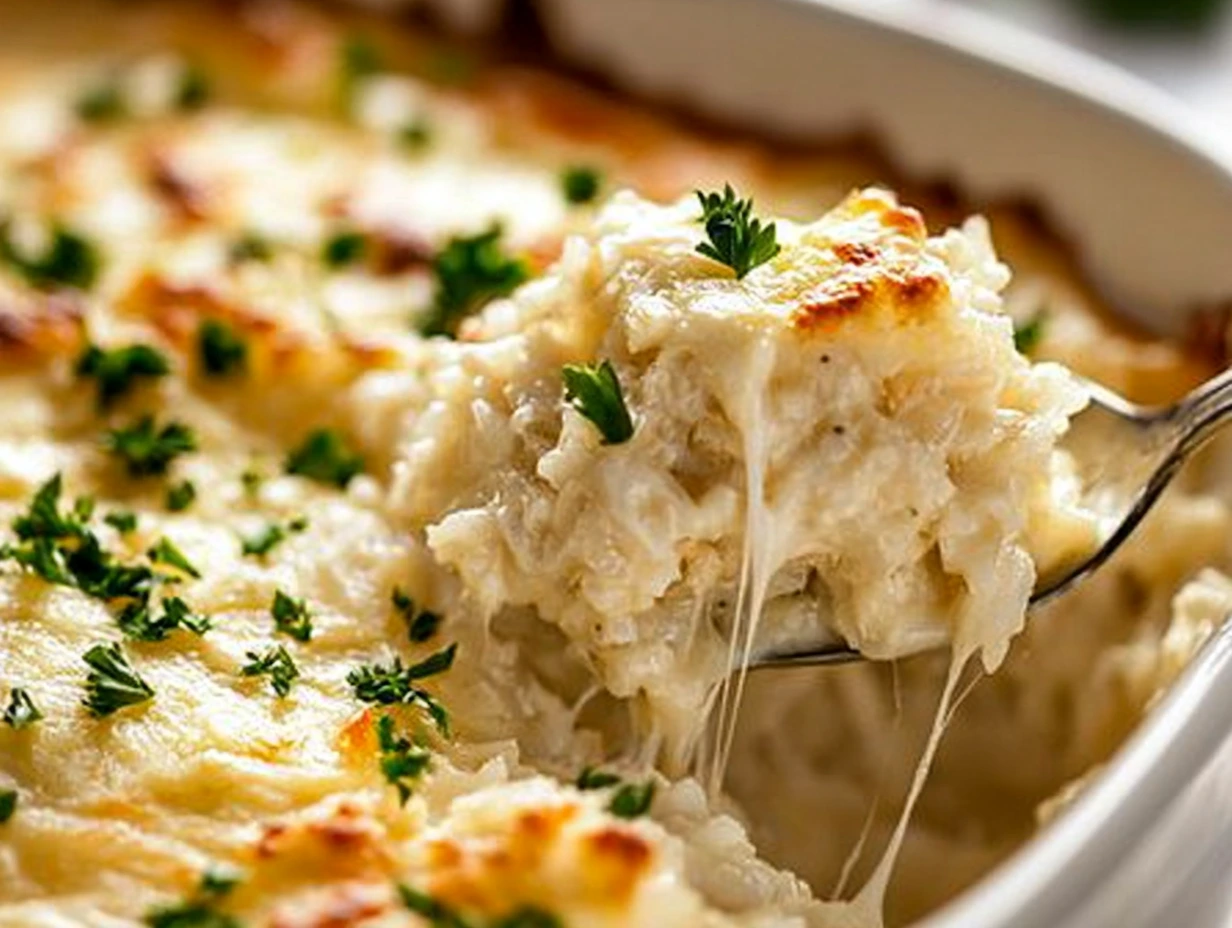
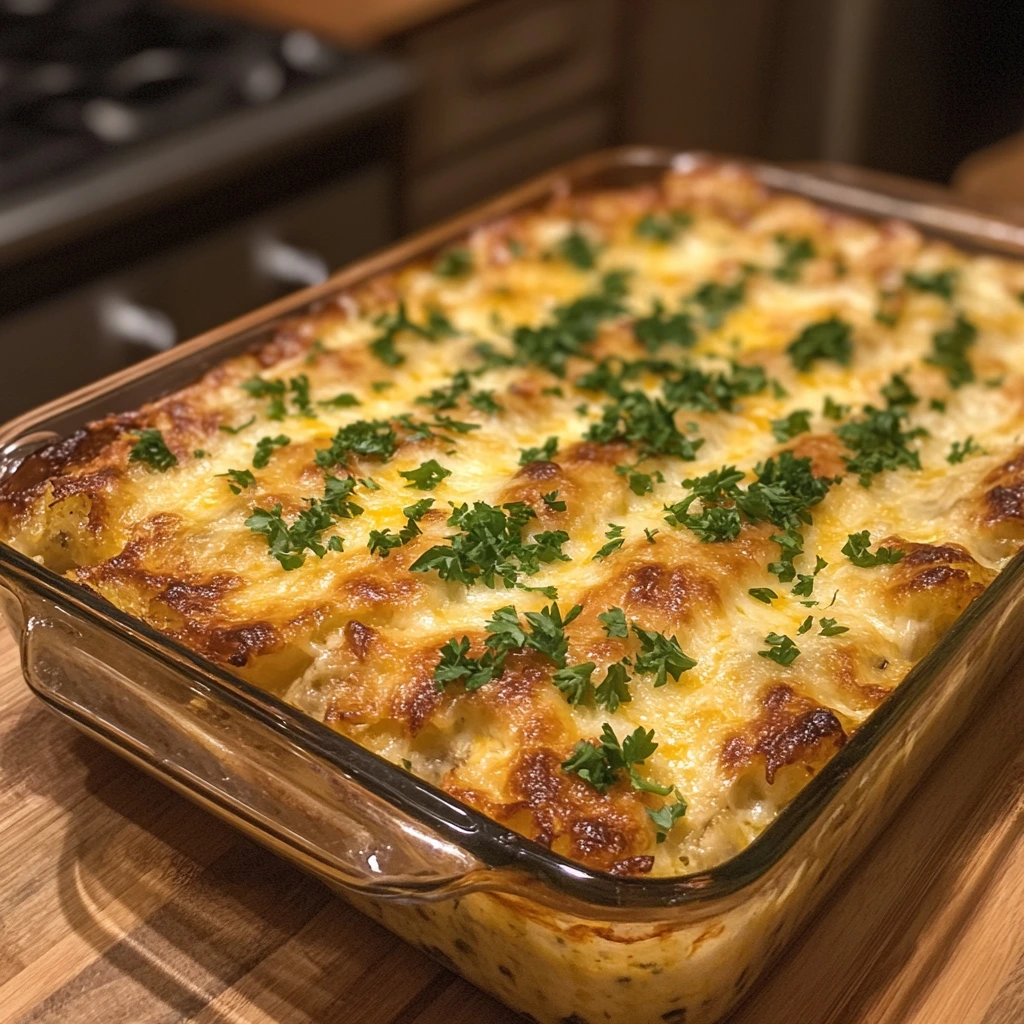
Now, let’s talk cheese. Because who doesn’t love an extra cheesy topping? Take the remaining shredded Colby Jack cheese and sprinkle it evenly over the top of your casserole. The cheese will melt beautifully during baking and create a golden, bubbly top that will make your kitchen smell absolutely heavenly. You’ll want to be sure you cover the whole casserole evenly so that every bite gets that cheesy goodness.
This layer of cheese is one of the key features of this dish. When it bakes, the cheese gets all gooey and perfectly browned, adding a little crispy crunch on top and a whole lot of flavor.
Step 6: Bake the Casserole
Pop the casserole into your preheated oven, and cover it with a piece of aluminum foil. The foil helps to trap moisture, ensuring that the casserole stays nice and creamy while baking. Bake it for about 20-25 minutes, or until the cheese is melted and the edges are bubbling. Keep an eye on it, and you’ll start to notice that the whole dish transforms into a golden, cheesy masterpiece.
The key here is that balance between getting the cheese perfectly melted and letting the casserole cook long enough to get bubbly and heated through. You’ll know it’s ready when the cheese is bubbly around the edges and everything looks perfectly set.
Step 7: Finish and Serve
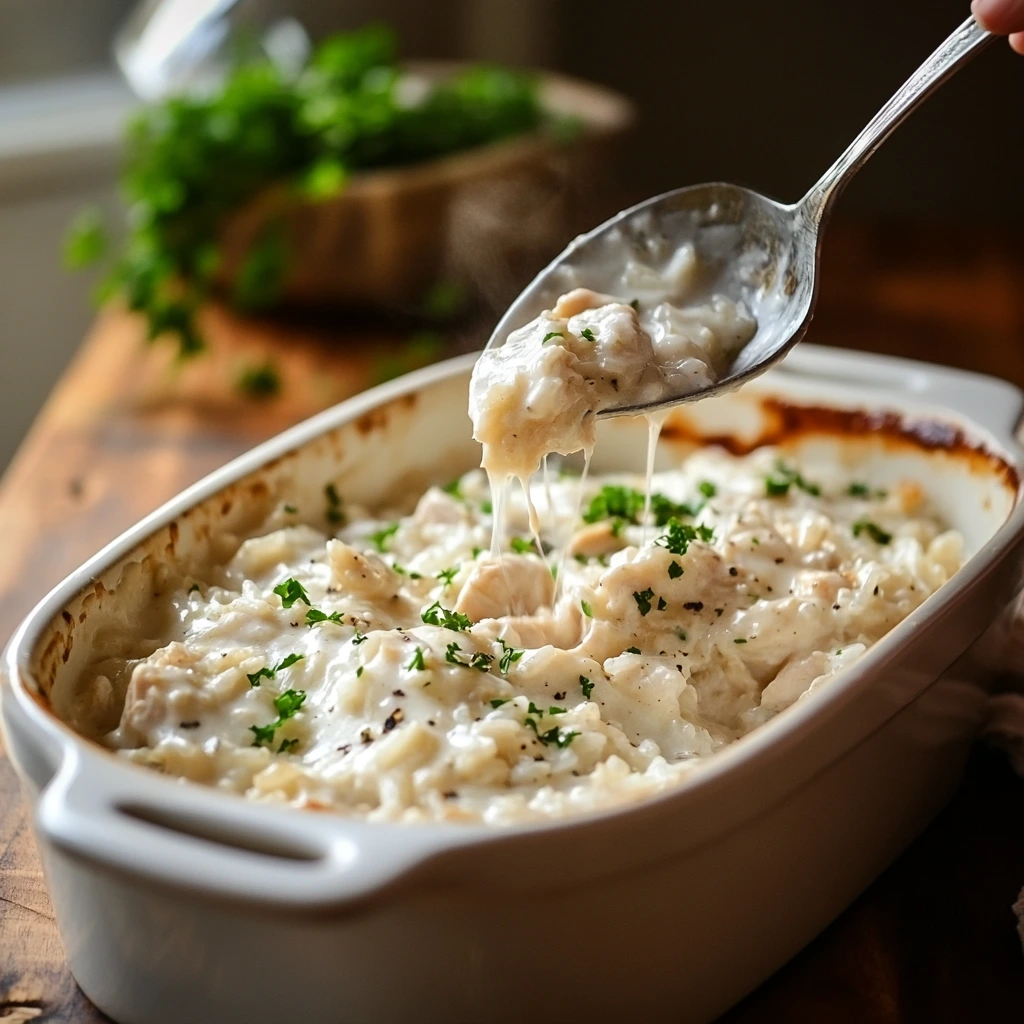
Once your casserole has baked to perfection, take it out of the oven and let it rest for about 5 minutes. I know it might be tempting to dive in right away, but a few minutes of resting allows the casserole to firm up slightly and makes it easier to serve.
When you’re ready, remove the aluminum foil and admire the golden cheese topping that’s just begging to be devoured. For a fresh and colorful touch, sprinkle a little chopped fresh parsley on top. Not only does it add a pop of color, but it also gives a slight herbal freshness that pairs perfectly with the rich, creamy casserole.
Now, the moment you’ve been waiting for – it’s time to serve. Spoon generous portions of this creamy, cheesy, chicken-filled casserole onto your plates. Trust me, it’s hard to resist the creamy texture and the hearty combination of chicken, rice, and melted cheese. This dish is a winner every time.


")

")


")
