

If you’re anything like me, the phrase “Boston Cream” sends your taste buds into overdrive. Rich custard, velvety chocolate, and tender cake—what’s not to love? Now imagine that indulgence in a handheld, perfectly portioned cupcake. Yep, it’s as heavenly as it sounds. Boston Cream Cupcakes are a game-changer, delivering all the flavors of the classic pie in the cutest, most portable form.
Whether you’re making these for a party, a family treat, or just because you need a little pick-me-up, this recipe is bound to wow everyone who takes a bite. And don’t worry—I’ve broken it down step by step to make it as simple and stress-free as possible.
Let’s get baking!
The Perfect Cupcake Base
When it comes to Boston Cream Cupcakes, the cake is the foundation. It needs to be light and fluffy yet sturdy enough to hold that dreamy custard filling. Here’s how to nail it:
Ingredients for the Cupcakes:
- 1 ½ cups all-purpose flour
- 1 cup granulated sugar
- 1 ½ teaspoons baking powder
- ½ teaspoon salt
- ½ cup unsalted butter, room temperature
- 2 large eggs
- ½ cup whole milk
- 1 teaspoon vanilla extract
Step 1: Preheat Your Oven
Preheat your oven to 350°F (175°C). Line a 12-cup muffin tin with cupcake liners. Trust me, this simple step makes cleanup a breeze and ensures your cupcakes pop out perfectly.
Step 2: Make the Batter
In a large mixing bowl, whisk together your dry ingredients—flour, sugar, baking powder, and salt. This ensures everything is evenly distributed and you don’t end up with clumps.
Next, add in the butter, eggs, milk, and vanilla extract. Beat the mixture with an electric mixer on medium speed until the batter is smooth and creamy. Pro tip: Scrape down the sides of the bowl a few times to make sure everything is well incorporated. You’re aiming for a silky texture that promises light, airy cupcakes.

Step 3: Fill and Bake
Divide the batter evenly among the cupcake liners, filling each about two-thirds full. This gives the cupcakes room to rise without spilling over. Bake for 18-20 minutes, or until a toothpick inserted into the center comes out clean.
Let the cupcakes cool in the pan for about five minutes before transferring them to a wire rack to cool completely. You’ll want them to be fully cooled before moving on to the filling—hot cupcakes and custard do not mix!

Why These Cupcakes Are Special
Boston Cream Cupcakes aren’t just a dessert; they’re a delightful experience. The contrast between the soft cake, creamy custard, and rich ganache is pure magic. Plus, they’re an elegant upgrade from your everyday cupcake, making them perfect for special occasions or when you want to treat yourself (because you totally deserve it).
The Creamy Custard and Decadent Ganache
Now that your cupcakes are cooling, it’s time to work on the two components that elevate Boston Cream Cupcakes from good to absolutely show-stopping: the silky custard filling and glossy chocolate ganache. These two layers bring all the richness and indulgence that Boston Cream lovers crave, and with a few simple steps, you’ll be whipping them up like a pro.
Making the Custard Filling
The custard is the creamy heart of these cupcakes, and it’s easier to make than you might think! Here’s how to do it.
Ingredients for the Custard:
- 1 cup whole milk
- 3 egg yolks
- ⅓ cup granulated sugar
- 2 tablespoons cornstarch
- 1 teaspoon vanilla extract
Step 1: Combine the Ingredients
In a medium saucepan, whisk together the milk, egg yolks, sugar, and cornstarch. Make sure the mixture is smooth and lump-free before turning on the heat. A good whisking at this stage ensures a silky custard later.
Step 2: Cook Until Thickened
Place the saucepan over medium heat and cook, stirring constantly. (Yes, constantly! Custard has a tendency to burn if left unattended.) After about 5-7 minutes, you’ll notice the mixture thickening. Keep stirring until it reaches a pudding-like consistency.
Step 3: Add Vanilla and Cool
Remove the saucepan from the heat and stir in the vanilla extract. Transfer the custard to a bowl and cover it with plastic wrap, pressing the wrap directly onto the surface to prevent a skin from forming. Pop it in the fridge to chill while you prep the ganache.

Crafting the Chocolate Ganache
Ganache is what takes these cupcakes to the finish line with its rich, glossy, chocolatey goodness. It’s a simple two-ingredient recipe, but the results are nothing short of spectacular.
Ingredients for the Ganache:
- 1 cup heavy cream
- 8 ounces semi-sweet chocolate, chopped
Step 1: Heat the Cream
In a small saucepan, heat the heavy cream over medium heat until it just begins to simmer. Keep an eye on it—you don’t want it to boil over.
Step 2: Combine with Chocolate
Place the chopped chocolate in a heatproof bowl. Pour the hot cream over the chocolate and let it sit for about 5 minutes. The heat from the cream will melt the chocolate.
Step 3: Stir Until Smooth
After 5 minutes, stir the mixture gently until the chocolate and cream combine into a smooth, glossy ganache. Let it cool slightly—it should still be pourable but not so hot that it runs off the cupcakes entirely.
Assembling the Cupcakes
Now comes the fun part—putting everything together! Here’s how to turn your cupcakes into miniature Boston Cream masterpieces.
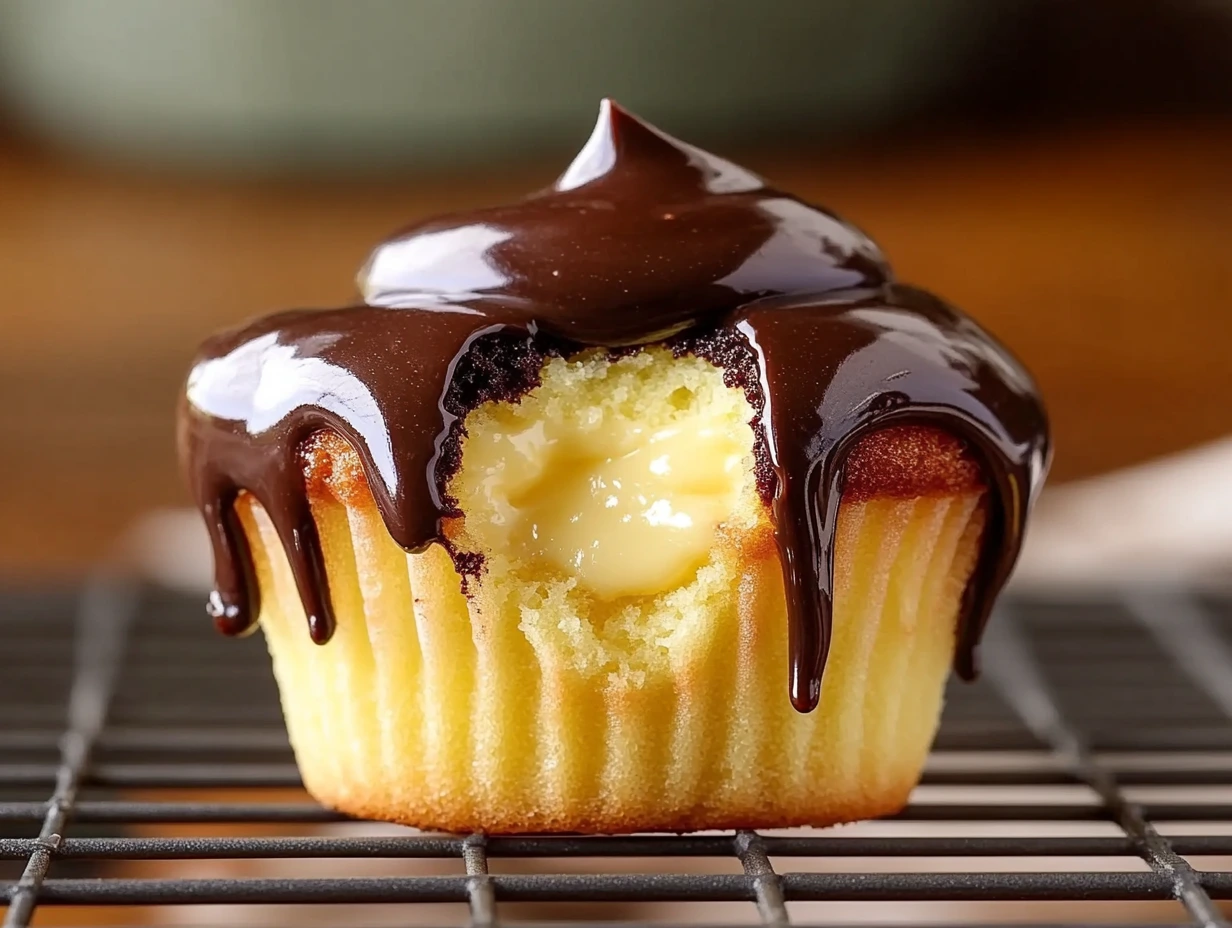
Step 1: Create a Custard Pocket
Once your cupcakes are completely cool, use a small knife or a cupcake corer to cut out a small hole in the center of each cupcake. Save the little cake pieces you remove—they’ll act as lids after the custard goes in.
Step 2: Fill with Custard
Spoon the chilled custard into the holes, filling them generously. You want each bite to have a delicious surprise of creamy custard. Replace the reserved cake pieces to seal the tops, pressing gently to secure them in place.
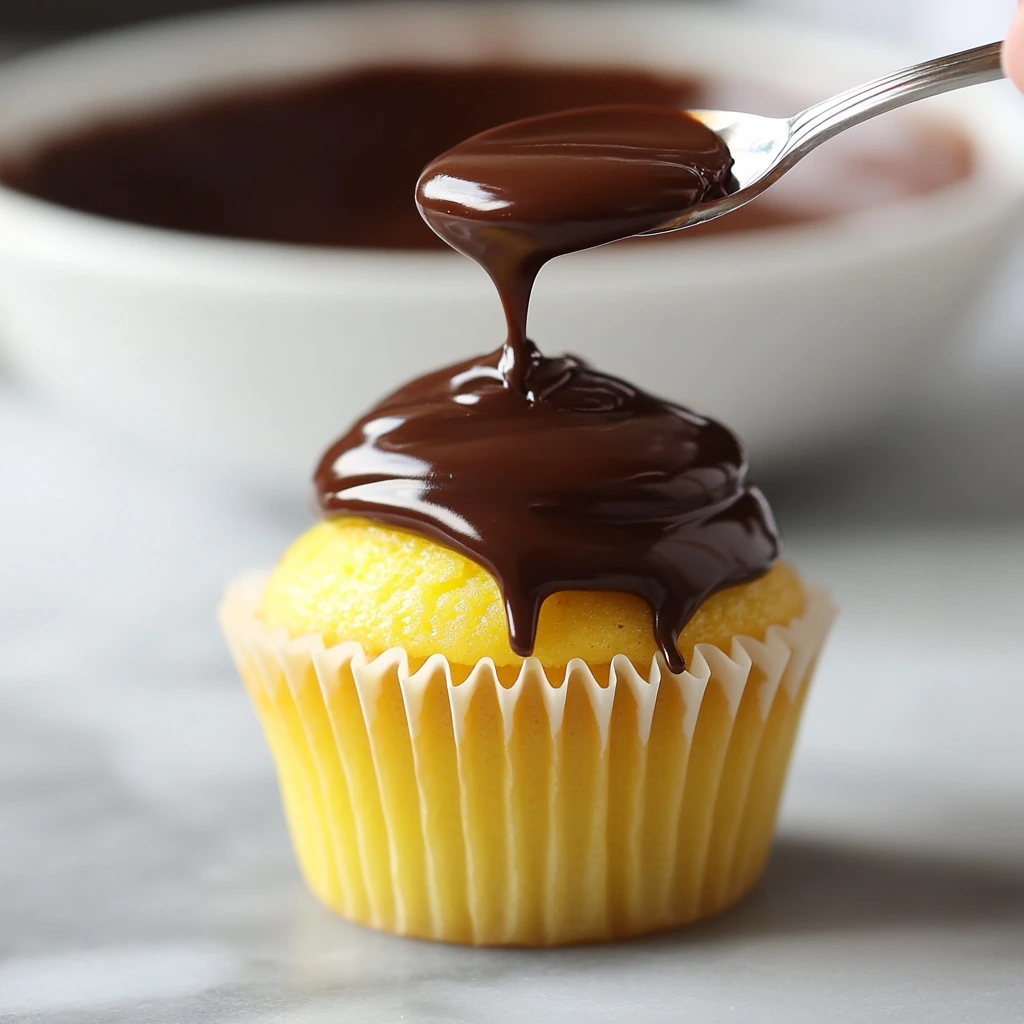
Step 3: Top with Ganache
Using a spoon or small ladle, drizzle the chocolate ganache over the tops of the cupcakes. Let it drip down the sides for that classic Boston Cream look. If you’re feeling fancy, give each cupcake a little swirl with the back of your spoon for an artistic touch.
Pro Tips for Perfection
- Chill the Custard Completely: Make sure your custard is fully chilled before filling the cupcakes. Warm custard can make the cake soggy.
- Use High-Quality Chocolate: The better the chocolate, the better your ganache will taste. Opt for semi-sweet or bittersweet chocolate for a rich, balanced flavor.
- Let the Ganache Set: While it’s tempting to dive right in, let the ganache set for a few minutes before serving. This makes the cupcakes easier to handle and enhances their appearance.
FAQs and Finishing Touches
By now, you’ve created stunning Boston Cream Cupcakes, filled with silky custard and topped with glossy chocolate ganache. As you admire your handiwork (or take that first decadent bite), let’s address some common questions to ensure your cupcakes turn out perfectly every time. Plus, I’ll share a few tips on serving and storing these beauties for maximum enjoyment.
FAQs About Boston Cream Cupcakes
1. Can I make the custard ahead of time?
Absolutely! You can prepare the custard up to two days in advance. Store it in the refrigerator in an airtight container with plastic wrap pressed directly onto the surface. When you’re ready to fill the cupcakes, give the custard a quick stir to restore its creamy texture.
2. What if I don’t have a cupcake corer?
No worries! A small paring knife works perfectly. Simply cut a small circle in the center of each cupcake and remove the plug of cake. You can also use the back of a spoon to scoop out a bit of the middle.
3. How do I keep the ganache glossy?
The key to a shiny ganache is not overheating the chocolate. Let the cream do the work of melting the chocolate, and stir gently to avoid introducing air bubbles. If you store the cupcakes in the fridge, allow them to sit at room temperature for 10-15 minutes before serving to restore the ganache’s shine.
4. Can I use store-bought custard or pudding?
Yes! If you’re short on time, high-quality vanilla pudding or custard from the store can be used as a filling. However, homemade custard offers that authentic Boston Cream flavor that’s hard to beat.
5. Can these cupcakes be made gluten-free?
Definitely! Substitute a gluten-free all-purpose flour blend for the regular flour in the cupcake batter. Ensure that all other ingredients, like chocolate and baking powder, are certified gluten-free.
6. How should I store leftovers?
Store leftover cupcakes in an airtight container in the refrigerator for up to three days. The ganache will firm up in the fridge but will soften again if left at room temperature for a few minutes before serving.
7. Can I freeze Boston Cream Cupcakes?
It’s possible to freeze these cupcakes without the ganache topping. Wrap the filled cupcakes individually in plastic wrap and store them in a freezer-safe bag. Thaw them in the refrigerator, and add the ganache fresh before serving.
Conclusion: Time to Indulge
Congratulations—you’ve mastered the art of Boston Cream Cupcakes! Whether you’re serving these for a birthday, a holiday, or just a cozy weekend treat, they’re sure to impress anyone lucky enough to enjoy them. The combination of tender cake, creamy custard, and rich chocolate is a timeless classic that never fails to delight.
Before you dig in, remember: these cupcakes are best savored slowly, one luxurious bite at a time. And don’t forget to share your creations with friends and family—they’ll thank you for introducing them to this handheld twist on the iconic Boston Cream Pie.
If you try this recipe, I’d love to hear about it! Share your thoughts, tweaks, or even photos in the comments below. Who knows, maybe your variation will inspire someone else to try their hand at these delightful treats. Happy baking, and enjoy every bite!
Print
Boston Cream Cupcakes
- Total Time: 50 minutes
Description
A delightful twist on the classic Boston Cream Pie, these cupcakes are a decadent combination of fluffy vanilla cake, creamy custard filling, and a rich chocolate ganache topping. Perfect for any occasion, they deliver the iconic flavors of the beloved dessert in a handheld treat!
Ingredients
- For the cupcakes:
- 1 ½ cups all-purpose flour
- 1 cup granulated sugar
- 1 ½ teaspoons baking powder
- ½ teaspoon salt
- ½ cup unsalted butter, room temperature
- 2 large eggs
- ½ cup whole milk
- 1 teaspoon vanilla extract
- For the custard filling:
- 1 cup whole milk
- 3 egg yolks
- ⅓ cup granulated sugar
- 2 tablespoons cornstarch
- 1 teaspoon vanilla extract
- For the chocolate ganache:
- 1 cup heavy cream
- 8 ounces semi-sweet chocolate, chopped
Instructions
1️⃣ Preheat the oven:
Preheat your oven to 350°F (175°C). Line a 12-cup muffin tin with cupcake liners.
2️⃣ Make the cupcake batter:
In a large mixing bowl, whisk together the flour, sugar, baking powder, and salt. Add the softened butter, eggs, milk, and vanilla extract. Beat with an electric mixer until the batter is smooth and well combined.
3️⃣ Bake the cupcakes:
Divide the batter evenly among the cupcake liners, filling each about ⅔ full. Bake for 18-20 minutes, or until a toothpick inserted into the center comes out clean. Let the cupcakes cool in the pan for 5 minutes, then transfer to a wire rack to cool completely.
4️⃣ Prepare the custard filling:
In a medium saucepan, whisk together the milk, egg yolks, sugar, and cornstarch. Cook over medium heat, stirring constantly, until the mixture thickens, about 5-7 minutes. Remove from heat and stir in the vanilla extract. Transfer the custard to a bowl, cover with plastic wrap directly on the surface to prevent a skin from forming, and chill in the refrigerator until cool.
5️⃣ Make the chocolate ganache:
Heat the heavy cream in a small saucepan over medium heat until it just begins to simmer. Pour the hot cream over the chopped chocolate in a heatproof bowl. Let sit for 5 minutes, then stir until smooth and glossy. Allow the ganache to cool slightly.
6️⃣ Assemble the cupcakes:
Use a small knife or cupcake corer to cut a small hole in the top center of each cupcake. Fill the holes with the chilled custard.
7️⃣ Top with ganache:
Spoon or drizzle the chocolate ganache over the top of each cupcake, allowing it to slightly drip down the sides.
8️⃣ Serve:
Let the ganache set slightly before serving. Store leftovers in the refrigerator.
Notes
- For best results, bring the cupcakes to room temperature before serving to enhance the flavors.
- Use a piping bag for filling the cupcakes with custard for a cleaner presentation.
- These cupcakes can be stored in an airtight container in the fridge for up to 3 days.
- Prep Time: 30 minutes
- Cook Time: 20 minutes
Nutrition
- Serving Size: 12 cupcakes


")

")


")
