

If your family is anything like mine, you probably get a little stuck in the “What’s for dinner?” rut more often than you’d like to admit. When I find myself staring into the pantry wondering what I can whip up that’s quick, satisfying, and doesn’t require a pile of dishes afterward, I always fall back on one of our all-time favorite creations—Cheesy Taco Sticks.
These are everything you love about tacos—seasoned ground beef, gooey melted cheese, and bold flavor—but wrapped in soft pizza dough and baked to golden perfection. They’re warm, comforting, perfectly cheesy, and handheld (which means they’re a huge hit with kids and adults alike). Whether you’re looking for an easy dinner, a crowd-pleasing game day snack, or something fun to tuck into lunchboxes, this recipe has got your back.
Why You’ll Love These Cheesy Taco Sticks
Aside from the fact that they come together in about 30 minutes, these taco sticks are endlessly customizable. You can add extra veggies, spice things up with jalapeños, or keep it simple with just beef and cheese. Plus, they reheat beautifully—so leftovers never go to waste.
I originally made these on a whim during a football Sunday when I didn’t want to deal with taco shells breaking apart or kids spilling fillings everywhere. Let’s just say they disappeared faster than anything else on the snack table, and they’ve been in our regular rotation ever since.
Let’s jump into how to make them!
Ingredients You’ll Need
Before you get started, here’s a quick list of what you’ll need for the base recipe:
1 pound ground beef
1 tablespoon taco seasoning
2 tablespoons water
1 can refrigerated pizza dough (or homemade, if you’re feeling ambitious)
1½ cups shredded cheddar or Mexican blend cheese
1 tablespoon butter, melted
½ teaspoon garlic powder
½ teaspoon dried parsley (optional)
These are the basics, but I’ll talk later about how you can mix it up if you’re feeling adventurous.
STEP 1: Preheat and Prep
Start by preheating your oven to 400°F (200°C). Line a baking sheet with parchment paper or lightly grease it to prevent sticking. This will help the bottoms of your taco sticks get golden and crisp without sticking to the pan.

STEP 2: Cook the Ground Beef
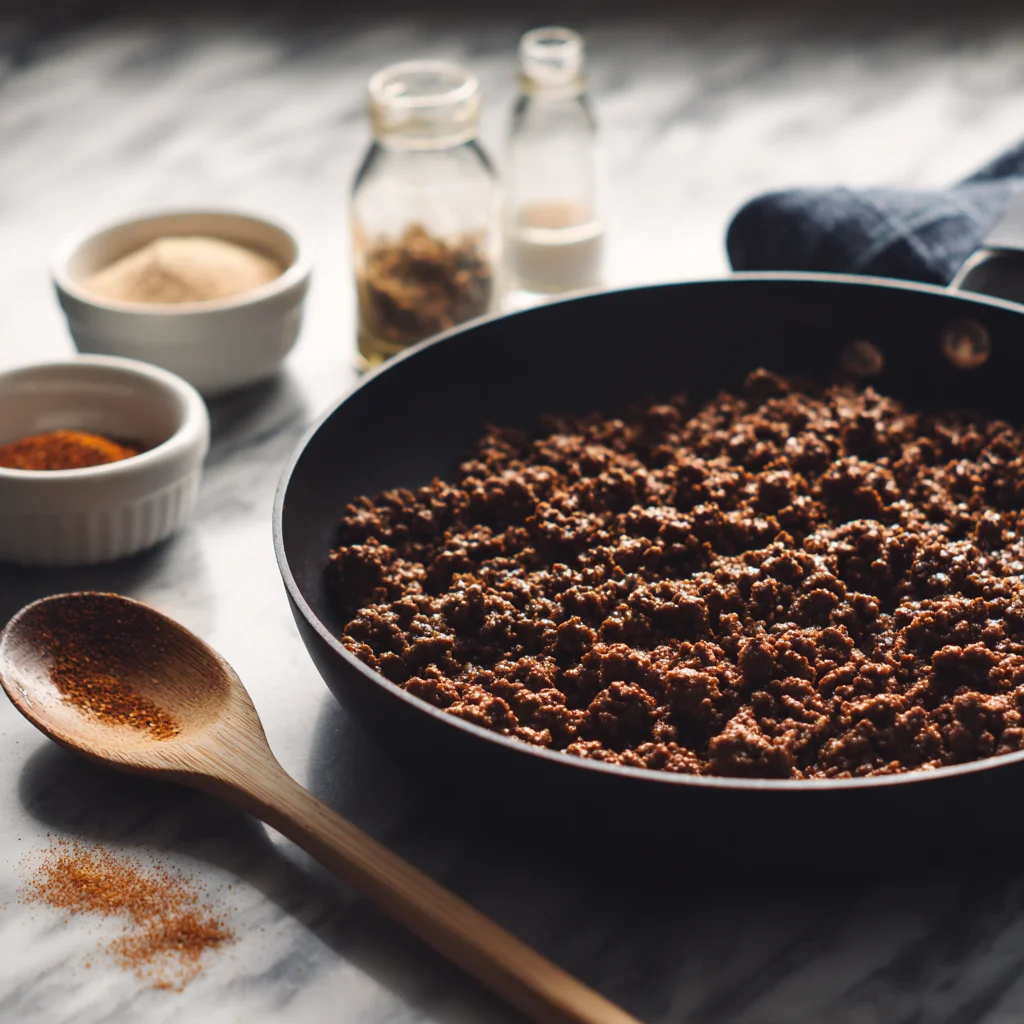
In a medium skillet over medium heat, add the ground beef and cook it until it’s fully browned. Break it up with a spatula as it cooks so you get that perfect taco-meat texture. Once it’s no longer pink, drain off any excess grease.
Next, sprinkle in the taco seasoning and pour in the water. Stir it all together and let it simmer for a few minutes so the flavors can really blend. You’ll want it to thicken just slightly. Once it’s ready, remove it from the heat and set it aside to cool for a few minutes. (This step is important—if the filling is too hot, it can make the dough harder to seal later.)
STEP 3: Roll and Cut the Dough
Now it’s time for the dough. On a lightly floured surface, roll out your refrigerated pizza dough into a large rectangle. Try to make it even in thickness—this helps the sticks cook consistently.
Cut the dough into 6 to 8 equal rectangles, depending on how big you want your taco sticks to be. I usually go for 8 because they’re more snackable that way, but if you’re serving them as a main dish, 6 works great too.
STEP 4: Fill and Fold
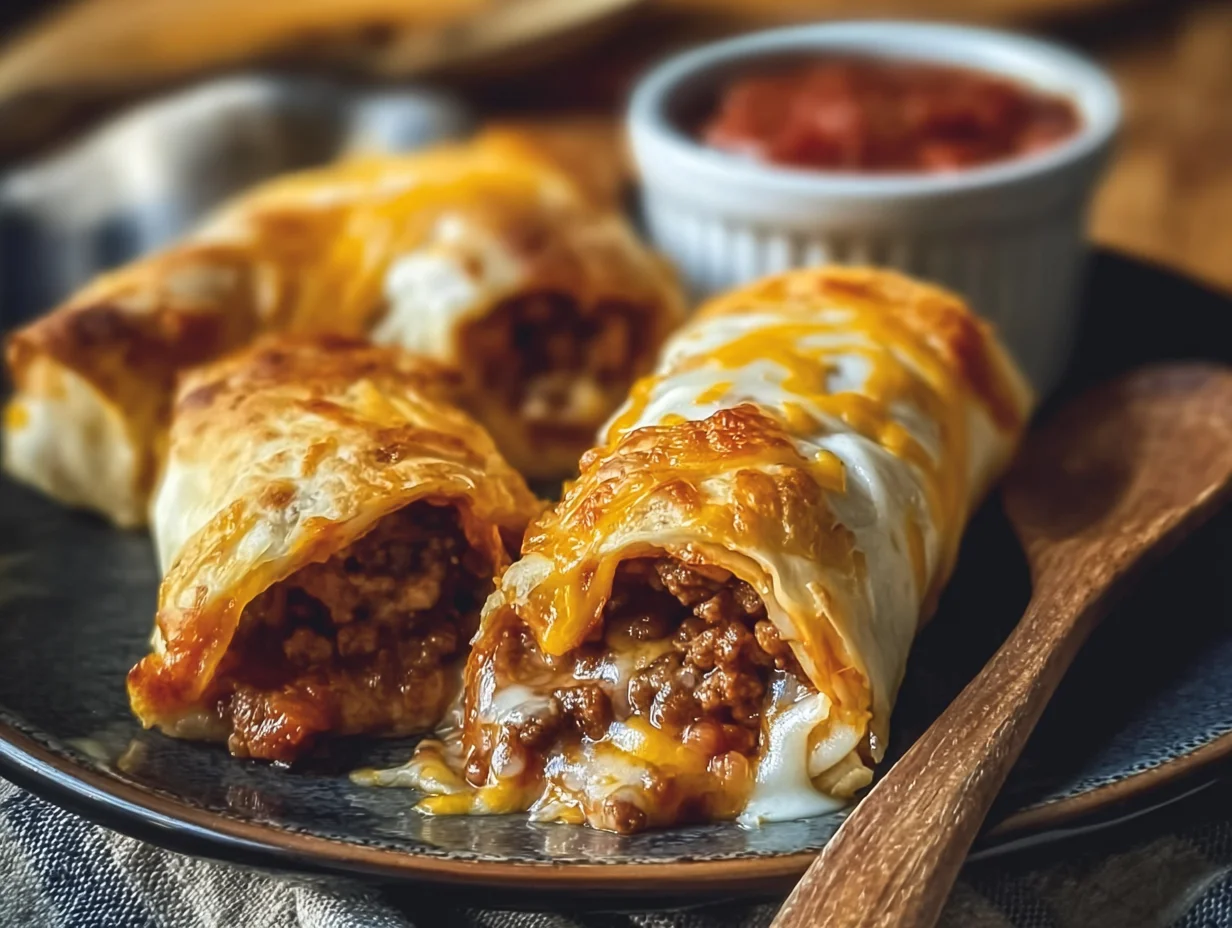
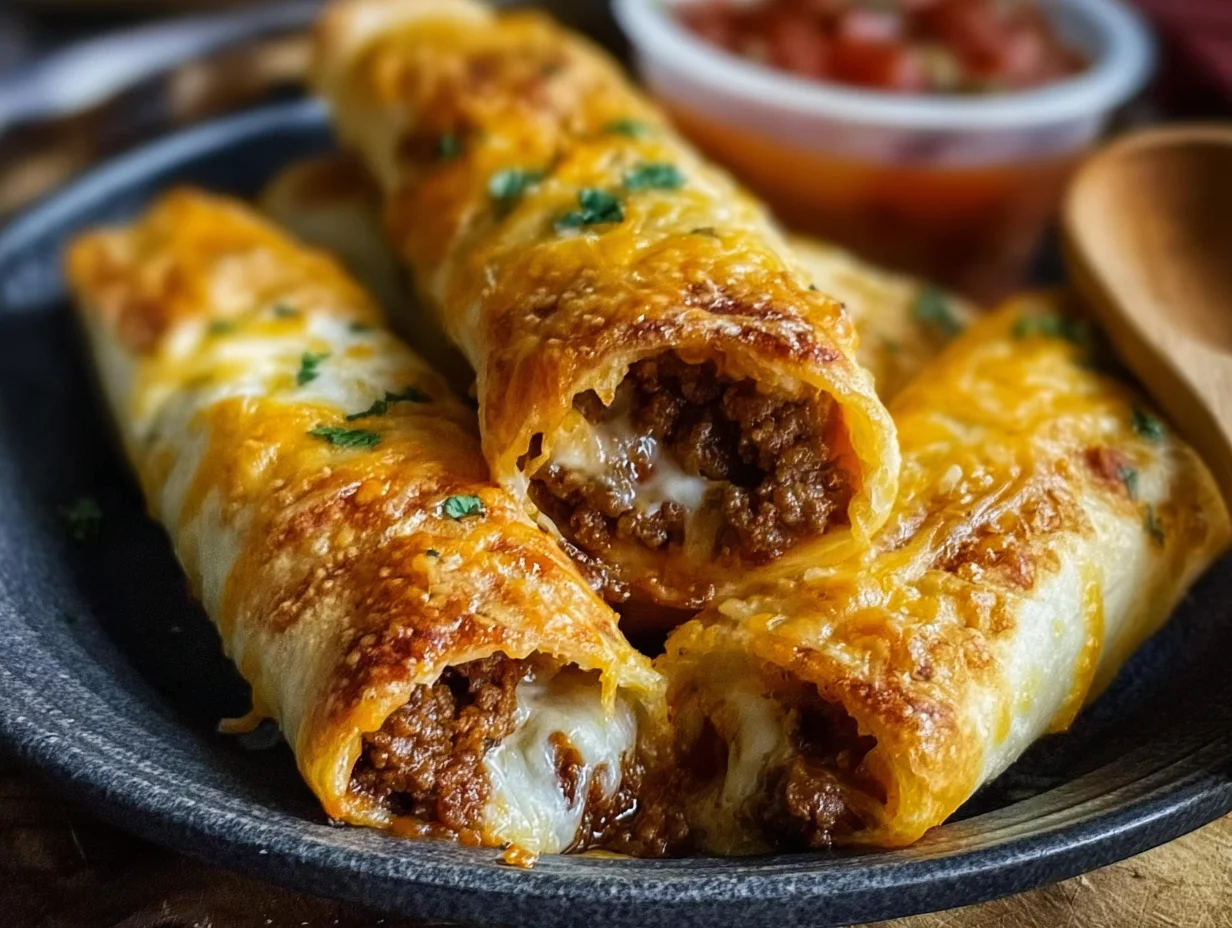
Spoon a generous portion of the taco meat into the center of each dough rectangle, then sprinkle the shredded cheese on top. Don’t be shy with the cheese—this is the part that gets all melty and delicious in the oven.
Fold the dough over the filling and pinch the edges to seal them well. You want to make sure there are no open seams so the cheese stays tucked inside while baking. You’ll end up with a stick-like shape that’s easy to pick up and dip later.
Cheesy Taco Sticks: Easy, Flavor-Packed Goodness
Welcome back! If you’ve already got your Cheesy Taco Sticks filled and folded, you’re more than halfway to serving up one of the most satisfying, family-friendly meals ever. In this part, we’re going to walk through baking them to golden perfection and dive into a few of my favorite tips, variations, and serving ideas. Trust me, this is where it gets really fun—especially if you like crispy edges and melty cheese as much as I do.
Let’s finish strong!
STEP 5: Bake Until Golden and Gooey
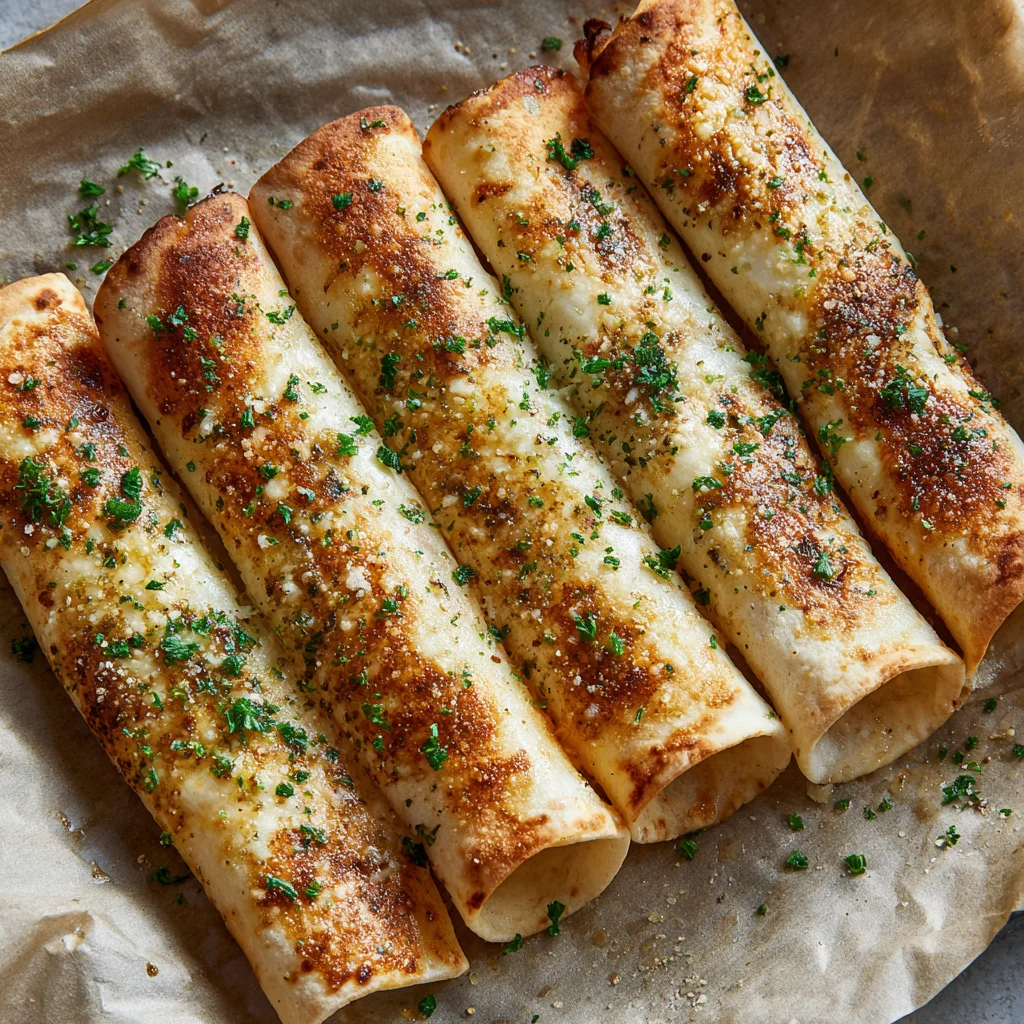
Now that your taco sticks are assembled and ready to go, place them seam-side down on your prepared baking sheet. This keeps the filling sealed in while they bake and helps everything cook evenly.
Brush the tops of each stick with melted butter, which not only adds flavor but also helps them turn that perfect golden-brown color. If you want to bump up the flavor even more, sprinkle with garlic powder and a pinch of dried parsley. The parsley is optional, but I love how it adds a little pop of color.
Bake the taco sticks in your preheated oven for 12 to 15 minutes, or until the dough is puffed up and golden on top. The cheese should be fully melted inside, and the edges should be slightly crisp.
When they come out of the oven, let them cool for a few minutes—I know it’s tempting to bite right in, but the filling will be hot!
Topping and Dipping Ideas
This is where you can really make your Cheesy Taco Sticks shine. While they’re absolutely delicious on their own, I love serving them with a variety of dips and toppings to add a little extra flair.
Here are a few of our go-to pairings:
Sour cream – Classic, cool, and creamy. Perfect contrast to the warm, cheesy filling.
Salsa – Mild, medium, or hot—whatever your heat level preference is.
Guacamole – Because avocado makes everything better.
Queso dip – Double the cheese? Yes, please.
Hot sauce or taco sauce – For anyone who wants to turn up the spice.
You can also serve these taco sticks with a side salad, Mexican rice, or refried beans if you’re turning them into a full dinner.
Tips for the Best Taco Sticks Ever
Even though this recipe is super simple, a few little tricks can take your taco sticks from good to seriously great.
Cool the filling before assembling – If the taco meat is too hot, it can make the dough harder to handle and cause leaks while baking.
Don’t overfill – As tempting as it is to pack them full, a little goes a long way. Too much filling can lead to bursting during baking.
Seal the edges well – Press and pinch tightly so the cheese doesn’t ooze out (though a little crispy cheese on the pan is never a bad thing!).
Use parchment paper – This keeps cleanup easy and helps prevent sticking.
Try an egg wash – If you don’t have butter, brushing the tops with a simple egg wash will still give you a beautiful golden finish.
Easy Variations to Try
Once you’ve made these a few times, you’ll definitely want to start experimenting. This recipe is a great base that’s super flexible depending on what you have on hand.
Here are a few tasty variations:
Spicy Beef & Jalapeño – Add diced jalapeños or a sprinkle of crushed red pepper to the beef mixture.
Vegetarian Version – Replace the ground beef with black beans, corn, sautéed peppers, or even plant-based crumbles.
Chicken Taco Sticks – Use cooked, shredded chicken with taco seasoning instead of beef.
Breakfast Style – Try scrambled eggs, sausage or bacon, and cheese for a morning twist.
Cheesy Bean – Use refried beans and extra cheese for a meatless and super gooey option.
Perfect for Every Occasion
Whether you’re prepping a weeknight dinner, packing school lunches, or feeding a crowd on game day, Cheesy Taco Sticks are one of those recipes that just work. I’ve made them ahead of time and reheated them in the oven or air fryer, and they still come out crispy on the outside and gooey on the inside.
If you have picky eaters at home, you can even set up a little taco stick “bar” with different fillings and let everyone customize their own. It’s a fun way to get the kids involved and make dinner feel a little more exciting.
Cheesy Taco Sticks: FAQ + Final Thoughts
We’ve made it to the final part of this Cheesy Taco Sticks recipe adventure, and if you’re already imagining biting into one of these golden, gooey delights—you’re not alone. Before we wrap up, I want to take a minute to answer some of the most common questions people have when making this recipe. Whether it’s your first time or your fifth, these quick tips can help you avoid mishaps and make the most out of every batch.
Let’s dive into the FAQ section, then we’ll wrap things up with a few last thoughts to help you get started!
Frequently Asked Questions
1. Can I use crescent roll dough instead of pizza dough?
Yes, you can! Crescent roll dough will give you a slightly flakier texture and a lighter bite, which some people actually prefer. Just make sure to press the seams together if you’re using the sheeted version so it doesn’t come apart during baking.
2. Can I make Cheesy Taco Sticks ahead of time?
Absolutely. You can fully assemble the sticks and store them in the fridge (uncooked) for up to 24 hours. When you’re ready to bake, just pop them in the oven straight from the fridge. You may need to add an extra 2–3 minutes to the baking time.
3. How do I store and reheat leftovers?
Store any leftover taco sticks in an airtight container in the refrigerator for up to 3 days. To reheat, place them in a 350°F oven or an air fryer for 5–8 minutes to get them crisp again. Microwaving works too, but they won’t be as crispy.
4. Can I freeze Cheesy Taco Sticks?
Yes! Let them cool completely, then wrap individually in foil or plastic wrap and freeze in a zip-top bag. To reheat, bake from frozen at 375°F for 15–20 minutes or until heated through.
5. What other cheeses can I use?
While cheddar and Mexican blend cheese are classic choices, you can also use Monterey Jack, pepper jack, mozzarella, or even a mix of them. Just make sure it’s a cheese that melts well.
6. How do I keep the dough from getting soggy on the bottom?
A couple of tips: make sure your beef mixture isn’t too wet, and try baking the sticks on a preheated baking sheet or using parchment paper to help draw out excess moisture. Also, don’t overfill them—it makes sealing tricky and can lead to soggy spots.
7. Can I make these vegetarian or gluten-free?
Yes! For vegetarian, swap the meat for black beans, seasoned tofu, or plant-based crumbles. For gluten-free, you’ll need a gluten-free pizza dough alternative, which you can usually find in the refrigerated section of most grocery stores.
Final Thoughts and Serving Inspiration
Cheesy Taco Sticks are one of those recipes that once you try, they instantly earn a permanent place in your meal rotation. They’re quick, versatile, fun to make, and—most importantly—packed with flavor.
What I love most is how adaptable they are. You can keep things simple or get creative with the filling, serve them as a main dish with a salad or rice, or cut them into smaller pieces for a shareable appetizer. They’re also great for kids’ lunches, weekend snacks, or game day trays.
If you’ve got leftover taco meat from a previous dinner, this is a brilliant way to use it up without feeling like you’re eating the same thing twice.
So go ahead—give them a try this week and see how fast they disappear off the plate. And if you put your own spin on them (maybe with spicy sausage or a veggie-packed version?), I’d love to hear how it went. Drop your tips, twists, and serving ideas in the comments below!
Print
Cheesy Taco Sticks
- Author: David
Description
Cheesy Taco Sticks are a fun, handheld twist on taco night, filled with seasoned ground beef and gooey melted cheese, all wrapped in soft pizza dough and baked to golden perfection. These are perfect for game days, lunchboxes, quick dinners, or appetizers. With just a few simple ingredients, they deliver all the bold, savory flavors of tacos in a portable, cheesy package.
Ingredients
1 pound ground beef
1 tablespoon taco seasoning
2 tablespoons water
1 can refrigerated pizza dough or homemade equivalent
1 ½ cups shredded cheddar or Mexican blend cheese
1 tablespoon butter, melted
½ teaspoon garlic powder
½ teaspoon dried parsley (optional)
Instructions
1 Preheat the oven to 400°F (200°C). Line a baking sheet with parchment paper or lightly grease it.
2 In a skillet over medium heat, cook the ground beef until browned and fully cooked. Drain excess grease. Add taco seasoning and water, stir well, and simmer for a few minutes until the mixture thickens. Remove from heat and let it cool slightly.
3 Roll out the pizza dough into a large rectangle on a lightly floured surface. Cut into 6 to 8 equal rectangles, depending on size preference.
4 Spoon a portion of the taco meat onto the center of each rectangle and top with shredded cheese. Fold the dough over the filling, pinching the edges to seal and forming a stick shape.
5 Place the filled taco sticks seam-side down on the prepared baking sheet. Brush each one with melted butter and sprinkle with garlic powder and parsley if using.
6 Bake for 12 to 15 minutes, or until golden brown and cooked through. Let cool for a few minutes before serving.
Notes
These taco sticks are easy to customize with your favorite taco toppings. Add chopped jalapeños, black beans, or sautéed onions to the filling for extra flavor. Serve with sour cream, salsa, or guacamole for dipping. If using homemade pizza dough, allow it to rest at room temperature before rolling to make it easier to work with. Leftovers can be stored in the refrigerator and reheated in the oven or air fryer for a crisp texture.


")

")


")
