

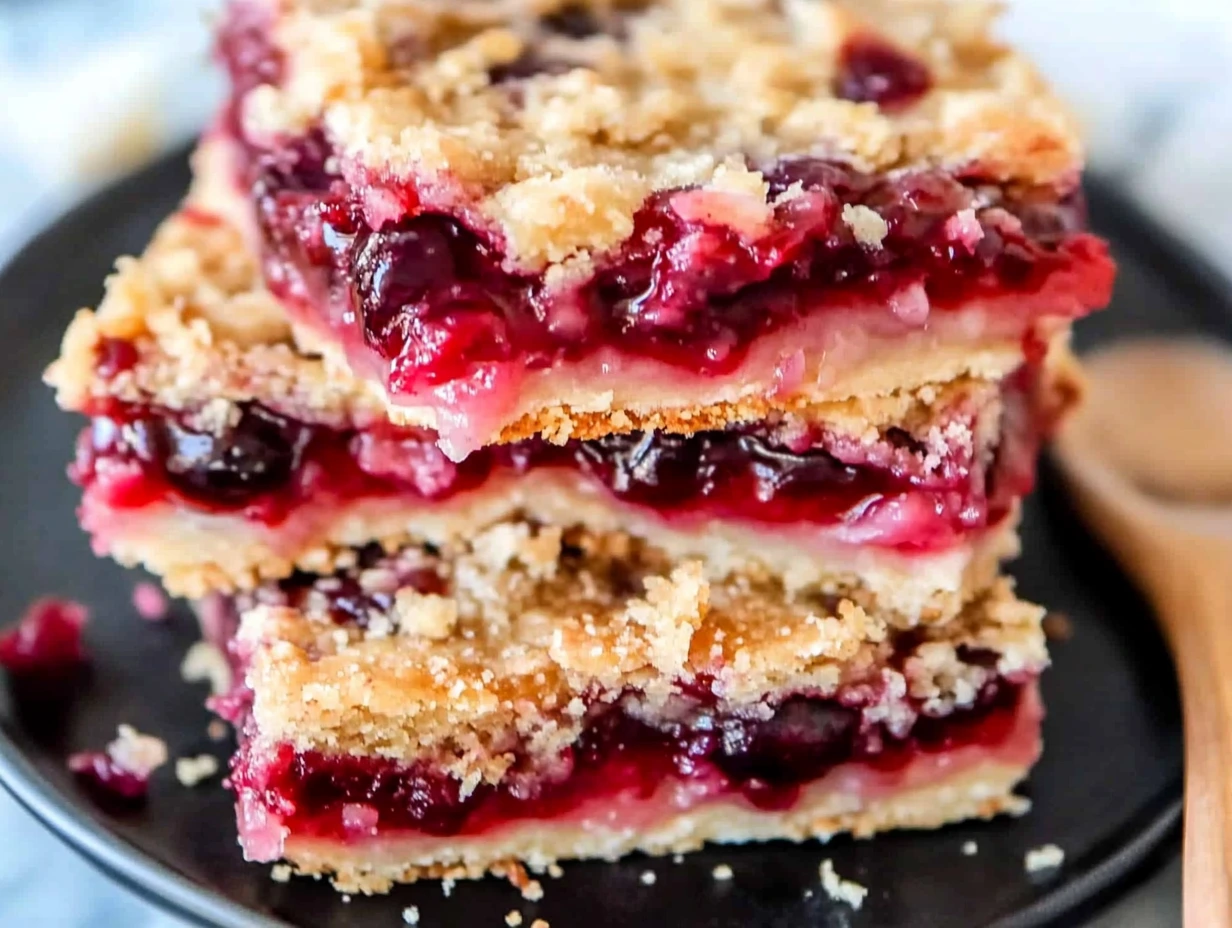
There’s something about cherries that just screams summer, isn’t there? Whether it’s a picnic at the park, a casual barbecue, or just a quiet night at home, cherry desserts always seem to bring a little burst of sunshine to the table. And let me tell you—these Cherry Pie Bars are one of my absolute favorites for that very reason. They’re the kind of treat that looks fancy enough to impress but is simple enough to make on a regular Tuesday. I first made these bars for a Fourth of July potluck, and they were gone in minutes (with several people sneaking back for seconds).
What makes them so special? It’s the perfect combo: a buttery shortbread-style crust, a juicy cherry filling that’s just the right balance of sweet and tart, and a golden, crumbly streusel topping that gives you those crisp edges and soft centers in every bite. They slice up beautifully, hold their shape like a dream, and travel well—so they’re ideal for potlucks, bake sales, or just keeping on your kitchen counter to enjoy throughout the week.
In this first part, we’ll get started with making the crust and preparing that luscious cherry filling. Whether you’re using fresh cherries or pulling a bag of frozen ones from your freezer, you’re going to love how easy this recipe is to bring together.

Ingredients You’ll Need
Let’s break down the ingredients so you’re prepped and ready:
For the Crust and Topping:
225 g all-purpose flour
75 g granulated sugar
150 g cold unsalted butter, cut into cubes
¼ tsp salt
For the Cherry Filling:
400 g pitted fresh or frozen cherries
100 g granulated sugar
2 tbsp cornstarch
1 tbsp fresh lemon juice
½ tsp vanilla extract
A quick note here—if you’re using frozen cherries (which I often do in the winter months), just make sure to thaw and drain them first so you’re not adding too much liquid to your filling.
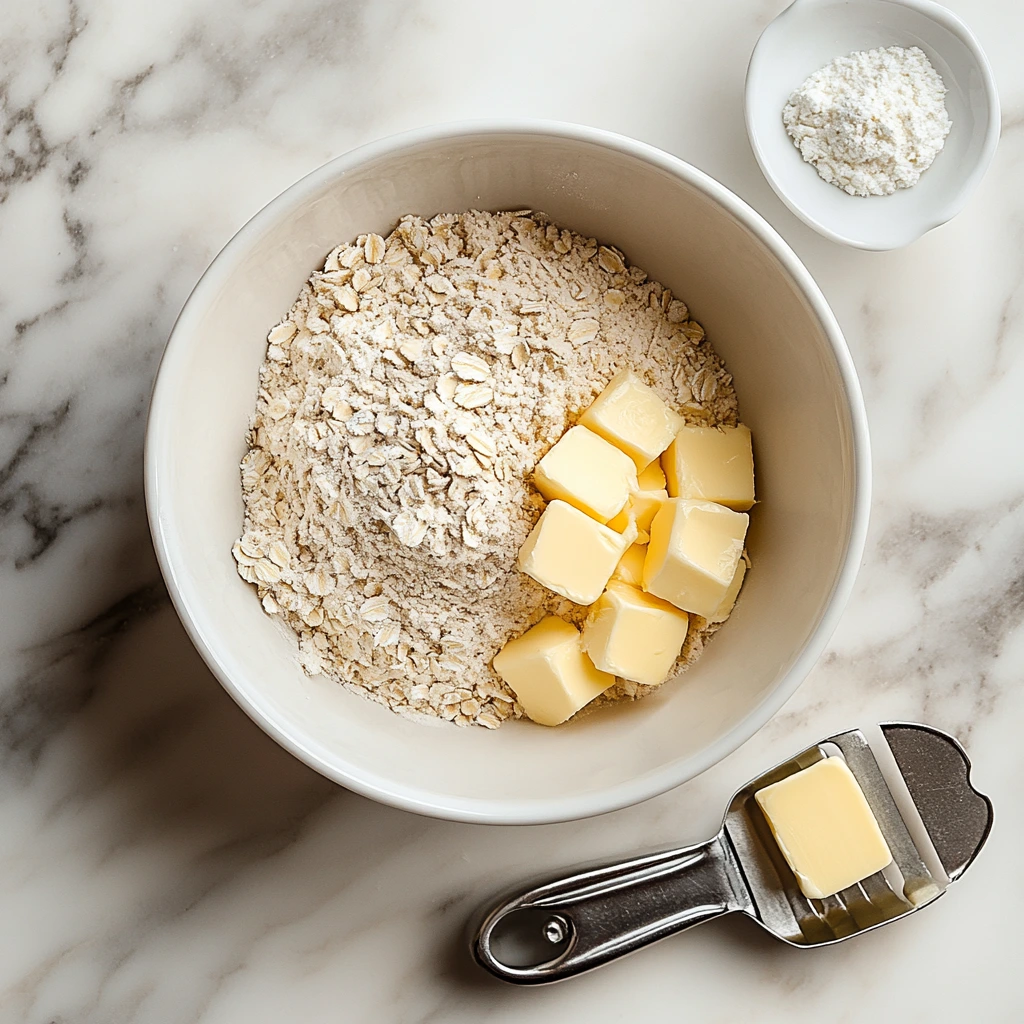
STEP 1: Make the Crust and Topping
This base mixture pulls double duty as both the crust and the topping, and it couldn’t be easier.
In a large mixing bowl, combine the flour, sugar, and salt.
Add the cold butter cubes, and use a pastry cutter or a fork to work the butter into the dry ingredients. You’re aiming for a crumbly texture—think coarse sand or small pebbles.
Once it’s combined, set aside about one-third of the mixture. This will become that deliciously crumbly topping we’ll add later.
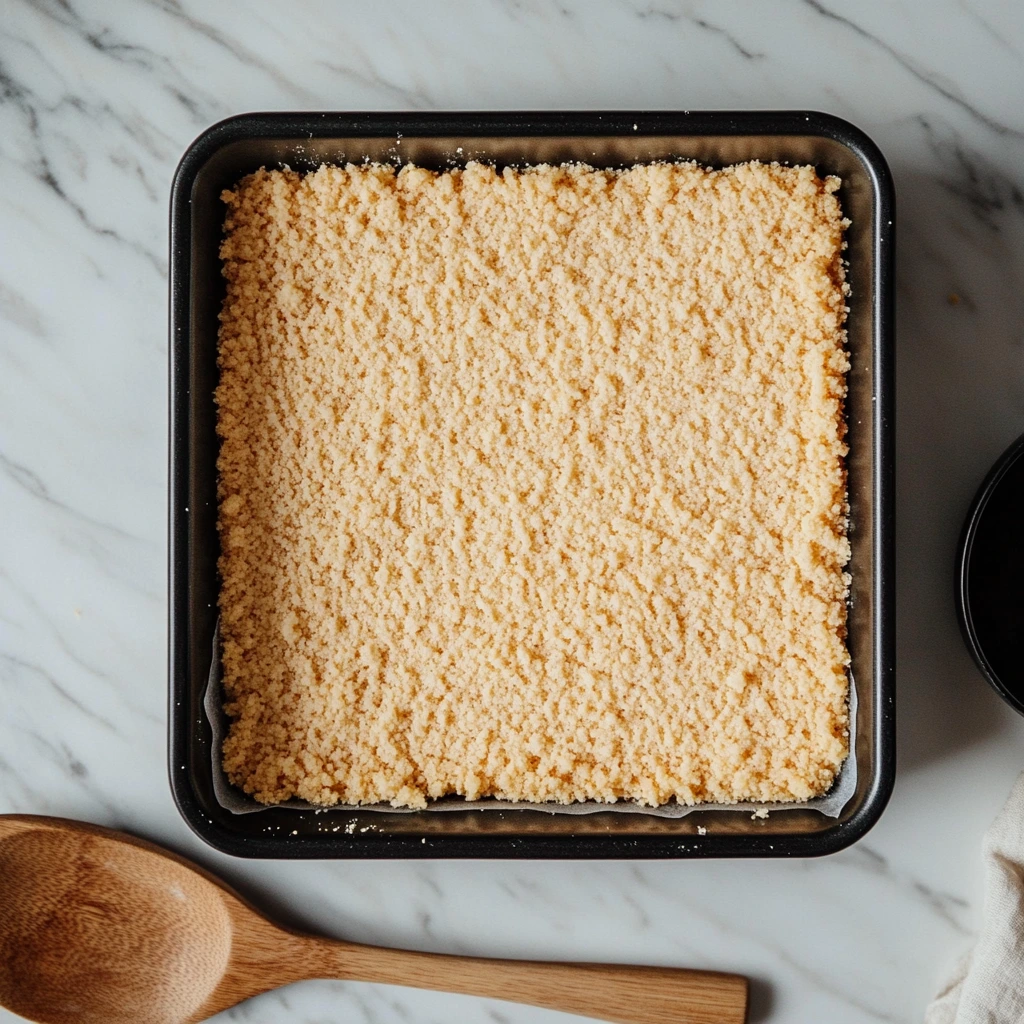
Press the remaining two-thirds of the mixture firmly into the bottom of a parchment-lined 20 cm square baking pan. You want an even layer with no gaps or loose crumbs.
Pop the pan into the fridge to chill for 15 minutes. This helps the crust firm up before baking and ensures it stays nice and crisp.
STEP 2: Prepare the Cherry Filling
While the crust is chilling, it’s the perfect time to get that cherry filling cooking.
In a medium saucepan over medium heat, combine the cherries, sugar, and cornstarch.
Stir regularly as the mixture begins to warm and the cherries start releasing their juices. Within about 5 to 7 minutes, you’ll see the filling thicken up into a glossy, syrupy consistency.
Remove from heat and stir in the lemon juice and vanilla extract. This step adds brightness and depth that really balances the sweetness.
Set the filling aside and let it cool slightly while your crust finishes chilling. You don’t want to pour piping hot filling onto a cold crust—it’s best when it’s warm but not steaming.
Easy Cherry Pie Bars – Assemble, Bake, and Enjoy
Now that your crust is chilling and your cherry filling is thickened and fragrant, it’s time to pull everything together. This is the fun part—layering those sweet-tart cherries onto a buttery base and topping it off with golden, crumbly streusel. You’ll want to stick close to the oven for this part because the smell that starts wafting through your kitchen? Absolutely irresistible.
I love how low-stress this recipe is. No need to roll out dough or fuss with lattice crusts like you would with a traditional pie. These bars give you all the flavor of cherry pie, with a whole lot less work and cleanup. Plus, they slice so neatly that they’re perfect for serving to a crowd—or for sneaking one after dinner every night for the rest of the week.
STEP 3: Assemble the Bars
Once the crust has chilled and your filling has cooled slightly, here’s how to bring it all together:
Preheat your oven to 175°C (350°F) so it’s ready when the bars go in.
Remove the crust from the refrigerator. Spoon the cherry filling evenly over the crust, spreading it gently with the back of a spoon or spatula to make sure it reaches the edges. Try not to press too hard—you don’t want to disturb the base.
Now grab that reserved crumb mixture and sprinkle it generously over the top of the cherries. The chunks don’t need to be uniform—those uneven, golden bits are part of what makes the bars look so beautifully rustic.
Press the crumbs lightly into the cherry layer with your hands or the back of a spoon. Just enough so they stay in place, but not so much that they sink into the filling.
STEP 4: Bake to Golden Perfection
Now it’s time to let the oven work its magic:
Place the assembled pan on the center rack of your preheated 175°C oven.
Bake for 30–35 minutes, or until the topping is golden and the cherry filling is bubbling at the edges.
Don’t worry if the center still looks a little soft—these bars will firm up as they cool.
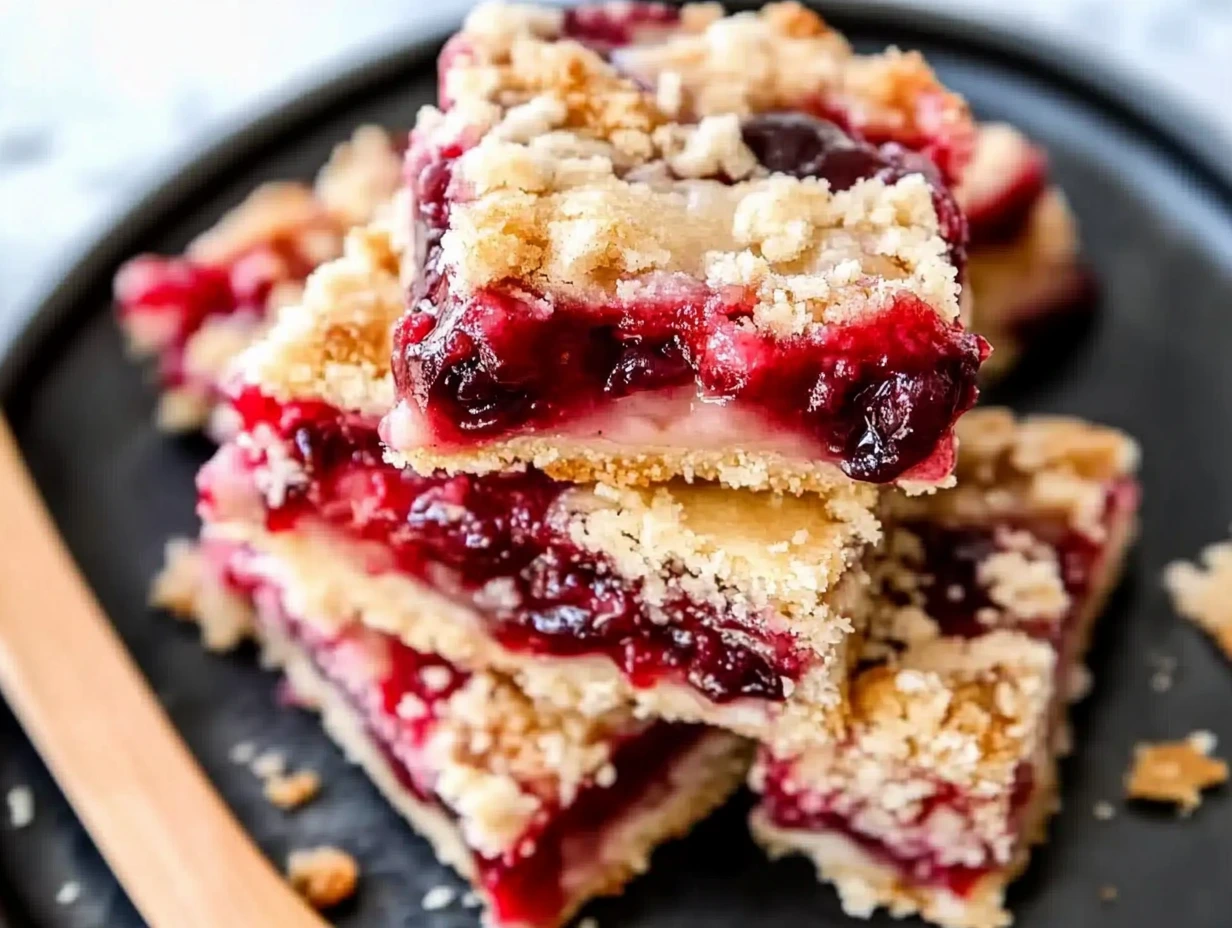
Once they’re done, remove the pan from the oven and let the bars cool completely in the pan on a wire rack. This step takes some patience, but trust me, it’s worth the wait. Cutting them too early can result in a gooey mess, and you’ll miss out on those clean, beautiful edges.
Tips for the Best Cherry Pie Bars
Over the years, I’ve made a few little tweaks to this recipe depending on what I have in the pantry or who I’m baking for. Here are a few tips to help you get perfect results every time:
Use parchment paper to line your baking pan. It makes lifting the bars out and slicing them into neat squares so much easier.
Frozen cherries work great, but be sure to thaw and drain them before cooking. Too much extra liquid can throw off the filling consistency.
Want a little almond flair? Add ¼ teaspoon of almond extract to the cherry filling along with the vanilla. Cherry and almond are a dreamy flavor combo.
If your topping isn’t browning as much as you’d like, you can broil it for the last 1–2 minutes—just keep a close eye so it doesn’t burn.
For extra crunch, try adding a handful of chopped almonds or walnuts to the topping before baking.
Storing and Serving Your Cherry Bars
Once your bars are fully cooled, lift them out of the pan using the parchment and cut them into 16 even squares. They’re great at room temperature but also super tasty chilled straight from the fridge.
You can store them:
At room temperature (in an airtight container) for up to 3 days.
In the fridge for up to a week.
In the freezer for longer storage—just place parchment between the bars so they don’t stick together.
These bars are wonderful on their own, but if you’re feeling indulgent, serve them with a scoop of vanilla ice cream or a dollop of whipped cream. They also make a gorgeous dessert platter when paired with lemon bars or brownie bites.
Cherry Pie Bars – FAQs and Final Thoughts
Now that you’ve seen how easy and rewarding it is to make these cherry pie bars, you might still have a few questions before you head into the kitchen. Totally understandable—especially if you’re new to baking fruit bars or wondering about substitutions and storage. I’ve rounded up the most common questions I’ve gotten about this recipe to help you out.
These bars are pretty forgiving, which is part of their charm. Whether you’re working with frozen cherries, cutting back on sugar, or thinking of adding a personal twist, chances are this recipe will still come out beautifully.
Frequently Asked Questions
1. Can I use canned cherry pie filling instead of fresh or frozen cherries?
Yes, you can—but with a caveat. Canned cherry pie filling is already sweetened and thickened, so you’ll want to skip the sugar and cornstarch steps in the filling portion of the recipe. Just spoon the canned filling over the crust and proceed with the streusel topping. It won’t have the same fresh cherry flavor, but it still makes a tasty shortcut.
2. What can I use instead of cornstarch to thicken the filling?
If you don’t have cornstarch on hand, you can use the same amount of all-purpose flour or tapioca starch. Just make sure you let the filling simmer long enough to thicken up before using it.
3. How do I know when the bars are fully baked?
The top should look golden brown and crisp, and the cherry filling should be bubbling around the edges. The center might still look slightly soft, but it will firm up as it cools. Don’t be tempted to overbake or you’ll lose that perfect chewy texture.
4. Can I freeze cherry pie bars?
Absolutely. Once the bars are completely cooled and sliced, layer them between pieces of parchment paper and freeze in an airtight container. They’ll keep well for up to 2 months. You can thaw them in the fridge or enjoy them straight from the freezer if you like a firmer texture.
5. What other fruits can I use in this recipe?
This recipe is super versatile! Try using blueberries, raspberries, blackberries, or even chopped peaches or apples. Just be sure to adjust the sugar slightly based on how sweet or tart your fruit is. You can keep the base recipe the same and swap out the filling ingredients as needed.
6. Can I make these bars gluten-free?
Yes, you can substitute a gluten-free 1:1 baking flour blend for the all-purpose flour in both the crust and the filling. Make sure your other ingredients are certified gluten-free as well, and you’re good to go.
7. Why does my topping look pale after baking?
Every oven is a little different. If the bars are baked through but the streusel isn’t as golden as you’d like, try turning on the broiler for 1–2 minutes at the end. Just watch closely—things can go from golden to burnt fast under a broiler.
Final Thoughts: Why These Cherry Pie Bars Deserve a Spot in Your Recipe Box
There’s something so satisfying about a recipe that looks and tastes like you spent hours on it—when it actually came together with just a handful of pantry staples and a single bowl. These cherry pie bars are that kind of dessert.
They’re easy enough to whip up on a weeknight, but they look so polished when sliced that they fit right in at any gathering. And they strike that perfect balance of sweet, tart, buttery, and crisp. If you’re a fan of cherry pie but don’t always feel like making a full pie crust from scratch, this is your go-to solution.
Print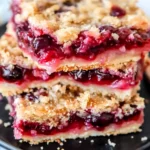
Cherry Pie Bars
- Author: David
Description
These cherry pie bars combine a buttery shortbread crust with a sweet-tart cherry filling and a streusel topping for an irresistible handheld treat. Perfect for picnics, potlucks, or a simple weeknight dessert, they showcase the bright flavor of cherries in an easy-to-slice bar form.
Ingredients
225 g all-purpose flour
75 g granulated sugar
150 g cold unsalted butter, cut into cubes
¼ tsp salt
Ingredients for filling
400 g pitted fresh or frozen cherries
100 g granulated sugar
2 tbsp cornstarch
1 tbsp fresh lemon juice
½ tsp vanilla extract
Instructions
Combine flour, sugar and salt in a bowl and cut in the cold butter with a pastry cutter or fork until the mixture resembles coarse crumbs. Reserve about one third of this mixture for the topping and press the remaining crumbs evenly into the bottom of a parchment-lined 20 cm square baking pan. Chill for 15 minutes.
Meanwhile, in a saucepan over medium heat stir together cherries, sugar and cornstarch until the fruit releases its juices and the mixture thickens, about 5–7 minutes. Remove from heat and stir in lemon juice and vanilla. Let cool slightly.
Spread the cherry filling evenly over the chilled crust. Sprinkle the reserved crumb mixture on top, gently pressing it into the fruit layer.
Bake in a preheated 175 °C oven until the topping is golden and the filling is bubbling at the edges, about 30–35 minutes. Let bars cool completely in the pan on a wire rack before lifting out the parchment and cutting into 16 squares.
Notes
Using frozen cherries is convenient year-round; thaw and drain any excess liquid before cooking. For extra flavor, stir a pinch of almond extract into the filling. Bars can be stored in an airtight container at room temperature for up to three days or refrigerated for up to a week. Freezing individual bars between sheets of parchment ensures they won’t stick together.


")

")


")
