


There’s just something magical about biting into a warm, golden cherry turnover fresh from the oven. That buttery, flaky crust paired with a juicy cherry center? Absolute bliss. Whether you’re making them for a cozy Sunday brunch, a casual dessert, or just because your sweet tooth is calling, these homemade Cherry Turnovers are a bakery-style treat that couldn’t be easier to whip up.
I’ll be honest—I have a soft spot for hand pies. They feel nostalgic, like something you’d pick up at a country fair or find tucked into a lunchbox with a handwritten note. And the best part? You don’t need to fuss with making dough from scratch or spend hours in the kitchen. Thanks to store-bought puff pastry, this recipe is all about low effort and high reward.
These turnovers come together in less than 30 minutes from start to finish, and the results are so worth it. With just a handful of ingredients and a few simple steps, you’ll be serving up bakery-style cherry turnovers that look fancy but are totally foolproof.
So let’s get right into it and start baking!

Ingredients You’ll Need:
1 sheet puff pastry, thawed
1 cup cherry pie filling
1 egg, beaten
1 tbsp water
For the optional glaze:
½ cup powdered sugar
1–2 tsp milk
¼ tsp vanilla extract
STEPS
Step 1: Preheat and Prep Your Baking Sheet
Start by preheating your oven to 400°F (200°C). Line a baking sheet with parchment paper to prevent sticking and make cleanup a breeze. Puff pastry can be a little sticky as it bakes, and parchment paper ensures you get those crisp bottoms without any hassle.
Step 2: Roll Out and Cut the Puff Pastry
On a lightly floured surface, gently roll out your thawed puff pastry sheet. You don’t need to go crazy here—just enough to even out the edges. Then, using a sharp knife or a pizza cutter, slice the pastry into four equal squares. Try to keep the cuts clean so they puff up evenly in the oven.
Step 3: Add the Cherry Filling
Here’s where the fun begins. Spoon about 2 tablespoons of cherry pie filling into the center of each pastry square. It might be tempting to overfill, but trust me—less is more here. Too much filling and you’ll end up with leaks (and no one wants a cherry explosion on their baking sheet).
Step 4: Fold and Seal
Now, fold each square diagonally to form a triangle, enclosing the cherry filling inside. Gently press the edges together, then use a fork to crimp and seal the edges. This not only keeps the filling secure but also gives that classic turnover edge. If a little filling tries to sneak out—don’t stress. It adds rustic charm!
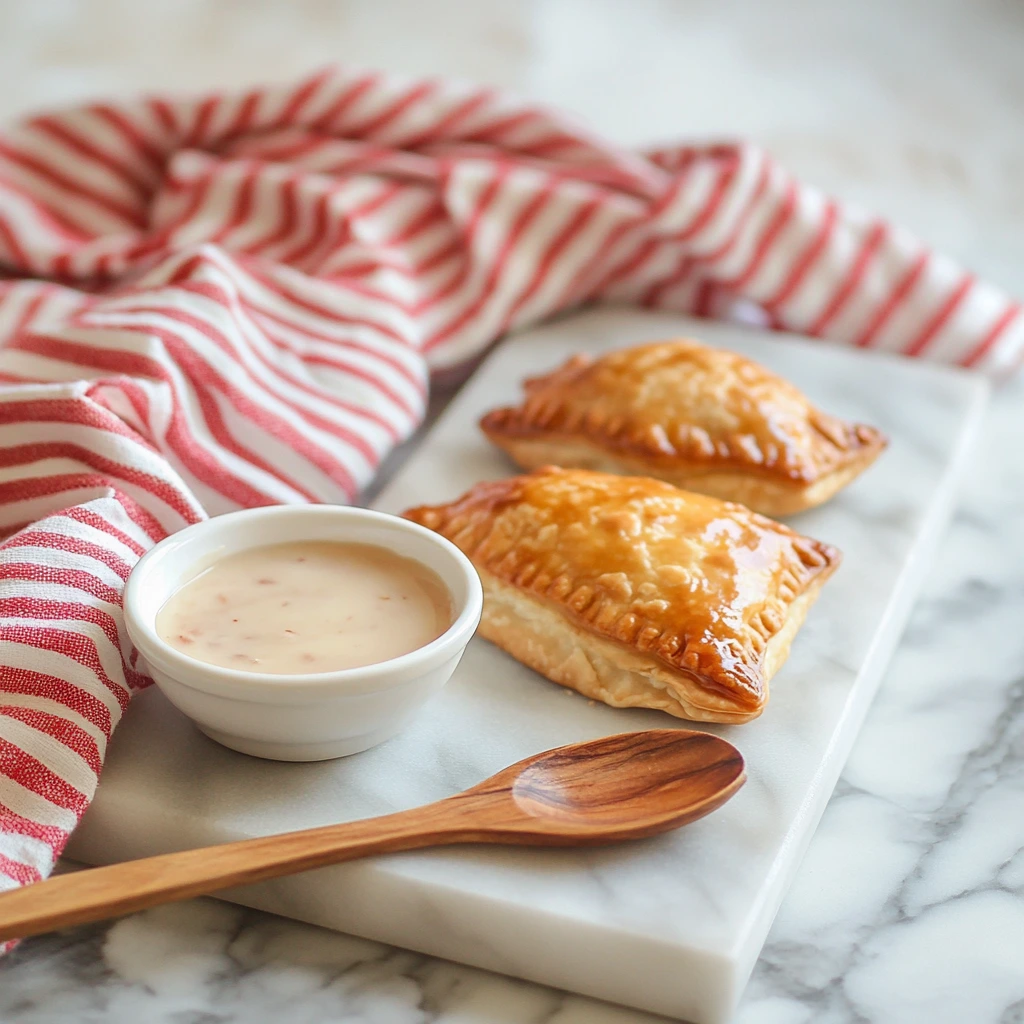
Step 5: Egg Wash for That Golden Finish
In a small bowl, whisk together the egg and water to create your egg wash. Brush the tops of each turnover with the egg wash—this gives them that beautiful golden color and bakery-style shine when baked. Don’t skip this step unless you’re okay with a dull-looking crust.
Bake, Glaze & Helpful Tips
Alright, if you’ve been following along, you already have your cherry turnovers filled, folded, and brushed with that golden egg wash. And if your kitchen smells even half as good as mine did at this point, you know you’re onto something truly delicious. In Part 2, we’re going to bake these sweet little parcels until they’re puffed and perfectly golden, then finish them off with a simple vanilla glaze that adds just the right touch of sweetness.
Also, I’ve included some tips and fun variations below to help you get creative or troubleshoot any baking hiccups. Because once you’ve made these once, trust me—you’ll want to keep making them again and again.
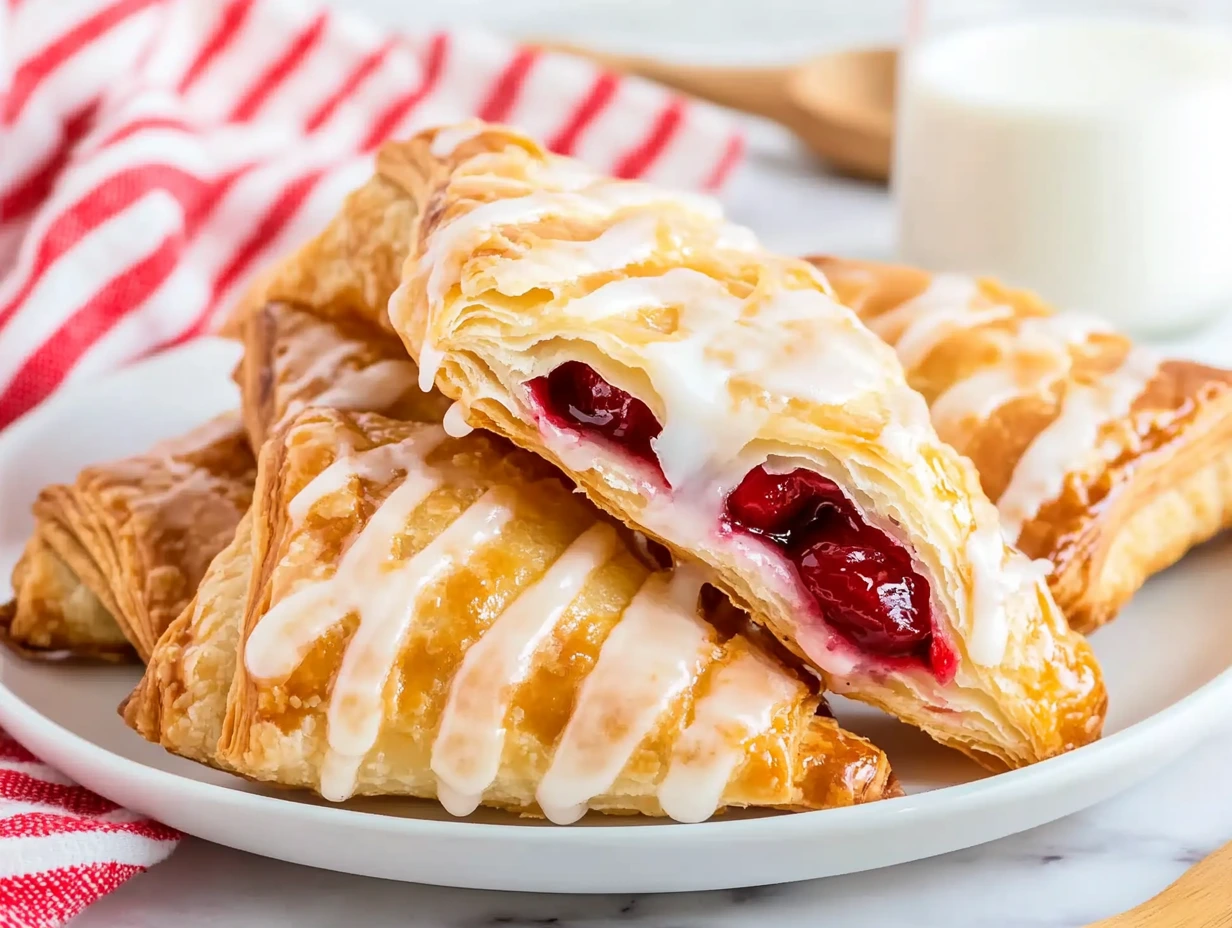
Step 6: Bake Until Golden and Flaky
Place your turnovers on the parchment-lined baking sheet, making sure to give them a bit of space so they can puff up nicely. Pop the tray into the preheated oven and bake for 18–20 minutes. You’re looking for a rich, golden-brown color and visible puffing of the pastry layers.
Every oven runs a little differently, so keep an eye on them starting around the 17-minute mark. The tops should look glossy from the egg wash, and the edges should be crisp to the touch.
Step 7: Cool Slightly Before Glazing
Once baked, remove the turnovers from the oven and let them cool on the baking sheet for about 10 minutes. You want them warm—but not hot—before adding the glaze. If the pastry is too hot, the glaze will just melt right off. A slightly warm turnover allows the glaze to settle and set beautifully on top.
Step 8: Whip Up a Quick Glaze (Optional but Recommended)
In a small bowl, mix together ½ cup powdered sugar, 1–2 teaspoons of milk, and ¼ teaspoon vanilla extract. Start with one teaspoon of milk and add more a few drops at a time until you reach a drizzle-able consistency—not too thick, not too runny.
Using a spoon, drizzle the glaze over the warm turnovers in a zigzag pattern. You don’t need to be precise—rustic is the name of the game here. Let the glaze set for a few minutes before serving.
TIPS & TRICKS FOR TURNOVER SUCCESS
1. Don’t Overfill
I know it’s tempting to load them up with that glossy cherry filling, but resist the urge. Overfilling makes it hard to seal the edges and leads to messy leakage during baking. Stick to about 2 tablespoons per turnover for best results.
2. Keep the Pastry Cold
Puff pastry performs best when it’s cold. If it starts getting too soft or sticky as you’re working with it, pop it in the fridge for a few minutes before folding and sealing.
3. Use a Fork to Seal Edges Tightly
A fork doesn’t just make a pretty crimped edge—it also helps keep the filling tucked inside during baking. Press firmly but gently to avoid tearing the dough.
4. Try Different Fillings
This recipe is super flexible. Swap the cherry filling for blueberry, apple, raspberry, or even peach. You can use canned pie filling or make your own. Just make sure it’s not too runny, or it could ooze out the sides.
5. Glaze or No Glaze?
Totally up to you. If you want to skip the glaze, you can sprinkle the turnovers with coarse sugar before baking for a crunchy finish. But that vanilla glaze does add a bakery touch that’s hard to resist.
6. Want a Smaller Treat?
You can cut the puff pastry into 6 smaller squares instead of 4 for mini turnovers. Just adjust the filling and bake time slightly—check them around 15 minutes.
FAQs & Final Thoughts
Now that your kitchen smells like a dream and your golden cherry turnovers are cooling on the counter (with or without that vanilla glaze—no judgment), let’s tackle a few common questions. Whether this is your first time working with puff pastry or you’re already dreaming up flavor swaps, I’ve got answers to help make your next batch even easier.
FREQUENTLY ASKED QUESTIONS
1. Can I use homemade cherry filling instead of canned pie filling?
Absolutely! If you have fresh or frozen cherries on hand, you can cook them down with a bit of sugar, lemon juice, and cornstarch to create your own pie filling. Just make sure it’s thickened and cooled before using so it doesn’t make the turnovers soggy.
2. How do I keep the turnovers from leaking in the oven?
Make sure you don’t overfill them and that the edges are sealed tightly. Using a fork to crimp the edges really helps. Also, brush the egg wash along the edges before sealing for an extra “glue” effect.
3. Do I need to thaw the puff pastry completely?
Yes—thaw it according to the package instructions (usually about 30–40 minutes at room temp or overnight in the fridge). It should be pliable but still cool. If it’s too warm or sticky, it’s harder to work with and won’t puff as nicely.
4. How should I store leftover turnovers?
These are best fresh, but you can store them in an airtight container at room temperature for up to 2 days. Reheat in a 350°F oven for about 5–7 minutes to bring back that crisp texture.
5. Can I freeze cherry turnovers?
You can! Freeze them before baking: assemble the turnovers and place them on a baking sheet in the freezer until solid. Transfer to a freezer bag and store for up to 2 months. When ready to bake, you can go straight from freezer to oven—just add a couple of extra minutes to the bake time.
6. What other fillings work well in this recipe?
So many! Apple, blueberry, raspberry, peach, and even Nutella or cream cheese. If using a wetter filling, try straining off excess liquid to prevent sogginess.
7. Can I skip the glaze?
Definitely. The turnovers are delicious on their own, especially with that golden, flaky crust. For a simpler finish, just sprinkle a little coarse sugar on top before baking for a bit of sparkle and crunch.
A Sweet Little Treat Worth Repeating
There’s something so satisfying about pulling a tray of warm, homemade turnovers from the oven. They look impressive, they taste amazing, and yet they’re so incredibly simple. With just a sheet of puff pastry and a cup of cherry filling, you can create something that feels a little extra special—perfect for a weekend breakfast, a brunch with friends, or a cozy dessert any day of the week.
And once you’ve mastered the basic steps, you can really make them your own. Try mixing up the fruit filling, adding a pinch of cinnamon to the glaze, or even tucking in a bit of cream cheese for a cherry cheesecake-style twist. It’s one of those recipes that invites creativity but doesn’t require a lot of fuss.
Print
Cherry Turnovers
- Author: David
Description
Cherry Turnovers are flaky, golden pastry pockets filled with sweet-tart cherry filling. These delightful hand pies are easy to make with puff pastry and are perfect for breakfast, dessert, or a sweet snack. With a crisp exterior and juicy fruit center, they’re a delicious bakery-style treat right from your oven.
Ingredients
1 sheet puff pastry, thawed
1 cup cherry pie filling
1 egg, beaten (for egg wash)
1 tbsp water
For the glaze (optional):
1/2 cup powdered sugar
1–2 tsp milk
1/4 tsp vanilla extract
Instructions
Preheat the oven to 400°F (200°C). Line a baking sheet with parchment paper.
Roll out the puff pastry on a lightly floured surface and cut into four equal squares.
Place about 2 tablespoons of cherry pie filling in the center of each square. Fold each square diagonally to form a triangle. Press the edges together and crimp with a fork to seal.
In a small bowl, whisk the egg with water to make an egg wash. Brush the tops of the turnovers with the egg wash for a shiny, golden finish.
Place the turnovers on the prepared baking sheet and bake for 18-20 minutes or until puffed and golden brown.
Let the turnovers cool slightly before drizzling with glaze.
For the glaze, mix powdered sugar, milk, and vanilla extract until smooth. Drizzle over warm turnovers and allow to set.
Notes
You can substitute cherry pie filling with other fruit fillings like apple or blueberry. Be careful not to overfill the turnovers to prevent leakage. These are best enjoyed fresh but can be stored in an airtight container for up to two days. Reheat in the oven for crispness.


")

")


")
