

There are desserts that make you smile, and then there are desserts that stop time. You know the ones I’m talking about—that first spoonful hits, warm chocolate pours out like a dream, and you suddenly forget every other sweet treat you’ve ever known. That’s exactly what this Chocolate Lava Cake delivers: a perfectly tender cake on the outside with an irresistibly gooey, molten chocolate center. It’s the kind of dessert that’s shockingly simple to make but impressive enough to finish off a dinner party—or let’s be honest, a Tuesday night in your pajamas.
I first made this lava cake for a date night at home, thinking it might be a bit too “restaurant fancy” for me to pull off. Spoiler alert: it wasn’t. It was one of the easiest desserts I’ve ever thrown together, and it instantly earned a permanent spot in my dessert rotation. Now I keep it in my back pocket for everything from holidays to cozy nights when I need a little chocolate therapy.
So if you’ve been eyeing those lava cakes on menus for years but never dared try them at home, this recipe is your sign. Let’s dive into this warm, melty goodness one step at a time.

Ingredients You’ll Need
8 ounces semisweet or bittersweet chocolate, chopped
½ cup unsalted butter, cubed
2 large eggs
2 large egg yolks
¼ cup granulated sugar
2 tablespoons all-purpose flour
Pinch of salt
Vanilla ice cream or whipped cream, for serving
These are pantry basics, but don’t let the simplicity fool you. When they come together, the results are downright decadent.
STEP 1: Preheat and Prep Your Ramekins
First things first—go ahead and preheat your oven to 425°F (220°C). You’ll want the rack right in the center for even baking.
Now, grab four 6-ounce ramekins and show them a little love. Generously butter each one, making sure you get all the way up the sides, and then dust the insides with cocoa powder. This not only prevents sticking but also adds a subtle chocolatey crust to the outer layer. Tap out any extra powder, and set them aside on a baking sheet for easy handling later.
STEP 2: Melt the Chocolate and Butter
In a heatproof bowl, combine your chopped chocolate and cubed butter. Place the bowl over a saucepan of gently simmering water—this is your makeshift double boiler. Stir slowly and patiently until everything is completely melted and silky smooth. Once it’s ready, take the bowl off the heat and let it cool for just a few minutes. You want it warm but not piping hot when you add it to the eggs.
Pro tip: If you’re feeling bold, this is where you can stir in a teaspoon of espresso powder. It won’t taste like coffee, but it will deepen the chocolate flavor in the most luxurious way.
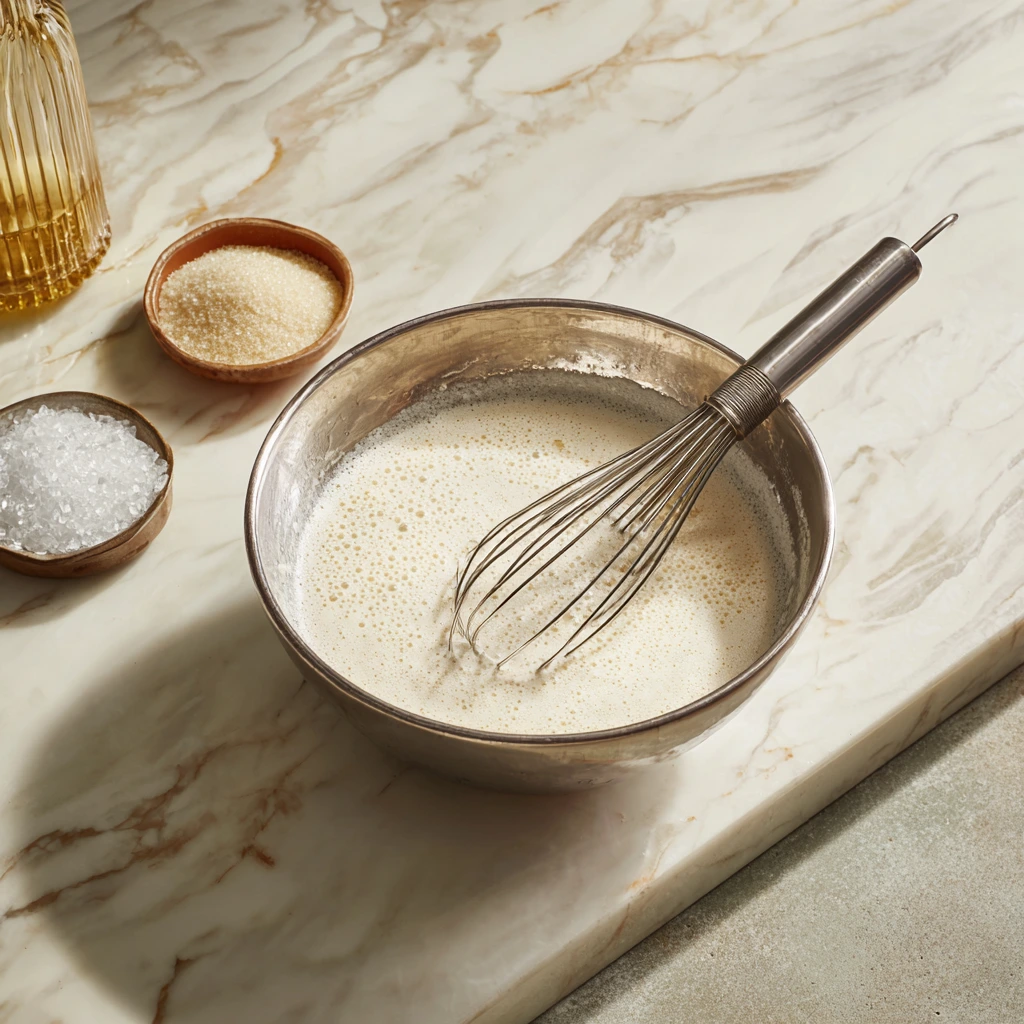
STEP 3: Whisk the Eggs and Sugar
In a separate bowl, whisk together the whole eggs, egg yolks, and granulated sugar. You’re aiming for a pale, thick mixture—this usually takes about 2 to 3 minutes of steady whisking. Don’t skimp here; this is what gives the cakes that soft, soufflé-like texture.
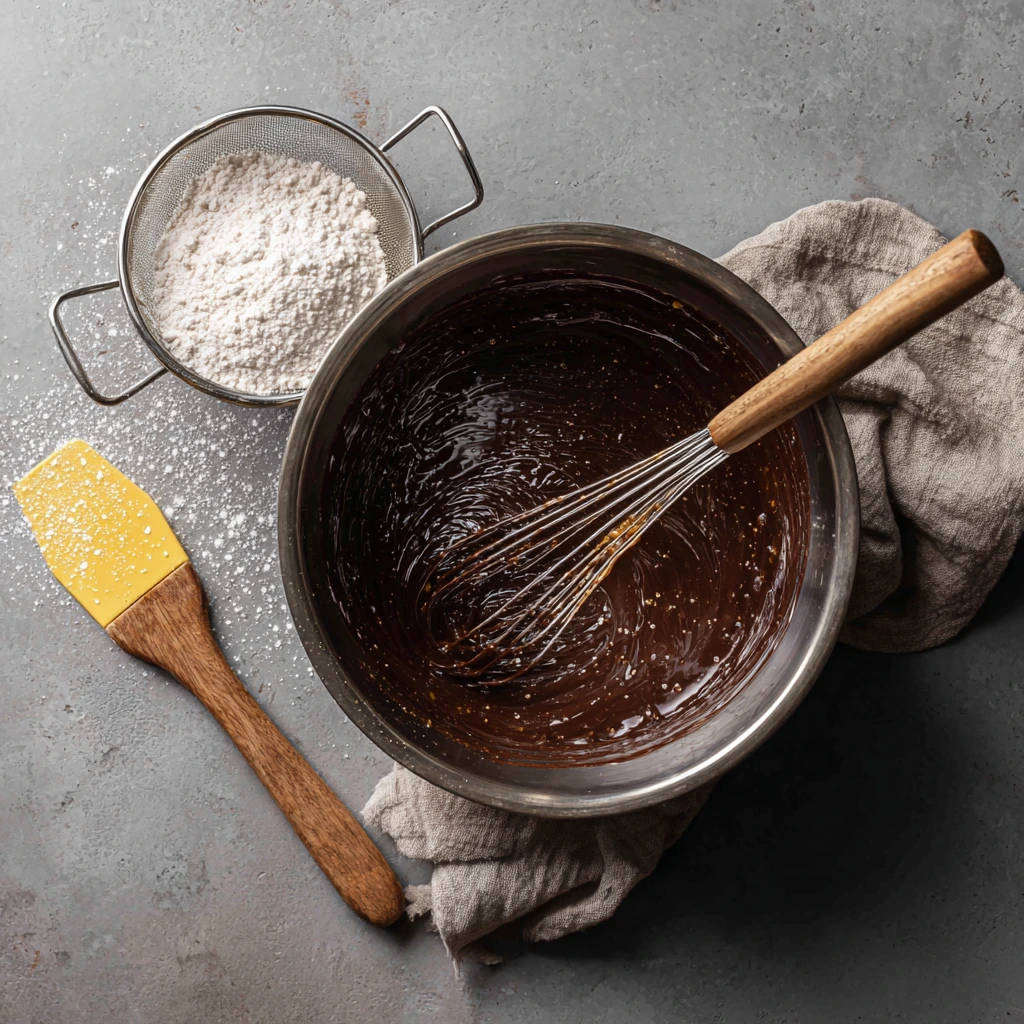
Once the egg mixture is ready, slowly fold in the melted chocolate mixture. Be gentle—you want everything to come together smoothly without deflating that lovely egg volume you just built up.
STEP 4: Add the Dry Ingredients
Now it’s time to bring it all home. Sift in the flour and a pinch of salt, then fold everything together until the batter is silky and uniform. It should be thick but pourable.
Evenly divide the batter between your prepared ramekins. They should be filled just below the rim. Pop them onto the baking sheet and slide it into your preheated oven.
Bake to Perfection & Serve It Right
Welcome back to Part 2 of our Chocolate Lava Cake adventure! If you’ve already made it through the prep, you’re just minutes away from dessert heaven. This is the part where things really come together—literally. The batter is already looking rich and glossy, and now it’s time to transform those ramekins into warm, molten magic.
The key here is timing. Since lava cakes are all about that delicate contrast—firm outer edges with a flowing center—just a minute too long in the oven can take you from gooey to overdone. But don’t worry, I’ve got you covered with tips to nail it every single time.
STEP 5: Bake the Lava Cakes
Slide your baking sheet with the ramekins into the preheated 425°F (220°C) oven. Set your timer for 10 to 12 minutes, but start checking around the 10-minute mark. What you’re looking for is edges that look set and centers that still jiggle slightly when you gently shake the ramekin.
If the tops look slightly puffed and maybe even a little cracked around the edges, you’re in good shape. Resist the urge to keep baking “just in case.” That slightly undercooked center is exactly what gives the cake its lava-like core.
Note: Oven temps can vary, and so can ramekin sizes. If you’re using smaller or larger ramekins than 6 ounces, you may need to adjust by 30-second increments either way.
STEP 6: Let Them Rest, Then Invert
Once you pull the cakes from the oven, let them sit for about one minute. This helps the cake firm up just enough to hold its shape when you flip it. Grab a small knife and gently run it around the edge of each cake to loosen it from the ramekin.
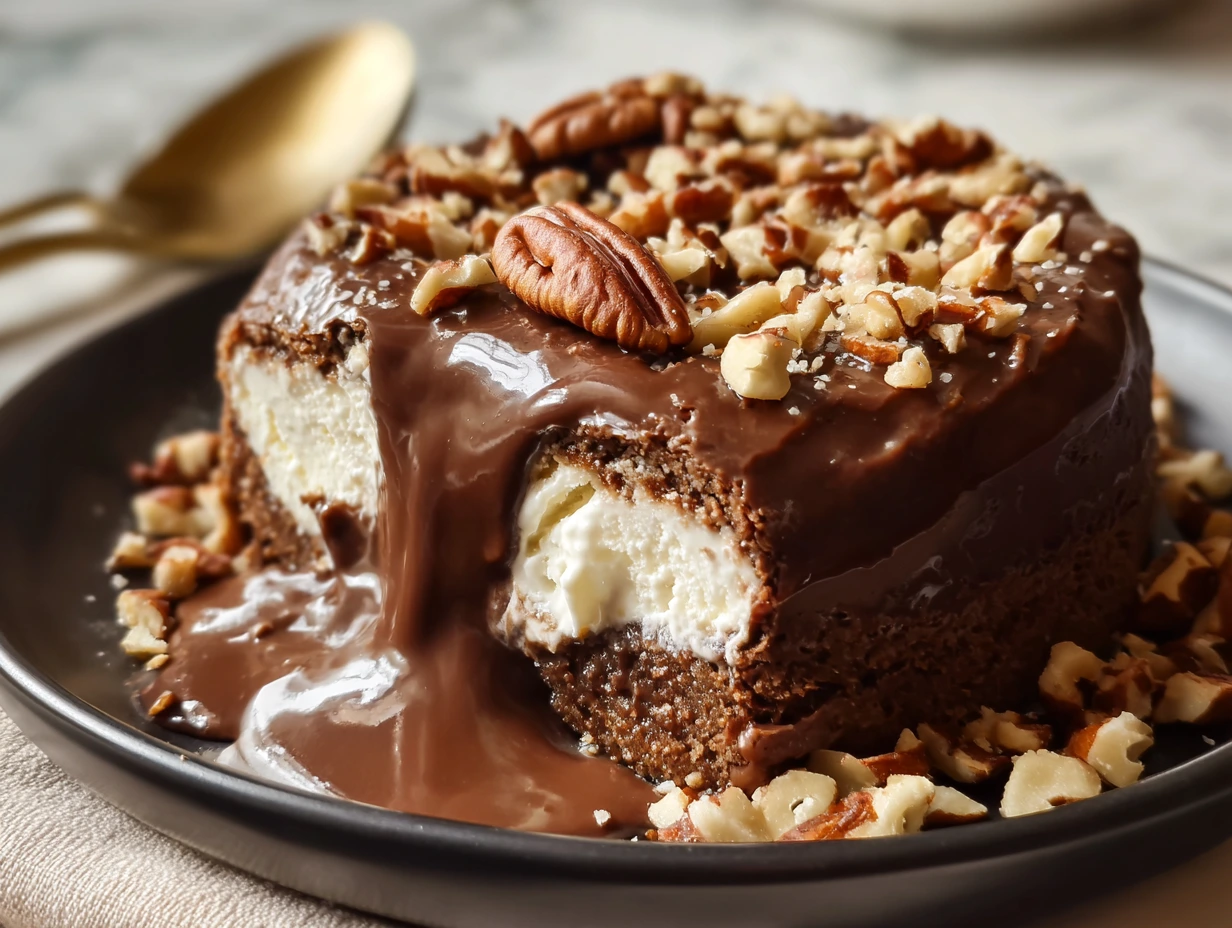
Then, carefully place a dessert plate on top of the ramekin, and—ready for the moment of truth?—invert it. Give it a gentle tap, lift off the ramekin, and there it is: your lava cake, ready to impress.
STEP 7: Add the Finishing Touches
You could serve the lava cake as is and it would be incredible—but we’re going all the way, right?
Top it with a scoop of vanilla ice cream, which melts beautifully into the warm center, or go for a generous swirl of fresh whipped cream. A sprinkle of powdered sugar adds a touch of elegance, and a few fresh raspberries or strawberries on the side? Chef’s kiss.

Bonus Tips & Variations
If you’re planning ahead or hosting a dinner party, lava cakes are a dream because you can make the batter in advance. Just fill the ramekins, cover them with plastic wrap, and refrigerate for up to 24 hours. When it’s time to bake, pop them straight into the oven—just add one extra minute to the baking time.
Here are a few simple twists you can try once you’ve mastered the classic version:
Peanut Butter Lava Cake: Drop a teaspoon of creamy peanut butter in the center of each ramekin before baking. It’ll melt into the cake and add a rich, nutty surprise.
Salted Caramel Lava Cake: Same idea—add a dollop of caramel sauce (store-bought or homemade) in the middle, and sprinkle sea salt on top after baking.
Spiced Lava Cake: Add a pinch of cinnamon or cayenne pepper to the batter for a subtle kick that pairs beautifully with dark chocolate.
Gluten-Free Option: Swap the all-purpose flour for a 1:1 gluten-free flour blend, and make sure your chocolate is gluten-free. That’s it!
And don’t worry—none of these variations require extra baking time or complicated steps. Just a little imagination and some delicious add-ins.
FAQ & Final Thoughts
You’ve made it through the prep, the melt, the bake, and the flip—and now it’s time to round things out with a few helpful answers to common lava cake questions. Even though this dessert is surprisingly simple, it does come with a few “what ifs” that tend to pop up for first-time bakers. So let’s clear those up and make sure you’re feeling confident every step of the way.
Frequently Asked Questions
1. What kind of chocolate works best for lava cake?
You’ll want to use semisweet or bittersweet chocolate with a cocoa content between 60-70%. It melts well and gives that rich, deep chocolate flavor without being too sweet. Avoid using chocolate chips—they contain stabilizers that can mess with the melt.
2. Can I make lava cakes ahead of time?
Yes! Once your batter is in the ramekins, you can cover and refrigerate them for up to 24 hours. When you’re ready to bake, just add an extra minute to the bake time to account for the chilled batter.
3. How do I know when the cakes are done?
Look for firm edges and a jiggly center. If the entire top is set and no longer moves when you shake the ramekin, it’s likely overbaked. Start checking around the 10-minute mark, and pull them once the center wobbles slightly.
4. What if I don’t have ramekins?
No ramekins? No problem. You can use muffin tins, but keep in mind the baking time will be shorter—about 7 to 9 minutes. Be sure to butter and flour each well thoroughly, and let them cool slightly before removing.
5. Can I freeze chocolate lava cakes?
Yes, they freeze well! After baking and cooling, wrap the cakes tightly and freeze them for up to 2 months. To reheat, warm them in the microwave for about 30–40 seconds until heated through and gooey inside.
6. Why did my lava cake fall apart when I flipped it?
If the cake didn’t release cleanly, it could be because it wasn’t loosened fully with a knife, or it was underbaked. Let it rest for a minute, run a knife around the edges, and be gentle when inverting. Don’t worry if it cracks a little—it’ll still taste amazing!
7. Can I make this recipe dairy-free?
Yes, with a few swaps. Use dairy-free chocolate and plant-based butter, and be sure your add-ons like whipped topping or ice cream are dairy-free too. The texture might be slightly different, but the taste will still be rich and chocolatey.
Final Thoughts: Try It Once, Love It Forever
Chocolate Lava Cake is one of those rare desserts that looks elegant and tastes like something from a five-star kitchen—but can be made at home in under 30 minutes. Once you’ve tried it, you’ll wonder why you didn’t sooner.
This recipe is now a go-to in my house. Whether I’m making a batch for Valentine’s Day, a birthday treat, or just to surprise the family after dinner, it always brings smiles to the table. And let’s be honest—it’s hard to beat that moment when you break into the center and the warm chocolate starts to flow.
Print
Chocolate Lava Cake
- Author: David
Description
A luxurious, warm dessert featuring a rich chocolate exterior that gives way to a molten, gooey center. This Chocolate Lava Cake strikes the perfect balance between a tender cake and flowing chocolate sauce, making it a standout finale for any meal.
Ingredients
8 ounces semisweet or bittersweet chocolate, chopped
½ cup unsalted butter, cubed
2 large eggs
2 large egg yolks
¼ cup granulated sugar
2 tablespoons all-purpose flour
Pinch of salt
Vanilla ice cream or whipped cream, for serving
Instructions
Preheat the oven to 425°F (220°C) and position a rack in the center. Generously butter four 6-ounce ramekins and dust the insides with cocoa powder, tapping out any excess.
Place the chopped chocolate and butter in a heatproof bowl over a gently simmering pot of water. Stir until fully melted and smooth, then remove from heat and let cool slightly.
Whisk the whole eggs, egg yolks, and sugar in a separate bowl until pale and thickened, about two to three minutes. Carefully fold the chocolate mixture into the egg mixture until combined, then sift in the flour and salt. Gently fold until the batter is smooth and even.
Divide the batter evenly among the prepared ramekins. Place them on a baking sheet and bake for 10 to 12 minutes, until the edges are set but the centers still wobble slightly when shaken.
Allow the cakes to rest for one minute, then run a knife around the edges and invert each cake onto a serving plate. Serve immediately with a scoop of vanilla ice cream or a dollop of whipped cream.
Notes
Ramekin size and oven temperatures can vary; if the cakes reach the perfect gooey center on the first try, adjust the baking time by 30-second increments for future batches. For an extra flavor pop, stir a teaspoon of espresso powder into the melted chocolate. You can prepare the batter ahead, cover the filled ramekins, and refrigerate for up to 24 hours—just add an extra minute to the bake time if chilled.


")

")


")
