

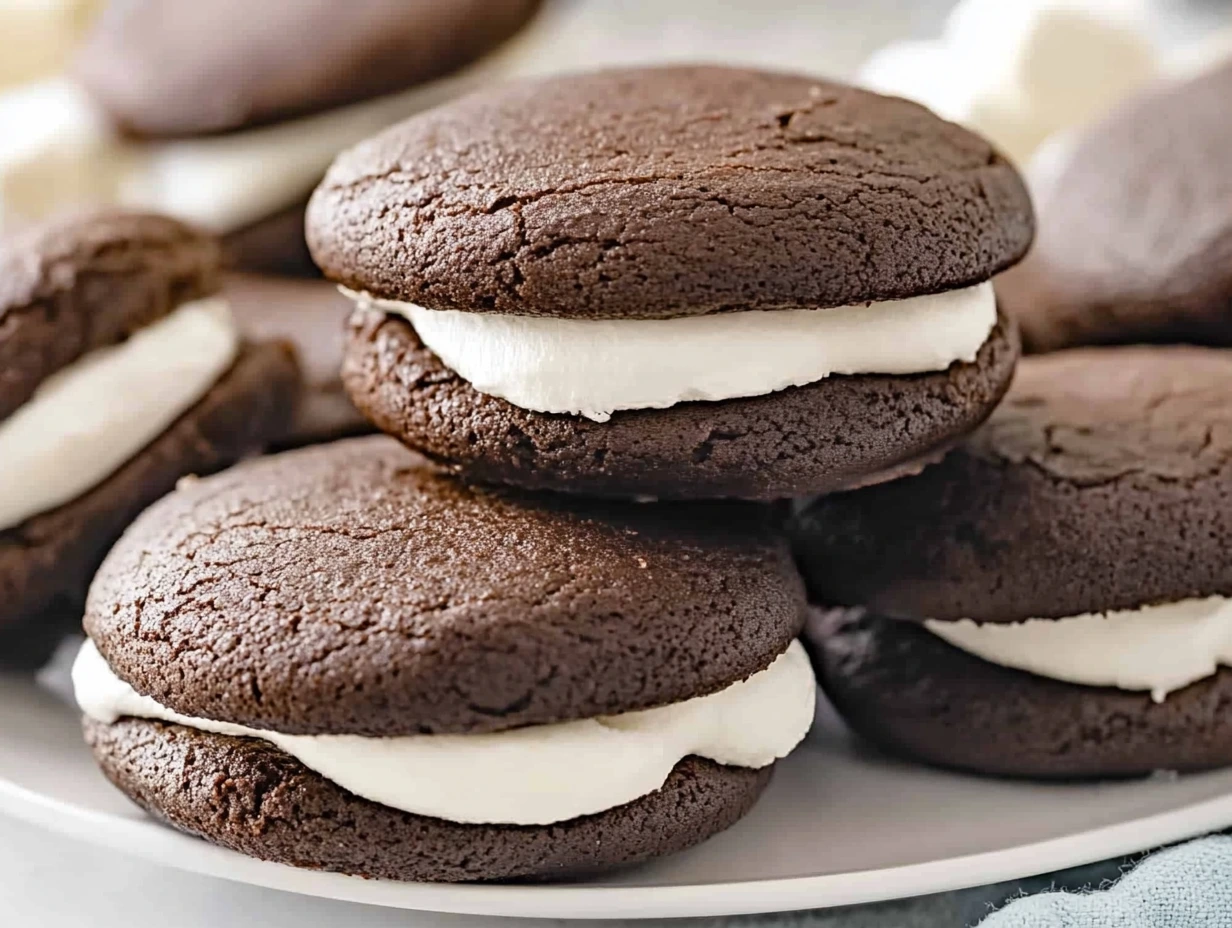
There’s just something about a chocolate whoopie pie that takes you right back to childhood, isn’t there? Whether you grew up calling them “gobs” or simply “whoopie pies,” this sweet little sandwich of fluffy vanilla filling between two soft, cake-like chocolate cookies is pure nostalgia. And honestly? They’re just as delightful now as they were back then.
These chocolate whoopie pies are the kind of dessert that checks all the boxes—easy to make, super fun to eat, and loved by kids and adults alike. I like to whip up a batch when we’re having friends over or need something portable for a bake sale. They look impressive, but they come together with pantry basics and a few quick steps.
The best part? You can customize the filling or dress them up with sprinkles around the edges if you’re feeling fancy. But even in their classic form, they’re a total crowd-pleaser. So let’s dive into the recipe and get started on making your new favorite treat!
Ingredients You’ll Need
For the chocolate cakes:
2 cups all-purpose flour
1/2 cup unsweetened cocoa powder
1 1/4 teaspoons baking soda
1/2 teaspoon salt
1 cup buttermilk
1 teaspoon vanilla extract
1/2 cup unsalted butter, softened
1 cup packed brown sugar
1 large egg
For the filling:
1/2 cup unsalted butter, softened
1 1/2 cups powdered sugar
1 jar (7 oz) marshmallow creme
1 teaspoon vanilla extract
STEPS: Making the Chocolate Cakes
Before we even get to the creamy filling (which, trust me, is worth the wait), let’s talk about the soft chocolate cookies that form the base of these whoopie pies. They’re like mini chocolate cakes with just the right amount of chew—rich, moist, and just begging to be sandwiched around a sweet filling.

Step 1: Preheat and Prep
Start by preheating your oven to 350°F (175°C). You’ll want to line two baking sheets with parchment paper to make cleanup easier and prevent sticking. These cookies are soft and delicate, so parchment is definitely your friend here.
Step 2: Mix the Dry Ingredients
In a medium bowl, whisk together the all-purpose flour, cocoa powder, baking soda, and salt. This step helps ensure the leavening agents and cocoa are evenly distributed before they meet the wet ingredients.
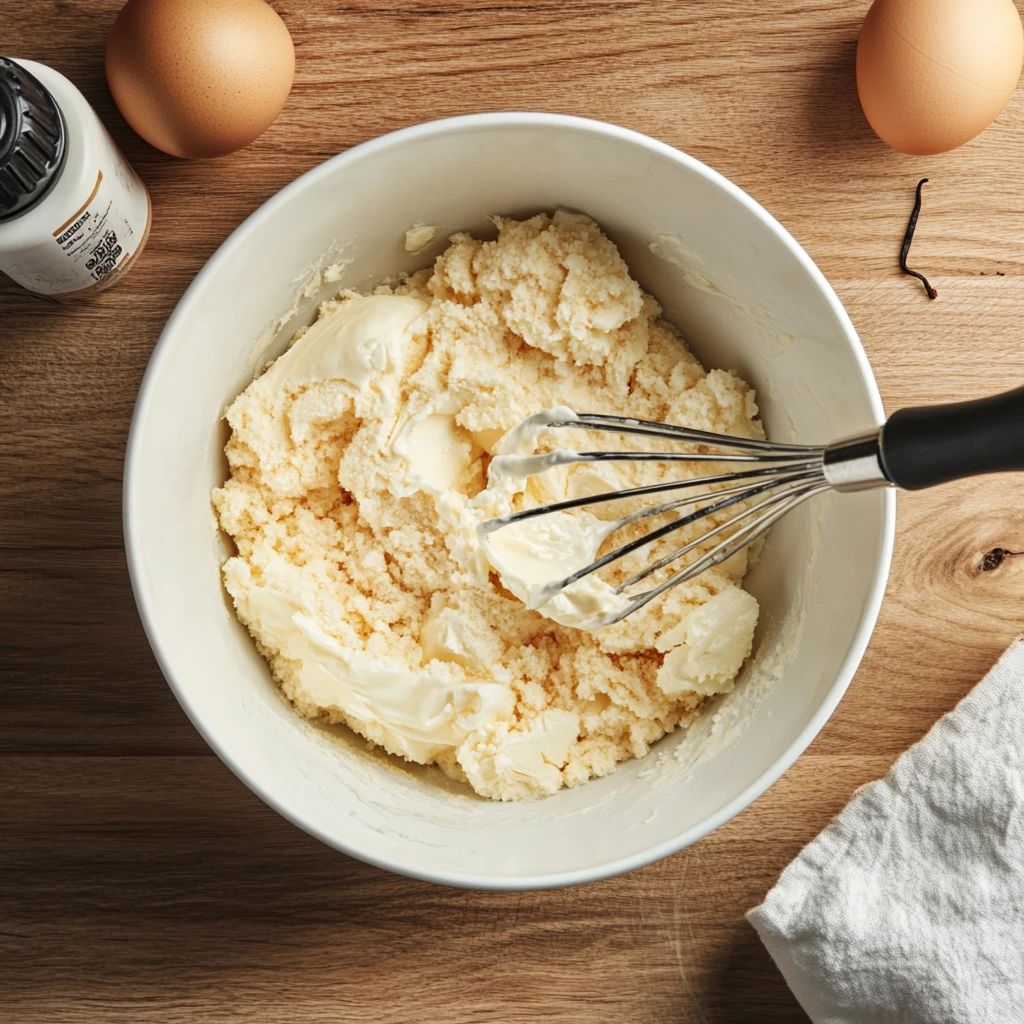
Step 3: Cream the Butter and Sugar
In a separate large bowl, beat the softened butter and brown sugar until the mixture is creamy and light. I like to use a hand mixer for this part, but a stand mixer works great too. The brown sugar adds moisture and depth of flavor that makes these whoopie pies extra special.
Step 4: Add the Egg and Vanilla
Next, mix in the egg and vanilla extract until everything is well combined. You should have a smooth, fluffy base at this point.
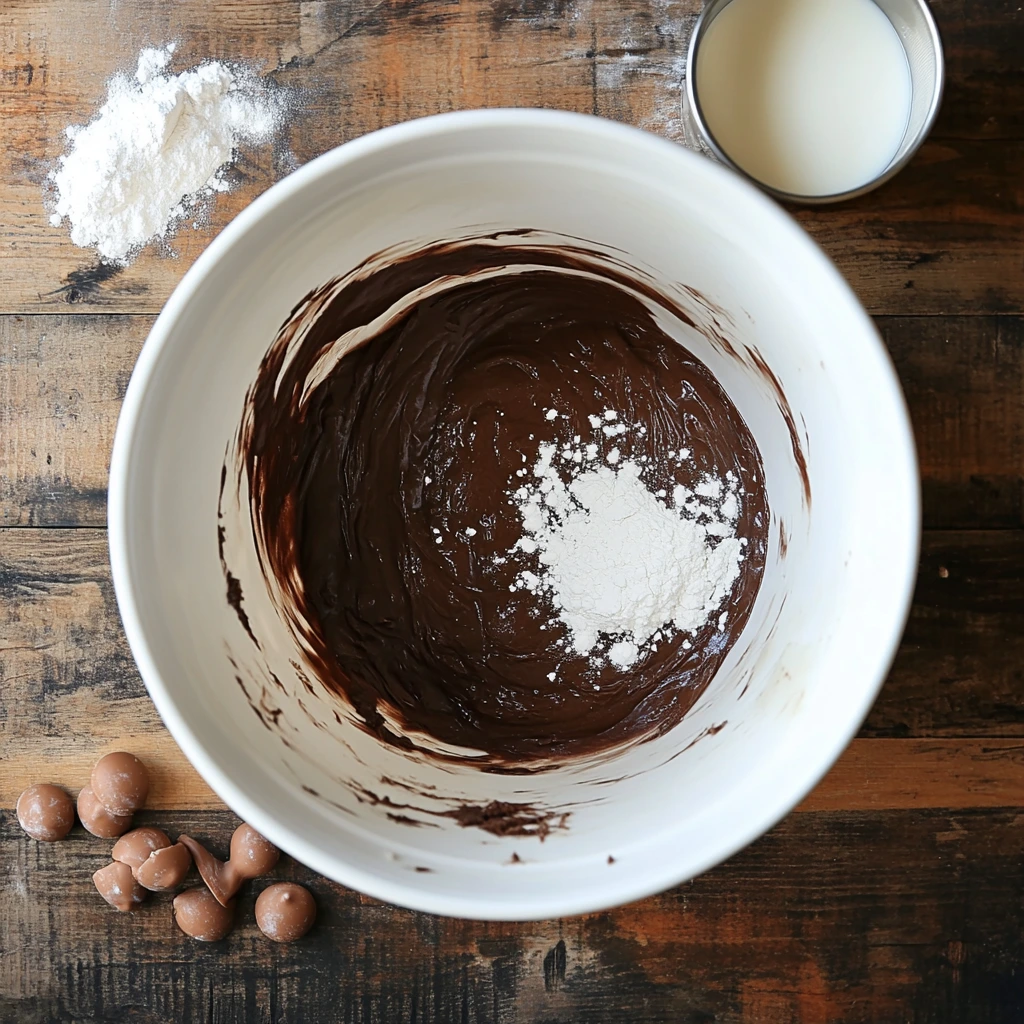
Step 5: Combine Wet and Dry Mixtures
Now, add the dry ingredients to the wet mixture in stages, alternating with the buttermilk. Begin and end with the dry mix, stirring just until everything is incorporated. You don’t want to overmix, or you might end up with dense cookies.
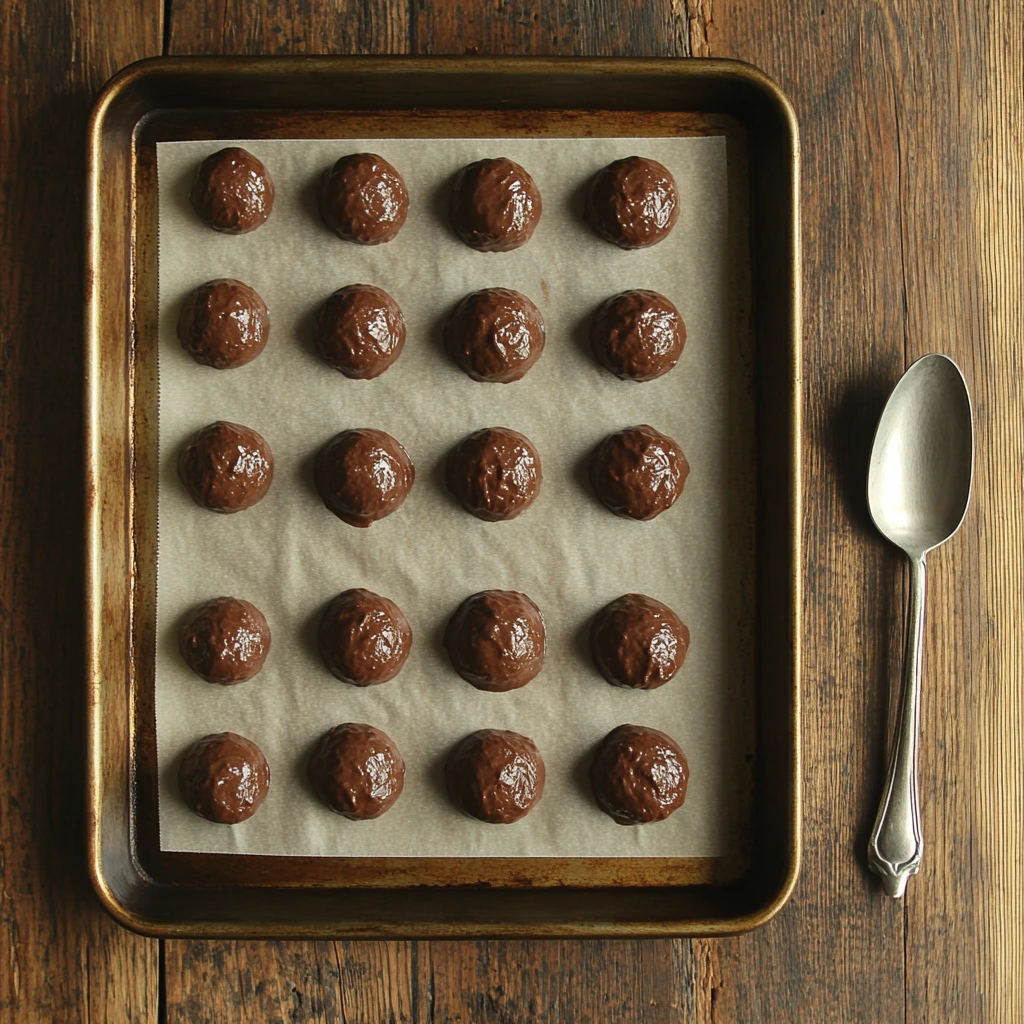
Step 6: Scoop and Bake
Drop heaping tablespoons of batter onto your prepared baking sheets. Leave about 2 inches between each one—they’ll spread a bit while baking. I like to gently flatten the tops with the back of a spoon to help them bake more evenly.
Bake them for 10–12 minutes, or until the tops spring back lightly when touched. Let them cool on the baking sheet for a few minutes before transferring to a wire rack to cool completely.
How to Make Fluffy Marshmallow Filling for Chocolate Whoopie Pies
Now that your chocolate cakes are cooling and making your kitchen smell like a bakery, it’s time to talk about the real showstopper: the filling. This isn’t just any frosting—it’s a light, creamy, marshmallow-based filling that gives these whoopie pies their signature nostalgic flavor and fluffy texture. It’s sweet without being too rich, and it pairs perfectly with the soft chocolate cakes.
If you’ve never worked with marshmallow creme before, don’t worry. It blends easily with butter and powdered sugar to create a filling that’s smooth, stable, and perfect for sandwiching. Ready to get started? Let’s whip it up!
STEPS: Making the Marshmallow Filling
Step 1: Beat the Butter
Start by adding your softened unsalted butter (1/2 cup) to a mixing bowl. Beat it until it’s nice and fluffy—this should take about 2–3 minutes with a hand mixer on medium speed. You want it light and airy before you add anything else.
Step 2: Add the Powdered Sugar
Gradually add the powdered sugar (1 1/2 cups) while continuing to beat the mixture. I recommend adding it in a couple of batches to avoid a powdered sugar cloud taking over your kitchen. Once fully combined, the mixture should be smooth and creamy.
Step 3: Mix in Marshmallow Creme and Vanilla
Now comes the magic—add one full jar (7 oz) of marshmallow creme and 1 teaspoon of vanilla extract. Beat until everything is fully blended and fluffy. The filling should hold its shape well and be easy to spread.
That’s it! Your filling is ready to go. You can use it right away or let it chill for a few minutes in the fridge if your kitchen is warm.
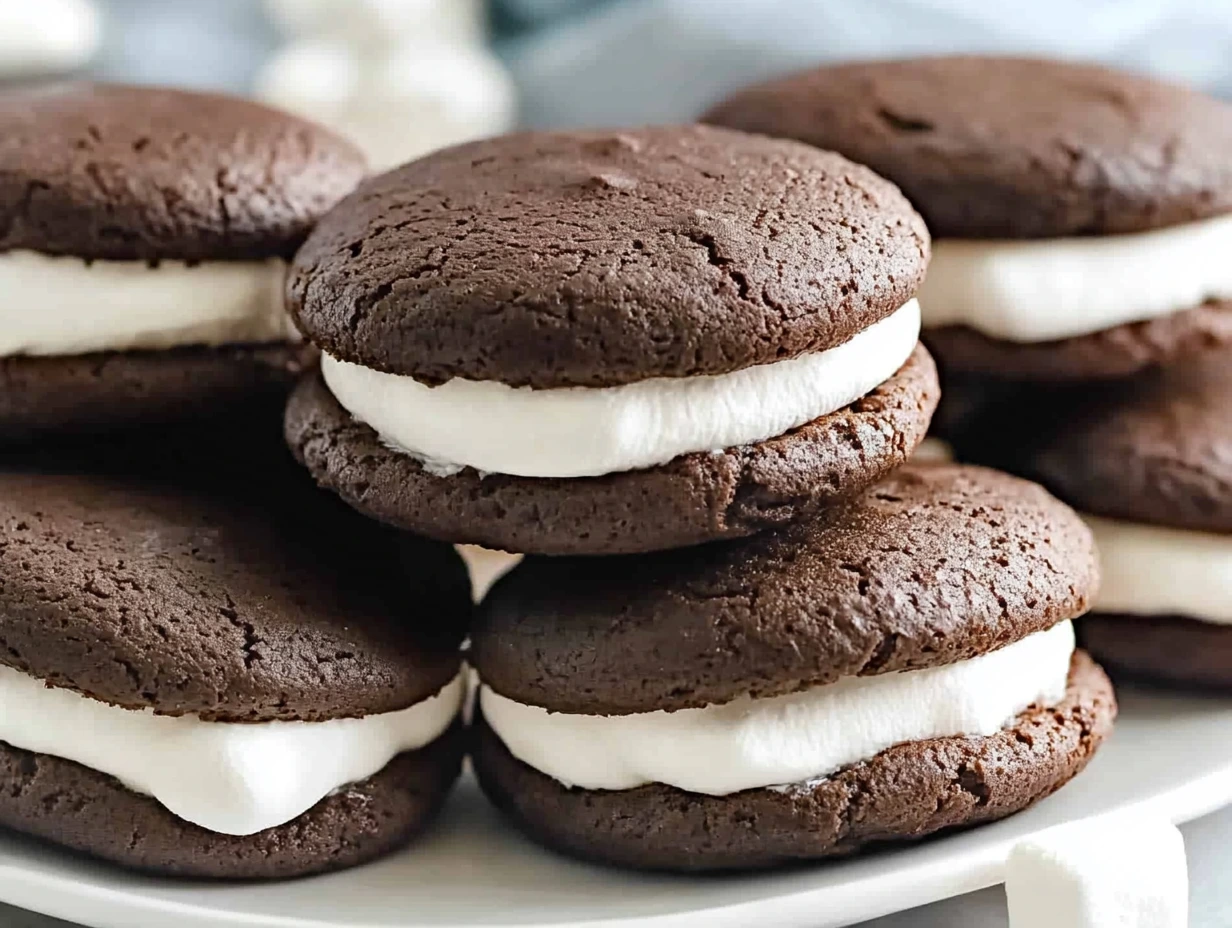
STEPS: Assembling the Whoopie Pies
This is the fun part! Once your chocolate cakes are completely cooled (and I do mean completely—any warmth will melt the filling), it’s time to make those sandwiches.
Step 1: Pair Up the Cakes
Find two cakes that are similar in size and shape—this will help your whoopie pies look more uniform. Lay them out flat-side up.
Step 2: Add the Filling
Spoon or pipe about a tablespoon of the filling onto the flat side of one cookie. I like using a piping bag for this—it makes it easy to control the amount and looks a little neater, but a spoon works just fine too.
Step 3: Sandwich and Press Gently
Place the second cookie on top, flat side down, and press lightly to spread the filling evenly to the edges. Repeat with the rest of the cookies until all your whoopie pies are assembled.
Tips and Variations for Perfect Whoopie Pies
These classic chocolate whoopie pies are amazing as-is, but there’s definitely room to get creative if you’re feeling adventurous. Here are a few ideas to make them your own:
1. Roll the Edges
After assembling, gently roll the sides of your whoopie pies in mini chocolate chips, crushed nuts, or sprinkles. This adds texture and makes them look extra festive—especially fun for parties or holidays.
2. Flavor the Filling
Add a drop or two of peppermint extract around the holidays, or try peanut butter for a Reese’s-inspired version. A little espresso powder can also give the filling a mocha twist.
3. Try a Different Cake Base
Chocolate is classic, but you can use the same recipe format with other flavors—vanilla, red velvet, or even pumpkin during the fall. Just swap the cocoa for more flour and tweak the flavorings.
4. Use a Cookie Scoop
To make all your cakes uniform in size, use a cookie scoop to portion out the batter. This helps them bake evenly and makes it easier to pair them up later.
5. Make Ahead for Easy Entertaining
These hold up beautifully when made a day in advance. Just store them in an airtight container at room temperature, or refrigerate if it’s warm in your kitchen. Let them come to room temp before serving.
How to Make Fluffy Marshmallow Filling and Assemble Your Chocolate Whoopie Pies
With your chocolate cakes baked and cooling, it’s time to focus on the creamy, dreamy filling that makes these whoopie pies so unforgettable. This marshmallow-based filling is the perfect sweet contrast to the rich chocolate cakes — light, fluffy, and just the right amount of sweetness.
Let’s dive into making the filling and then assembling your whoopie pies into the classic sandwich treat everyone loves.
STEPS: Making the Marshmallow Creme Filling
Step 1: Beat the Butter Until Fluffy
Start by placing the softened unsalted butter into your mixing bowl. Using a hand or stand mixer, beat it on medium speed until it becomes light and fluffy. This usually takes about 2 to 3 minutes. This step is crucial for a smooth and creamy filling.
Step 2: Add Powdered Sugar Gradually
Slowly add the powdered sugar, about 1 ½ cups, to the butter while continuing to beat the mixture. Adding the sugar in batches helps prevent a mess and ensures everything blends smoothly without lumps. Continue beating until the mixture is smooth and well combined.
Step 3: Mix in Marshmallow Creme and Vanilla
Next, add the entire 7-ounce jar of marshmallow creme along with 1 teaspoon of vanilla extract. Beat the mixture on medium speed until it’s fully combined and fluffy. The filling should be light, creamy, and easy to spread.
STEPS: Assembling the Whoopie Pies
Now that your cakes are cooled and the filling is ready, it’s time for the fun part — putting it all together!
Step 1: Match Cookie Pairs
Lay out your chocolate cakes and pair them up based on size and shape. This will help your whoopie pies look neat and uniform once assembled.
Step 2: Add the Filling
Spoon about one tablespoon of the marshmallow filling onto the flat side of one cake. If you want a neater finish, you can use a piping bag or a plastic sandwich bag with the tip cut off.
Step 3: Sandwich and Press
Place the matching cake on top, flat side down, pressing gently to spread the filling evenly to the edges. Repeat with the remaining cakes and filling.
Tips and Variations to Customize Your Whoopie Pies
Whoopie pies are wonderfully versatile, so feel free to play around with these ideas to suit your taste or occasion.
Roll the Edges: After assembling, gently roll the edges of your pies in mini chocolate chips, sprinkles, or chopped nuts for extra texture and visual appeal.
Try Different Flavors in the Filling: Add a teaspoon of peanut butter for a rich twist or a drop of peppermint extract for a festive flavor.
Swap the Cake Base: While chocolate is classic, you can also experiment with vanilla, red velvet, or pumpkin spice cakes to change things up.
Use a Cookie Scoop: For consistent cookie sizes and easier pairing, use a cookie scoop to drop the batter onto the baking sheet.
Make Ahead: These whoopie pies store well in an airtight container for a day or two. Keep them at room temperature or refrigerate in warmer climates, and bring to room temp before serving.
Chocolate Whoopie Pies: FAQ and Final Thoughts
We’ve covered everything from baking the soft chocolate cakes to whipping up that fluffy marshmallow filling and assembling the perfect whoopie pies. But before you head off to bake your own batch, I want to address some of the questions I often hear from readers about this recipe. Hopefully, these answers will make your baking experience even smoother!
FAQ: Your Whoopie Pie Questions Answered
1. Can I substitute regular milk for buttermilk?
Yes, you can! If you don’t have buttermilk on hand, simply add 1 tablespoon of lemon juice or white vinegar to 1 cup of milk. Let it sit for 5 minutes until it thickens slightly, then use it as a buttermilk substitute.
2. Can I make these gluten-free?
Absolutely. Use a gluten-free all-purpose flour blend that includes xanthan gum for the best texture. Keep in mind that baking times may vary slightly, so keep an eye on the cakes as they bake.
3. How should I store leftover whoopie pies?
Store them in an airtight container at room temperature for up to 2 days. If you want to keep them longer, refrigerate for up to a week. Bring to room temperature before serving for the best texture and flavor.
4. Can I freeze whoopie pies?
Yes! Freeze the assembled whoopie pies individually on a baking sheet, then transfer them to a freezer-safe container or bag. Thaw at room temperature for about an hour before eating.
5. What’s the best way to soften butter quickly if I forgot to take it out ahead of time?
Cut the butter into small cubes and let it sit at room temperature for about 10-15 minutes. Alternatively, you can microwave it for 5-7 seconds at a time, but be careful not to melt it.
6. Can I use store-bought frosting instead of making the marshmallow filling?
You can, but the marshmallow creme filling gives these whoopie pies their signature texture and flavor. If using frosting, try a fluffy vanilla buttercream for a closer match.
7. Why did my cakes turn out flat or dense?
This usually happens if the baking soda is old or if you overmix the batter. Make sure your leavening agents are fresh and mix the batter just until combined.
Final Thoughts
Chocolate whoopie pies are such a joyful treat to make and share. They’re simple enough for a beginner but special enough to impress anyone who takes a bite. Whether you’re baking for a party, a holiday, or just because you’re craving something sweet, these whoopie pies are a guaranteed hit.
Don’t hesitate to experiment with the filling flavors or decorating ideas—this recipe is a wonderful starting point that invites your creativity. And remember, baking is as much about having fun as it is about the end result.
Print
Chocolate Whoopie Pies
- Author: David
Description
Soft, cake-like chocolate cookies sandwich a fluffy, sweet filling to create this nostalgic treat. Chocolate whoopie pies are a cross between a cookie and a mini cake, offering a perfect balance of rich chocolate and creamy vanilla flavor. They’re great for parties, bake sales, or as a fun dessert anytime.
Ingredients
For the chocolate cakes:
2 cups all-purpose flour
1/2 cup unsweetened cocoa powder
1 1/4 teaspoons baking soda
1/2 teaspoon salt
1 cup buttermilk
1 teaspoon vanilla extract
1/2 cup unsalted butter, softened
1 cup packed brown sugar
1 large egg
For the filling:
1/2 cup unsalted butter, softened
1 1/2 cups powdered sugar
1 jar (7 oz) marshmallow creme
1 teaspoon vanilla extract
Instructions
Preheat the oven to 350°F (175°C). Line two baking sheets with parchment paper.
In a bowl, whisk together flour, cocoa powder, baking soda, and salt. Set aside.
In another bowl, beat together the butter and brown sugar until creamy. Add the egg and vanilla, and mix until well combined.
Add the dry ingredients to the wet mixture alternately with the buttermilk, beginning and ending with the dry ingredients. Mix until the batter is smooth.
Drop heaping tablespoons of batter onto the prepared baking sheets, spacing them about 2 inches apart. Flatten slightly with the back of a spoon.
Bake for 10–12 minutes or until the tops spring back when lightly touched. Let them cool on the baking sheet for a few minutes before transferring to a wire rack to cool completely.
To make the filling, beat the butter until light and fluffy. Add the powdered sugar and beat until smooth. Add the marshmallow creme and vanilla extract, and mix until fully combined and fluffy.
Once the cookies are completely cool, spread the filling on the flat side of one cake and top with another to form a sandwich. Repeat with remaining cakes.
Notes
These can be made a day ahead and stored in an airtight container. For a twist, try rolling the edges in sprinkles or mini chocolate chips. You can also experiment with flavored fillings like peanut butter or mint for a creative variation.


")

")


")
