

There’s something magical about a dessert that feels fancy but is delightfully easy to make. This Cream Puff Cake is exactly that—a crowd-pleaser that looks like it came straight from a bakery but is simple enough for even beginner bakers to master. Imagine a light, airy pastry base, a creamy vanilla filling, and a dreamy whipped topping all drizzled with chocolate. This dessert is guaranteed to make any day feel like a celebration.
Let me walk you through how to create this masterpiece, step by step, so you can wow your family, friends, or even just yourself (no judgment here—dessert is self-care).
Why You’ll Love This Cream Puff Cake
First things first—why is this cake so special? It’s like taking all the best parts of cream puffs—the delicate pastry, the luscious cream, the decadent topping—and transforming them into an easy, sliceable dessert. It’s perfect for potlucks, birthdays, or even as a sweet ending to a family dinner.
And don’t let its elegance intimidate you; the recipe is straightforward, with ingredients you likely already have in your pantry and fridge. Plus, I’ll sprinkle in a few pro tips to ensure your cake comes out perfect every time.
Getting Started: Preheat and Prep
Before you dive into the fun part, preheat your oven to 450°F (232°C) and grease a 9×13-inch baking pan. This step is crucial to prevent sticking and ensure your cake comes out cleanly after baking.
Step 1: Create the Dough for the Base
The base of this cake is essentially a choux pastry, the same dough used for eclairs and cream puffs. It’s easier than it sounds—I promise!
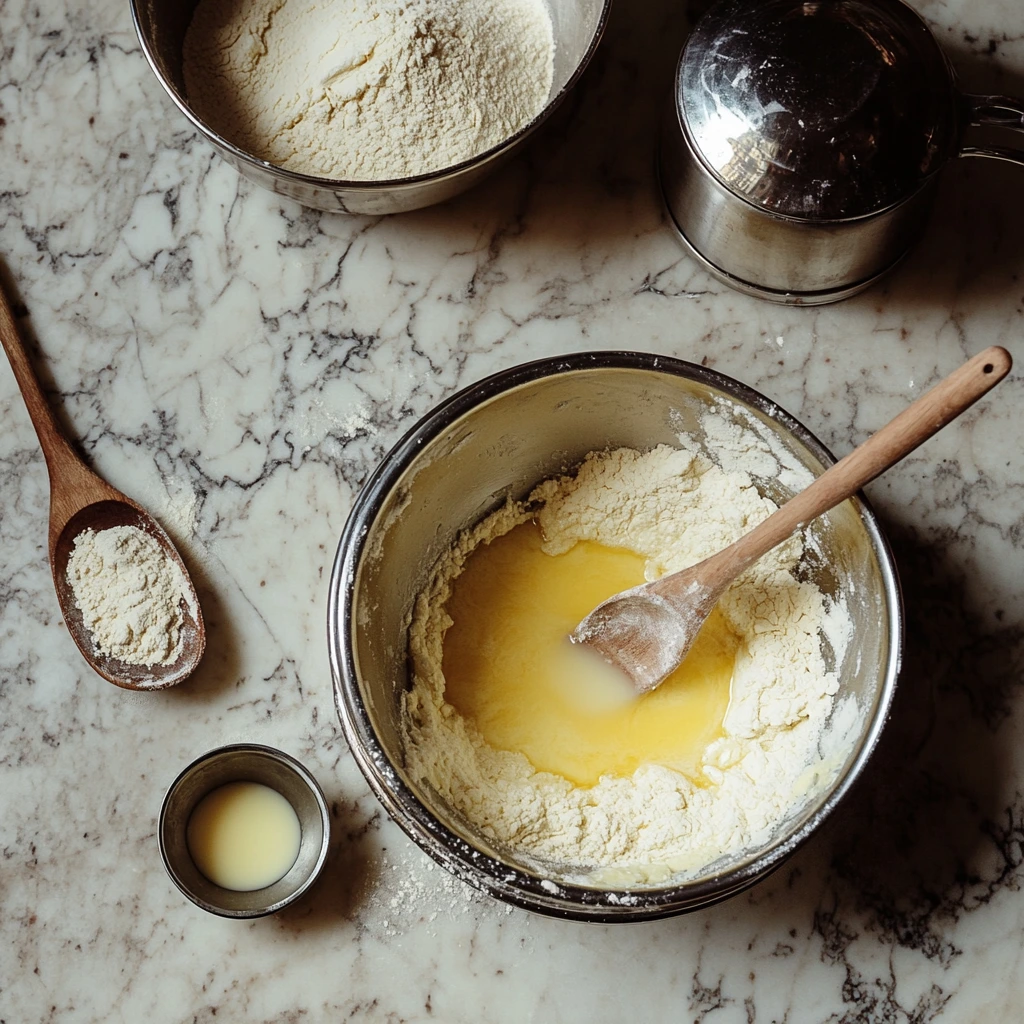
1️⃣ Combine the Ingredients: In a medium saucepan, bring 1 cup of water, ½ cup of butter, and ¼ teaspoon of salt to a boil. Once it’s bubbling, remove the pan from the heat.
2️⃣ Incorporate the Flour: Add 1 cup of all-purpose flour to the hot liquid and stir vigorously until the mixture forms a ball of dough. If you have an electric mixer, use it to beat the dough for about 2 minutes to ensure it’s well combined. Then, let it cool for 10 minutes.
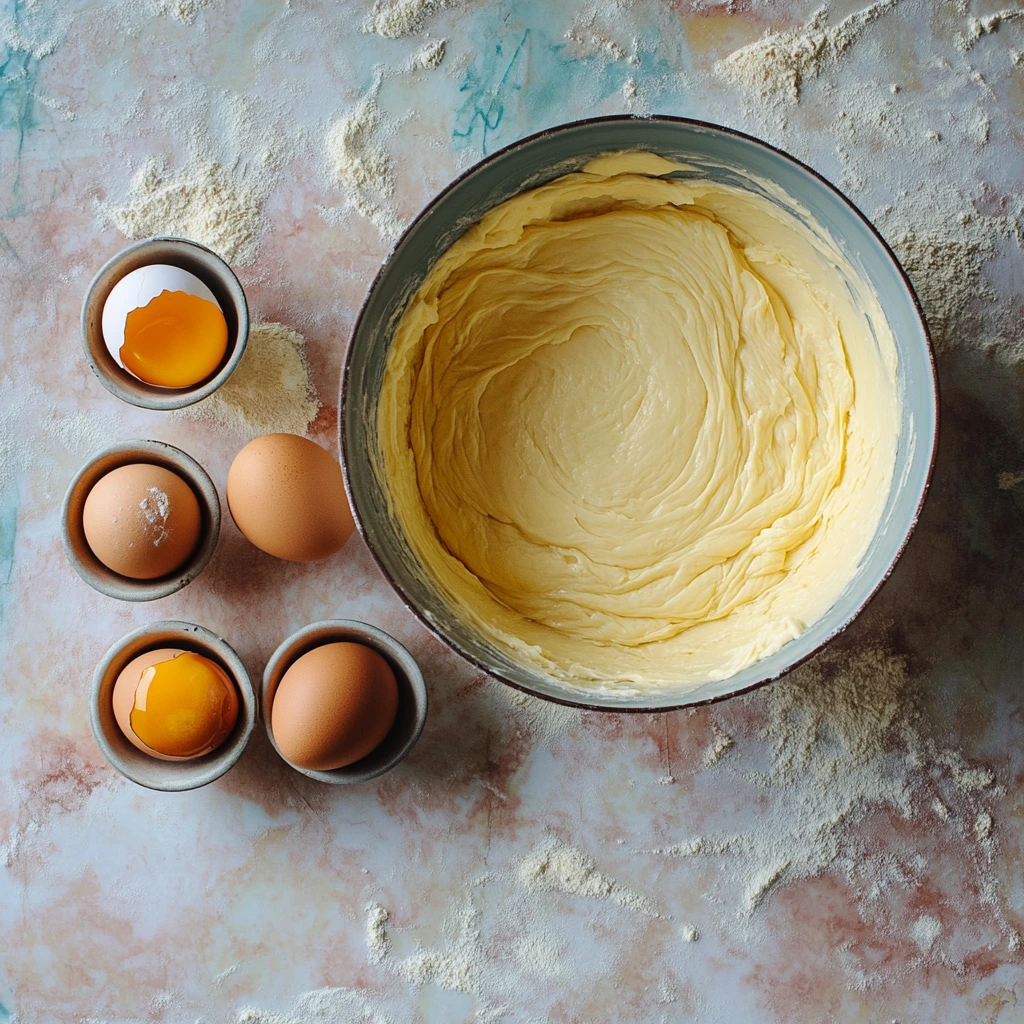
3️⃣ Add the Eggs: Once the dough has cooled slightly, beat in the eggs one at a time. This step is key—adding them one by one ensures the dough stays smooth and doesn’t curdle. By the end, your dough should be thick, silky, and glossy.
Step 2: Bake the Perfect Pastry Base
4️⃣ Spread the Dough: Transfer the dough to your greased baking pan, spreading it evenly across the bottom.
5️⃣ Bake It: Bake at 450°F for 15 minutes. The dough will puff up dramatically—don’t worry, that’s exactly what it’s supposed to do!
6️⃣ Release the Air: Once the time is up, carefully prick the puffed-up areas with a knife to release any trapped air. Then, reduce the oven temperature to 350°F (177°C) and bake for another 20 minutes until the base is golden and set.
7️⃣ Cool Completely: Allow the baked pastry to cool in the pan for at least 30–45 minutes. This step is essential; if the base is too warm when you add the cream filling, the filling will melt and become runny.

Pro Tip for a Light and Fluffy Base
Let the dough cool for the full 10 minutes before adding the eggs. If the dough is too hot, the eggs will cook instead of incorporating smoothly, resulting in a grainy texture. And don’t skip the step of reducing the oven temperature—this prevents the pastry from over-browning or drying out.
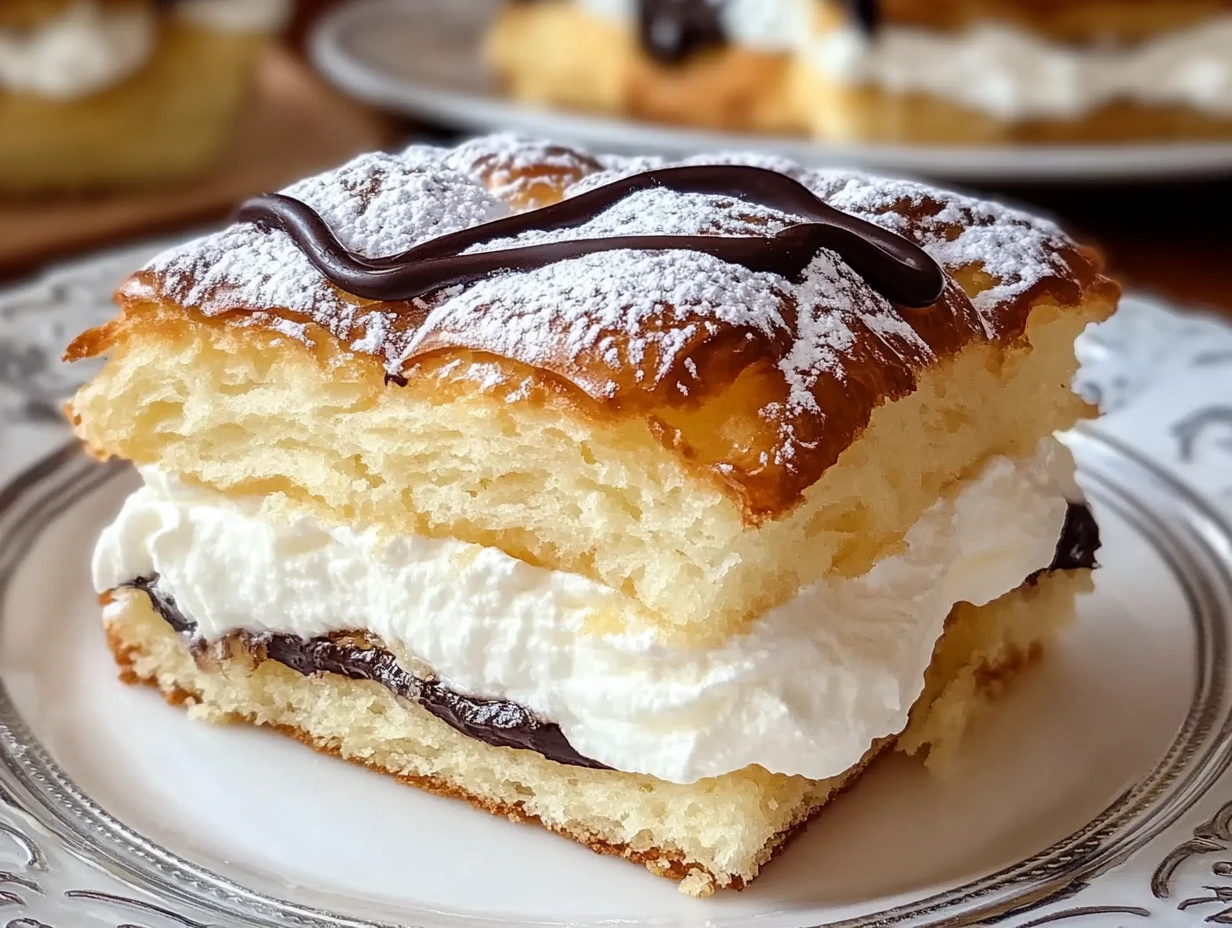
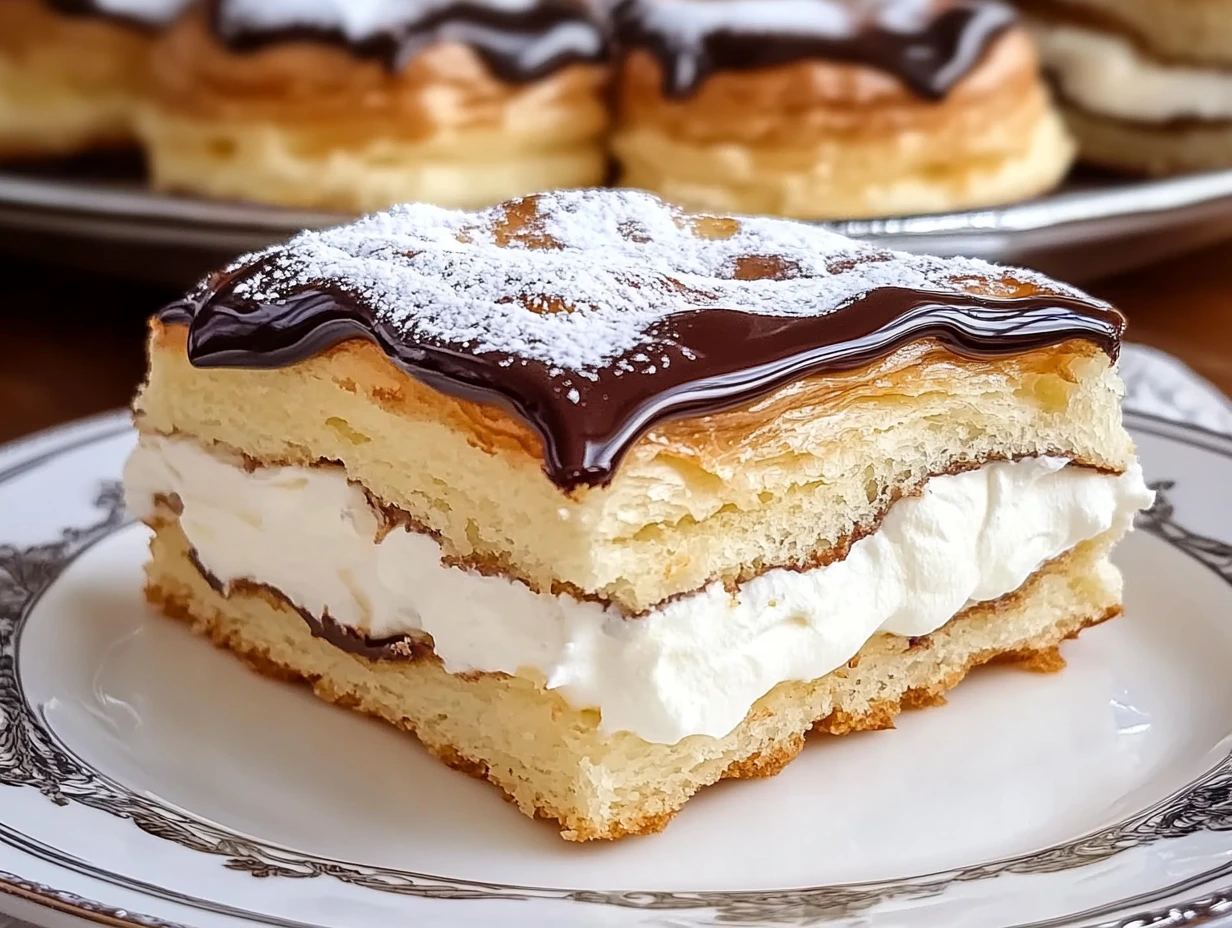
The Creamy Filling and Finishing Touches
Now that your light and golden pastry base is ready, it’s time to elevate this Cream Puff Cake with a luscious, silky cream filling. This layer is where all the magic happens—a creamy, slightly sweet vanilla pudding mixed with cream cheese. And the best part? It’s topped off with a dreamy whipped topping and a drizzle of chocolate for the ultimate indulgence.
Let’s dive into the next steps to bring your Cream Puff Cake to life!
Step 3: Make the Cream Filling
This step is all about creating a velvety filling that balances the airy pastry base. The key here is smoothness, so make sure to follow these instructions for a flawless result.
8️⃣ Beat the Cream Cheese: In a mixing bowl, beat 8 ounces of softened cream cheese until it’s completely smooth and lump-free. This is important because any lumps in the cream cheese will translate into a less-than-perfect texture in your filling.
9️⃣ Prepare the Pudding: In a separate bowl, whisk together 2 small boxes (3.9 oz each) of instant vanilla pudding mix and 3 ½ cups of milk. Whisk until the mixture thickens slightly and is smooth. This takes just a few minutes.
🔟 Combine the Mixtures: Gradually add the pudding mixture to the beaten cream cheese. Start slowly to ensure everything incorporates smoothly. Once combined, increase the speed to mix thoroughly until the filling is light, creamy, and free of any lumps.
Step 4: Assemble the Cake
Now that your filling is ready, it’s time to assemble this show-stopping dessert!
1️⃣1️⃣ Spread the Filling: Once the baked base is completely cool, evenly spread the cream filling over the top. Use a spatula to smooth it out and ensure the filling reaches every corner of the pan.

Step 5: Add the Topping
1️⃣2️⃣ Top with Whipped Topping: Gently spread 8 ounces of defrosted whipped topping over the cream filling. This layer adds a light, fluffy finish that perfectly complements the rich filling.
1️⃣3️⃣ Drizzle with Chocolate Syrup: Finally, drizzle ¼ cup of chocolate syrup decoratively over the whipped topping. You can get creative here—try zigzag lines, swirls, or even a marbleized effect by using a toothpick to create patterns.
Step 6: Chill the Cake
For the best results, the cake needs time to set. Refrigerate it for at least 1 hour before slicing and serving. This step allows the layers to meld together and ensures clean, neat slices when you’re ready to serve.
Pro Tips for Perfect Layers
- Softened Cream Cheese is Key: Make sure the cream cheese is fully softened before beating it. If it’s too cold, it won’t mix smoothly, leaving you with lumps in your filling. To speed up the softening process, cut the cream cheese into small cubes and let it sit at room temperature for 20–30 minutes.
- Patience Pays Off: Don’t rush the chilling step! The longer the cake sets, the better the flavors meld together. Overnight refrigeration is even better if you can wait.
Creative Variations to Try
Feeling adventurous? Here are some fun twists to make this dessert your own:
- Strawberry Cream Puff Cake: Add a layer of fresh, sliced strawberries between the cream filling and whipped topping.
- Peanut Butter-Chocolate Dream: Mix a few tablespoons of creamy peanut butter into the cream cheese before combining it with the pudding. Then, sprinkle chopped peanuts on top of the chocolate drizzle.
- Mocha Delight: Use instant chocolate pudding instead of vanilla and drizzle with coffee-flavored syrup for a mocha-inspired dessert.
FAQs and Serving the Cream Puff Cake Like a Pro
You’ve made it to the final stretch! By now, your Cream Puff Cake is chilling in the refrigerator, ready to transform into the dreamy dessert you envisioned. In this final part, I’ll address some common questions about the recipe, share a few serving tips, and wrap up with an encouraging note to get you excited to dig in.
FAQs About Cream Puff Cake
If you’ve got questions, you’re not alone! Here are the answers to some of the most common queries about making and serving this fabulous dessert.
1. Can I make Cream Puff Cake ahead of time?
Absolutely! This dessert is perfect for making ahead since it needs time to chill and set. Prepare it up to 24 hours in advance, and it will taste even better as the flavors meld together.
2. Can I use homemade whipped cream instead of store-bought whipped topping?
Yes! If you prefer the taste of fresh whipped cream, you can substitute it. Just whip 1 cup of heavy cream with 2–3 tablespoons of powdered sugar and 1 teaspoon of vanilla extract until stiff peaks form. Use it as you would the whipped topping.
3. What’s the best way to drizzle the chocolate syrup?
For an evenly spaced drizzle, pour the syrup into a small zip-top bag and snip off a tiny corner. Gently squeeze the bag to create thin, decorative lines or patterns across the top of the cake.
4. How should I store leftovers?
Store any leftovers in an airtight container in the refrigerator for up to 3 days. Keep in mind that the whipped topping may lose some of its fluffiness over time, but the cake will still taste delicious.
5. Can I freeze Cream Puff Cake?
Freezing is not recommended, as the pudding and whipped topping may separate upon thawing, altering the texture of the dessert. It’s best enjoyed fresh.
6. Can I use different flavors of pudding?
Absolutely! Feel free to swap the vanilla pudding for chocolate, butterscotch, or even banana pudding to change up the flavor profile.
7. What’s the secret to cutting clean slices?
Use a sharp knife dipped in warm water to slice the cake. Wipe the knife clean between cuts for neat, professional-looking pieces.
Tips for Serving Cream Puff Cake
- Presentation Matters: Serve each slice with a drizzle of extra chocolate syrup on the plate for a professional touch. A small dollop of whipped cream or a sprinkle of cocoa powder can also make it extra fancy.
- Pairings: This dessert pairs beautifully with a cup of coffee, a glass of milk, or even a dessert wine like Moscato.
- Perfect for Gatherings: If you’re serving this at a party, cut the cake into smaller squares so guests can enjoy it as a handheld treat.
Conclusion: Your New Go-To Dessert
Congratulations—you’ve just made a dessert that’s as elegant as it is delicious! Cream Puff Cake is a versatile recipe that’s perfect for any occasion, whether you’re hosting a dinner party, bringing a dish to a potluck, or just treating yourself.
Print
Cream Puff Cake
- Author: David
- Total Time: 45 minutes
Description
This easy-to-make Cream Puff Cake is a decadent dessert that combines the light, airy texture of cream puffs with a rich, creamy filling, all topped with whipped topping and a drizzle of chocolate syrup. It’s a show-stopping dessert that’s perfect for any occasion!
Ingredients
For the Cake Base:
- 1 cup water
- ¼ teaspoon salt
- ½ cup butter
- 1 cup all-purpose flour
- 4 eggs
For the Cream Filling:
- 2 (3.9 oz) boxes instant vanilla pudding (small packages)
- 8 ounces cream cheese, softened
- 3 ½ cups milk
For the Topping:
- 8 ounces whipped topping (defrosted)
- ¼ cup chocolate syrup
Instructions
1️⃣ Preheat the Oven: Preheat your oven to 450°F (232°C) and grease a 9×13-inch baking pan.
2️⃣ Make the Dough: In a medium saucepan, combine water, butter, and salt. Bring the mixture to a boil. Remove from heat and pour into a mixing bowl.
3️⃣ Incorporate the Flour: Add the flour to the hot mixture and beat by hand until it forms a ball, or use an electric mixer to beat until very well combined (about 2 minutes). Let the dough cool for 10 minutes.
4️⃣ Add the Eggs: Beat the eggs into the cooled dough one at a time, mixing thoroughly after each addition, until the dough is thick and smooth. The surface should have a satin sheen.
5️⃣ Prepare the Pan: Transfer the dough into the greased baking pan. Press it out evenly to cover the bottom of the pan.
6️⃣ Bake the Base: Bake for 15 minutes at 450°F. Then, prick the puffed-up areas in the center about 15 times with a knife to release the air. Reduce the oven heat to 350°F (177°C) and bake for an additional 20 minutes.
7️⃣ Cool Completely: Allow the pan and the baked base to cool for 30-45 minutes before adding the cream filling.
Prepare the Filling:
8️⃣ Mix the Cream Cheese: In a mixing bowl, beat the softened cream cheese until smooth.
9️⃣ Combine Pudding and Milk: In a separate bowl, whisk together the instant vanilla pudding mix and milk until smooth. Gradually add the pudding mixture to the cream cheese, mixing slowly at first to combine, then beating well until smooth and creamy.
🔟 Assemble the Cake: Pour the cream filling over the cooled baked base, spreading it evenly.
Add the Topping:
1️⃣1️⃣ Top with Whipped Topping: Spread the whipped topping evenly over the cream filling.
1️⃣2️⃣ Drizzle with Chocolate Syrup: Drizzle the chocolate syrup decoratively over the whipped topping.
1️⃣3️⃣ Chill and Serve: Store the cake in the refrigerator for at least 1 hour to set before slicing and serving.
Notes
- Variations: Use chocolate pudding or a mix of chocolate and vanilla for a different flavor.
- Make Ahead: This cake can be made a day in advance and stored in the refrigerator until ready to serve.
- Storage: Keep leftovers covered in the refrigerator for up to 3 days.
- Prep Time: 25 minutes
- Cook Time: 35 minutes
Nutrition
- Serving Size: 12-16


")

")


")
