

There’s something so comforting about takeout-style Chinese food—especially when it involves crispy chicken coated in a sticky, savory sauce. But what if I told you that you could make Crispy Sesame Chicken right at home, and it might even outshine your favorite takeout spot?
This homemade version is everything you love: golden-brown crispy chicken bites, that sweet and savory sesame glaze, and just the right touch of garlic and honey. Plus, you’ll be using everyday pantry staples, and you get to skip the mystery ingredients. Win-win, right?
I’ve made this dish more times than I can count. It’s one of those recipes that always earns a “wow” at the dinner table—even from picky eaters. Whether it’s a cozy weeknight dinner or you’re trying to impress guests with your at-home cooking skills, this recipe is a total crowd-pleaser.
Let’s dive into the magic of how to make crispy sesame chicken from scratch.
Why You’ll Love This Crispy Sesame Chicken Recipe
Crispy, golden chicken: Lightly battered and fried to perfection.
Sticky sesame glaze: Balanced with salty soy sauce, sweet honey, and a hint of garlic.
Fast and easy: 45 minutes from start to finish.
Customizable: Serve it with rice, veggies, noodles—you name it.
This recipe hits all the marks for flavor and texture, and the best part is, you have full control over every ingredient. No greasy takeout containers required!
Ingredients You’ll Need
Let’s break down the key components:
For the Chicken:
1 ½ pounds boneless, skinless chicken breasts or thighs (cut into bite-sized pieces)
½ cup cornstarch
½ cup all-purpose flour
2 eggs
½ teaspoon salt
½ teaspoon black pepper
Oil for frying (vegetable or canola oil work great)
For the Sesame Sauce:
¼ cup soy sauce
¼ cup honey
2 tablespoons ketchup
1 tablespoon rice vinegar
1 tablespoon toasted sesame oil
1 tablespoon brown sugar
2 garlic cloves, minced
1 tablespoon cornstarch + 2 tablespoons water (slurry for thickening)
1 tablespoon sesame seeds
2 green onions, sliced (optional, for garnish)
STEP 1: Prep and Season the Chicken
In a large bowl, start by seasoning your chicken pieces with the salt and black pepper. This may seem like a small step, but it’s the foundation of flavor for your crispy bites.
Crack the eggs into a shallow bowl and beat them. In a second shallow bowl, combine the flour and cornstarch. This combo gives you that perfect balance between light crunch and substantial coating.
One by one, dip each piece of chicken into the egg wash, then dredge in the flour-cornstarch mixture. Press gently so that the coating sticks well. Place each coated piece on a plate while you finish the rest.
Tip: If you want even crispier results, let the coated chicken sit for 10 minutes before frying. This gives the coating a chance to really adhere.

STEP 2: Fry the Chicken Until Crispy
Pour about 2 inches of oil into a deep pan or heavy skillet and heat it over medium-high heat. You’re aiming for 350°F—if you don’t have a thermometer, just drop a small piece of breading in. If it sizzles right away, you’re good to go.
Fry the chicken in batches, giving them enough space to get crisp (don’t overcrowd the pan). Each batch should take about 4–5 minutes, turning the pieces as needed so they get golden all over. Once done, move them to a paper towel-lined plate to drain excess oil.
Pro Tip: Dark meat like chicken thighs will give you a juicier bite, but breasts work great too if that’s what you have on hand.
Crispy Sesame Chicken (Better Than Takeout!)
Now that our chicken is perfectly golden and crispy, it’s time to move on to the heart of this dish: the sesame sauce. This is what brings everything together—the sweet, the savory, the sticky glaze that clings to every crispy bite of chicken. And trust me, it’s easier than you think.
I’ve tried plenty of versions over the years, but this sauce hits just the right balance. It’s not overly sweet, not too salty, and has a mellow kick of garlic that makes it completely crave-worthy. It’s also thickened just enough to coat the chicken without making it soggy.
Let’s get into the next steps and some tips to make sure your sesame chicken turns out perfect every time.
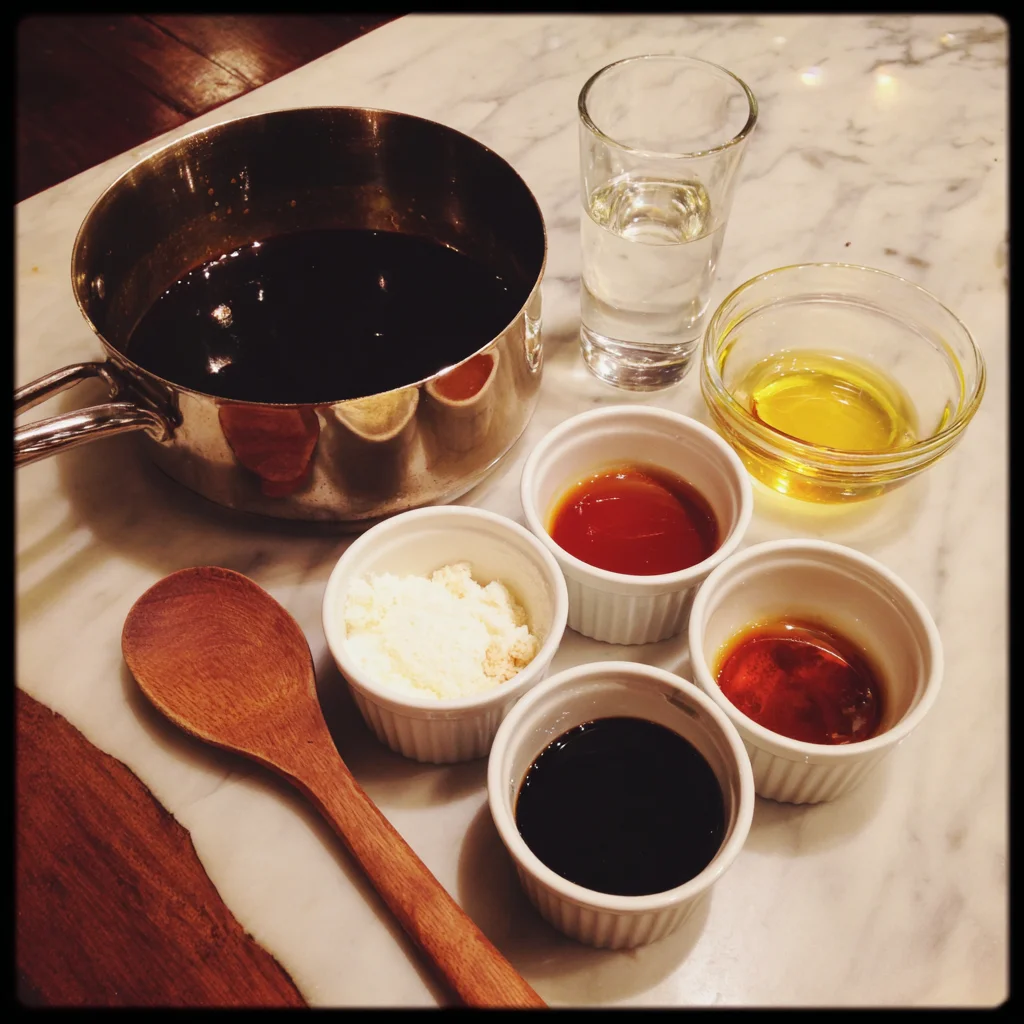
STEP 3: Make the Sesame Sauce
While your chicken is frying or resting, it’s the perfect time to whip up the sauce. Grab a small saucepan and set it over medium heat.
Add the following ingredients:
¼ cup soy sauce
¼ cup honey
2 tablespoons ketchup
1 tablespoon rice vinegar
1 tablespoon toasted sesame oil
1 tablespoon brown sugar
2 cloves of garlic, minced
Stir everything together and bring the sauce to a gentle simmer. The honey and brown sugar will start to dissolve, and the garlic will infuse the sauce with flavor. It should smell amazing at this point.
Once it’s simmering, stir in your cornstarch slurry (that’s 1 tablespoon of cornstarch mixed with 2 tablespoons of water). Keep stirring until the sauce thickens and turns glossy—this should only take 1 to 2 minutes. Once thickened, remove it from the heat.
Tip: Toasted sesame oil has a strong flavor, so stick to the measured amount—it adds that signature nutty depth without overpowering the sauce.
STEP 4: Toss the Chicken in the Sauce
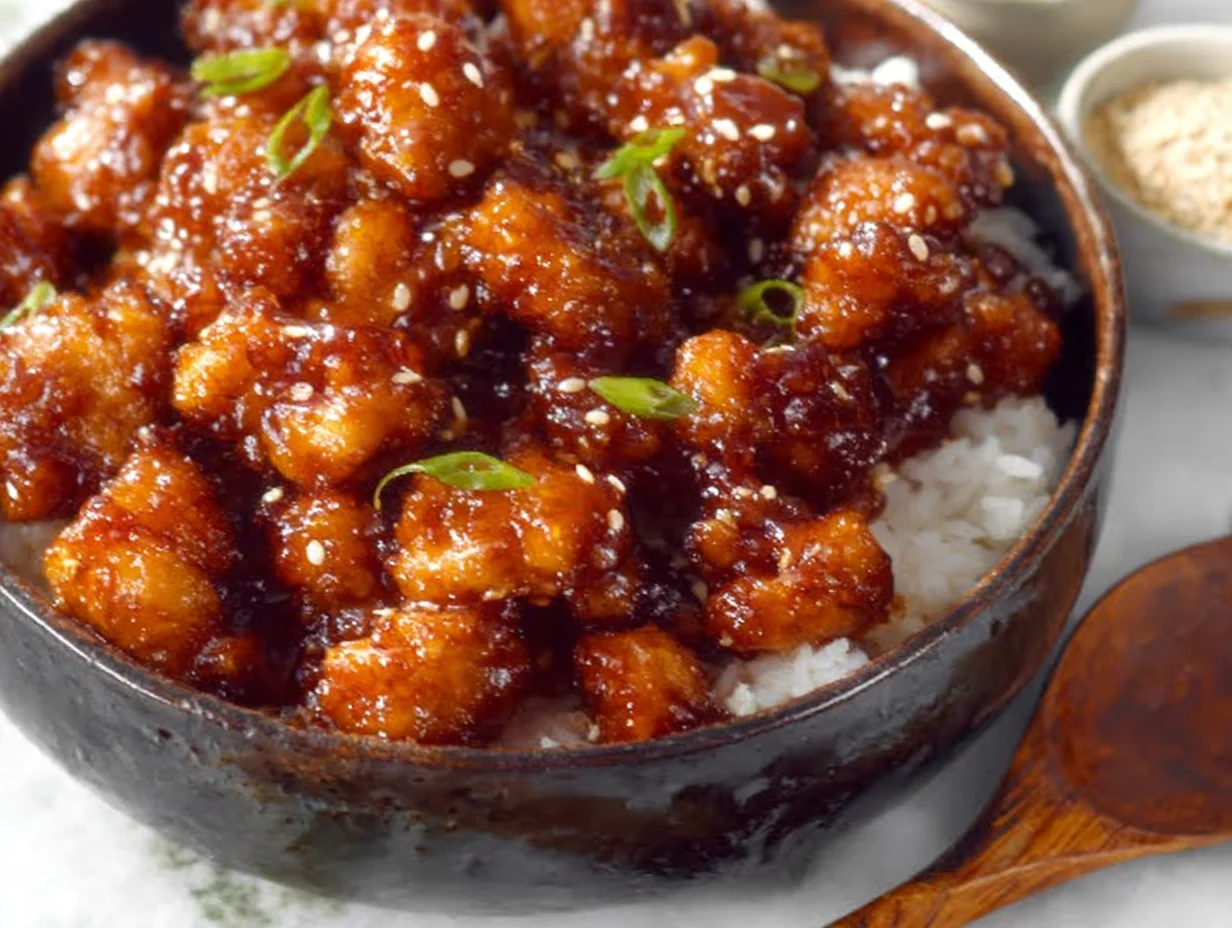
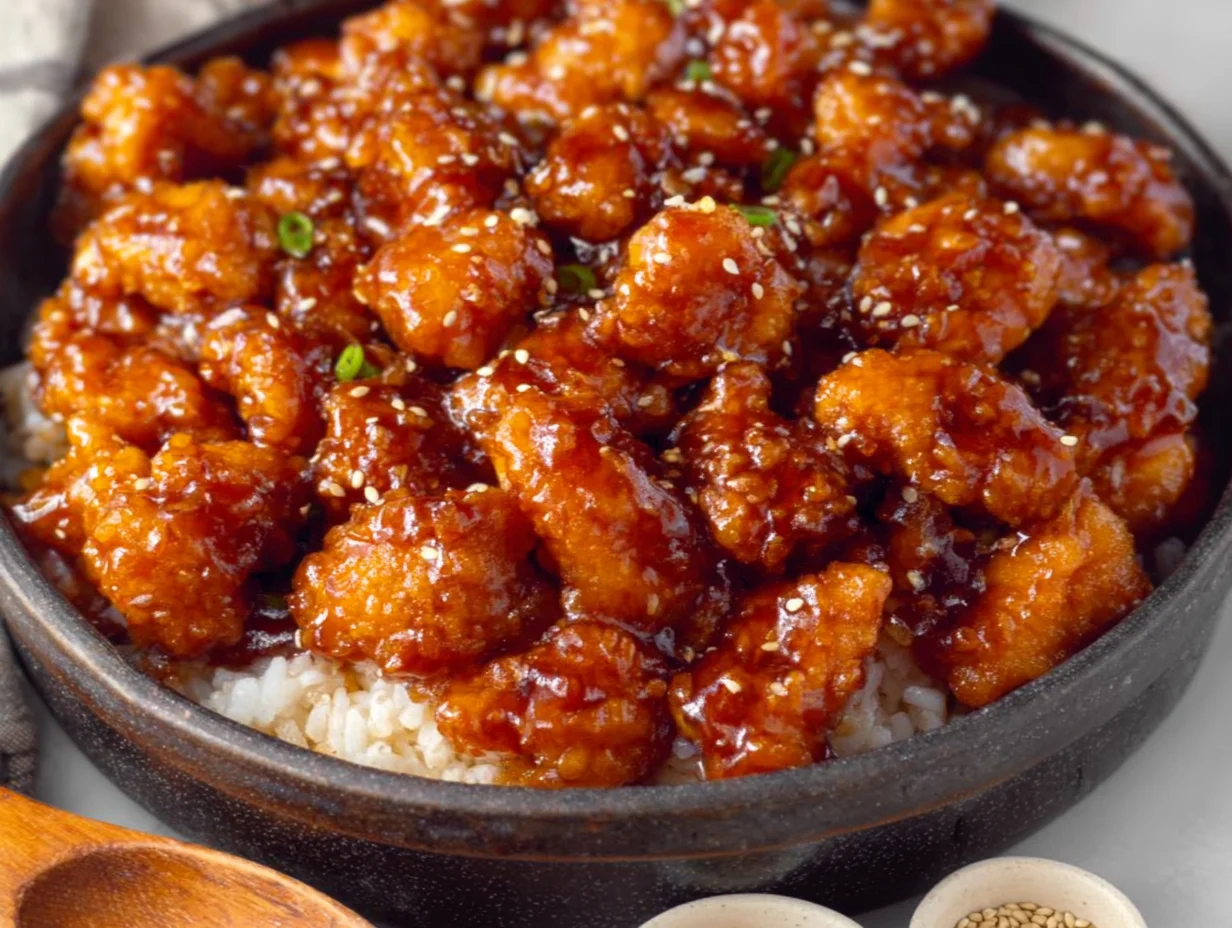
Now comes the fun part. Take your crispy chicken pieces and place them in a large mixing bowl. Pour the warm sesame sauce over the top and gently toss everything together until all the chicken is evenly coated.
You’ll see the sauce cling to every little crevice of the crispy coating, and it’s honestly hard not to sneak a bite at this stage. The sauce should be thick enough to coat without dripping off—if it’s too thin, you can simmer it a little longer next time or add a touch more cornstarch slurry.
Sprinkle the coated chicken with sesame seeds and sliced green onions if you’re using them. Not only do they make the dish look restaurant-ready, but they add a little extra texture and freshness, too.
Serving Suggestions
This crispy sesame chicken is so versatile. Here are a few of my favorite ways to serve it:
Steamed white rice – It soaks up all that delicious sauce.
Fried rice – For a more indulgent pairing, especially if you have leftover rice.
Stir-fried veggies – Broccoli, snow peas, or bell peppers all work great.
Noodles – Toss some lo mein or rice noodles with garlic and sesame oil for a fun twist.
If you’re cooking for kids, you can even serve this with plain rice and steamed broccoli for a no-fuss meal that still feels special.
Make-Ahead and Storage Tips
Want to save time on a busy weeknight? You can totally prep parts of this recipe ahead of time:
Make the sauce in advance – Store it in the fridge for up to 3 days. Just reheat gently on the stove or microwave before tossing with the chicken.
Prep the chicken – Cut and season your chicken, and even coat it ahead of time. Just be sure to fry it fresh so you don’t lose that crispy magic.
Leftovers? They’re still tasty, though the chicken won’t stay as crispy. Store them in an airtight container in the fridge for up to 3 days. Reheat in a skillet or in the oven at 350°F to revive some of that texture.
Pro Tip: Avoid microwaving if you can—it tends to soften the coating and make the sauce watery.
Crispy Sesame Chicken (Better Than Takeout!)
You’re almost at the finish line! By now, you’ve got golden, crispy chicken coated in a sticky-sweet sesame sauce that smells like it came straight out of your favorite takeout box. This homemade crispy sesame chicken really is something special—and once you see how easy it is, you might just retire your delivery app for good.
Before we wrap things up, let’s tackle some of the most commonly asked questions about this recipe. Whether it’s your first time making it or you’re just looking to tweak a few things, these FAQs will help guide you to sesame chicken success.
FAQ: Your Crispy Sesame Chicken Questions Answered
1. Can I bake the chicken instead of frying it?
Yes, you can! While frying gives the crispiest results, baking is a great option for a lighter version. Coat your chicken pieces as instructed, then place them on a greased wire rack over a baking sheet. Spray lightly with cooking spray and bake at 425°F for about 20–25 minutes, flipping halfway through.
2. What’s the best oil for frying the chicken?
Neutral oils like vegetable, canola, or peanut oil are best for frying. They have a high smoke point and won’t affect the flavor of the chicken.
3. Can I use chicken thighs instead of breasts?
Absolutely. Chicken thighs are actually preferred by many because they stay juicier and more flavorful during frying. Just be sure to trim off any excess fat and cut into uniform pieces for even cooking.
4. How do I keep the chicken crispy after tossing it in the sauce?
The key is to toss the chicken in the sauce right before serving. If it sits too long, the coating will absorb the sauce and soften. Also, make sure the sauce is thickened properly so it clings to the chicken without soaking it.
5. Is this recipe gluten-free?
Not as written. However, you can easily make it gluten-free by using a gluten-free flour blend in place of the all-purpose flour and making sure your soy sauce is labeled gluten-free (like tamari).
6. Can I double the recipe for a crowd?
Yes! This recipe doubles beautifully. Just make sure to fry the chicken in batches so it stays crisp, and you may want to make the sauce in a larger saucepan to accommodate the extra volume.
7. Can I make the sauce less sweet?
You can adjust the sweetness to your taste by reducing the honey or brown sugar slightly. Just be careful not to cut too much, as the sweetness helps balance the saltiness of the soy sauce.
Final Thoughts: Why You’ll Keep Coming Back to This Recipe
There’s a reason why this crispy sesame chicken keeps making its way back into my weeknight dinner rotation. It’s easy, incredibly satisfying, and tastes like you picked it up from a restaurant—but even better, because it’s homemade.
The crisp coating, the rich sesame glaze, and the fact that you probably already have most of these ingredients in your kitchen—it all adds up to one of the most reliable, family-friendly meals out there.
And the best part? It’s customizable. Serve it over rice, toss it in a noodle bowl, or pile it up next to stir-fried veggies. It’s flexible, flavorful, and guaranteed to please even the pickiest eaters at your table.
So go ahead, give this one a try. And if you do, I’d love to hear how it turns out for you! Did you make any tweaks? Serve it with something fun on the side? Drop a comment and let me know—I’m always looking for new ideas to try next time.
Print
Crispy Sesame Chicken
- Author: David
Description
Crispy Sesame Chicken is a takeout favorite made at home with golden, crunchy pieces of chicken coated in a sweet and savory sesame sauce. The chicken is lightly battered and fried until crisp, then tossed in a glossy glaze made from soy sauce, garlic, honey, and toasted sesame oil. It’s the perfect balance of crunchy, sticky, and flavorful, served best over steamed rice or with stir-fried vegetables. This version brings restaurant-style flavor with everyday pantry ingredients.
Ingredients
For the chicken
1 ½ pounds boneless, skinless chicken breasts or thighs, cut into bite-sized pieces
½ cup cornstarch
½ cup all-purpose flour
2 eggs
½ teaspoon salt
½ teaspoon black pepper
Oil for frying
For the sesame sauce
¼ cup soy sauce
¼ cup honey
2 tablespoons ketchup
1 tablespoon rice vinegar
1 tablespoon toasted sesame oil
1 tablespoon brown sugar
2 garlic cloves, minced
1 tablespoon cornstarch mixed with 2 tablespoons water (slurry)
1 tablespoon sesame seeds
2 green onions, sliced (optional for garnish)
Instructions
1 In a large bowl, season the chicken pieces with salt and pepper. In one shallow bowl, beat the eggs. In another, mix the flour and cornstarch together.
2 Dip each piece of chicken into the egg, then dredge in the flour-cornstarch mixture, pressing lightly to coat well. Set aside on a plate while you finish the rest.
3 Heat about two inches of oil in a deep pan or skillet over medium-high heat. Once the oil is hot (around 350°F), fry the chicken in batches until golden brown and cooked through, about 4 to 5 minutes per batch. Transfer to a paper towel-lined plate to drain.
4 While the chicken is frying, make the sauce. In a saucepan over medium heat, combine soy sauce, honey, ketchup, rice vinegar, toasted sesame oil, brown sugar, and minced garlic. Bring to a simmer.
5 Stir in the cornstarch slurry and cook, stirring constantly, until the sauce thickens and becomes glossy, about 1 to 2 minutes. Remove from heat.
6 In a large bowl, toss the crispy chicken pieces with the sauce until evenly coated. Sprinkle with sesame seeds and green onions if using.
Notes
For extra crispiness, let the coated chicken sit for 10 minutes before frying to help the breading adhere better. Thighs offer a juicier result, but breasts work well too. The sauce can be made in advance and stored in the refrigerator for up to three days. Reheat gently before tossing with fresh-fried chicken. Serve with white rice, fried rice, or steamed broccoli for a complete meal.


")

")


")
