


When it comes to easy, elegant dishes that feel a little fancy but don’t take a lot of time, these Blue Cheese Stuffed Pears are one of my absolute favorites. They check all the boxes—visually stunning, flavor-packed, and versatile enough to be served as an appetizer, salad topper, or even a light dessert.
I first made these on a whim for a small dinner party when I wanted something that felt upscale but didn’t require me to spend hours in the kitchen. Let’s just say they were a hit. There’s something about the combination of creamy blue cheese, the natural sweetness of ripe pears, a drizzle of honey, and the crunch of toasted nuts that makes every bite feel thoughtful and elevated. And the best part? You only need about 30 minutes from start to finish!
These stuffed pears are also surprisingly flexible. Don’t love blue cheese? Swap it for goat cheese. Want more crunch? Toast your walnuts or pecans first. Looking to really wow your guests? Serve them on a bed of peppery arugula with a drizzle of balsamic glaze. There are so many ways to make this your own while keeping the core of the recipe intact.
Let’s dive into how to make this beautifully balanced dish that’s as easy as it is elegant.

Ingredients You’ll Need
2 ripe but firm pears
½ cup crumbled blue cheese
2 tablespoons chopped walnuts or pecans
1 teaspoon fresh thyme leaves
1 tablespoon honey
Black pepper to taste
Olive oil (for brushing)
This list is short and sweet—which is exactly how I like my appetizers. The key is using quality ingredients, especially since there are only a few. Choose pears that are ripe but not too soft; they should hold their shape during baking. And when it comes to blue cheese, pick a variety you enjoy. Some are stronger than others, so go with your taste preference.
STEP-BY-STEP INSTRUCTIONS
Step 1: Preheat the Oven and Prep the Baking Dish
Start by preheating your oven to 375°F (190°C). Line a baking dish with parchment paper or lightly grease it with olive oil. You want just enough space to fit all the pear halves without overcrowding.
Step 2: Halve and Core the Pears
Take your ripe-but-firm pears and slice them in half lengthwise. Using a spoon or melon baller, gently scoop out the core and seeds from each half. You’re looking to create a small hollow that will hold the blue cheese filling—nothing too deep, just enough to nestle the goodness inside.

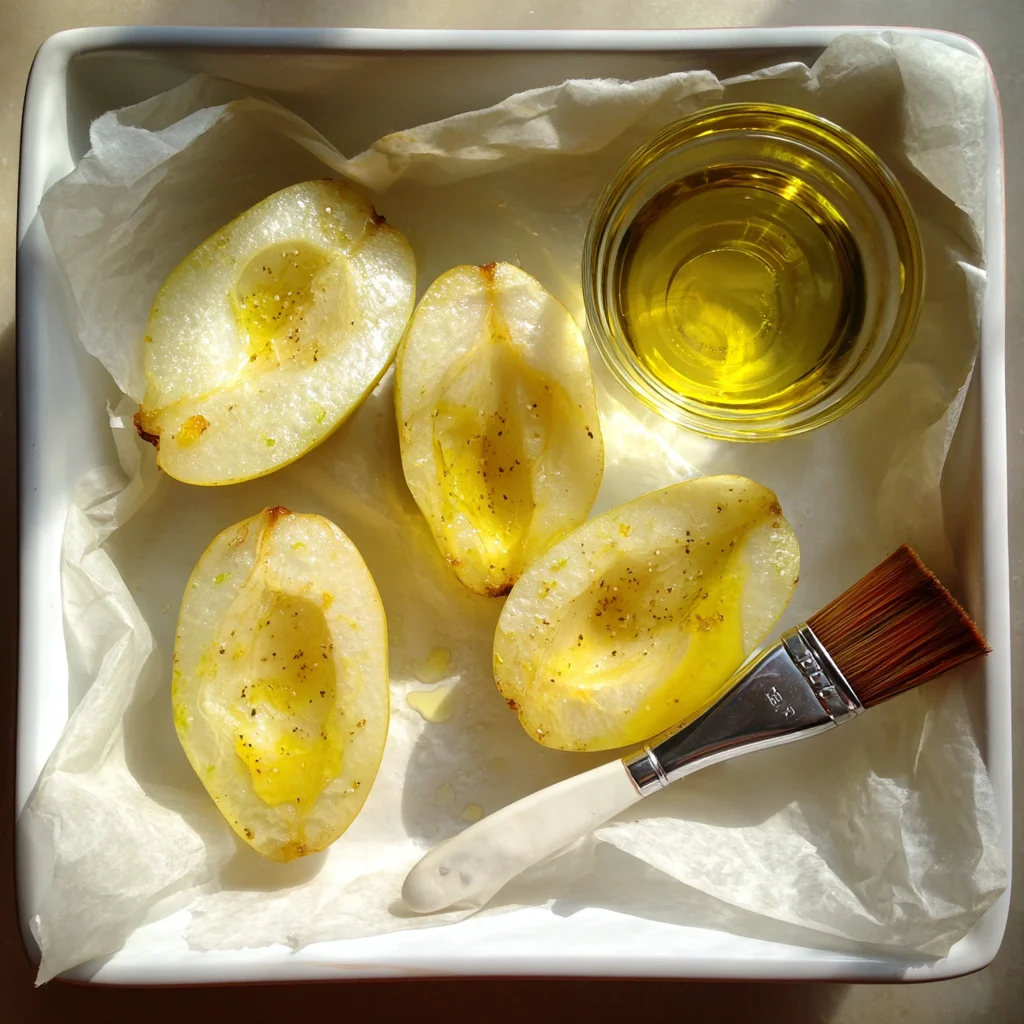
Step 3: Brush Pears with Olive Oil
Lightly brush the cut side of each pear half with olive oil. This helps them caramelize slightly while baking and keeps the flesh from drying out. Place the pears cut-side up in your prepared baking dish.
Elegant Blue Cheese Stuffed Pears: The Perfect Sweet & Savory Appetizer
Welcome back! If you’re just joining us, we’ve already prepped and halved our ripe pears, brushed them with olive oil, and nestled them into a baking dish. The stage is set—now it’s time to fill these beauties and bring out all the flavor with just a few more steps.
This is where the dish really starts to shine. The creaminess of the blue cheese pairs so beautifully with the natural sweetness of the baked pears, and the nuts and thyme add just enough earthy crunch and aroma to make each bite feel complex, without being heavy.
Step 4: Mix the Filling
In a small bowl, combine ½ cup crumbled blue cheese with 2 tablespoons of chopped walnuts or pecans and 1 teaspoon of fresh thyme leaves. Give it a quick stir so everything is evenly distributed. If you’re someone who likes a little extra nuttiness, you can toast the nuts in a dry skillet over medium heat for 2-3 minutes beforehand—it brings out a deeper flavor that really complements the cheese.
Step 5: Fill the Pears
Using a small spoon, gently press the cheese and nut mixture into the hollowed-out centers of the pears. Don’t overfill—they’ll look best with just enough of the mixture mounded slightly above the edge of the fruit. You want the filling to stay nestled as it softens in the oven.
Step 6: Bake the Pears
Place the stuffed pears into the preheated 375°F (190°C) oven and bake for 15 to 18 minutes. What you’re looking for here is a slight tenderizing of the pear flesh—the goal isn’t to roast them until they fall apart, but just until they’re soft enough to bite easily while still holding their shape.
The cheese will start to melt slightly but won’t completely lose its form, which is perfect. You want that contrast in textures: soft, warm fruit and creamy, tangy cheese.
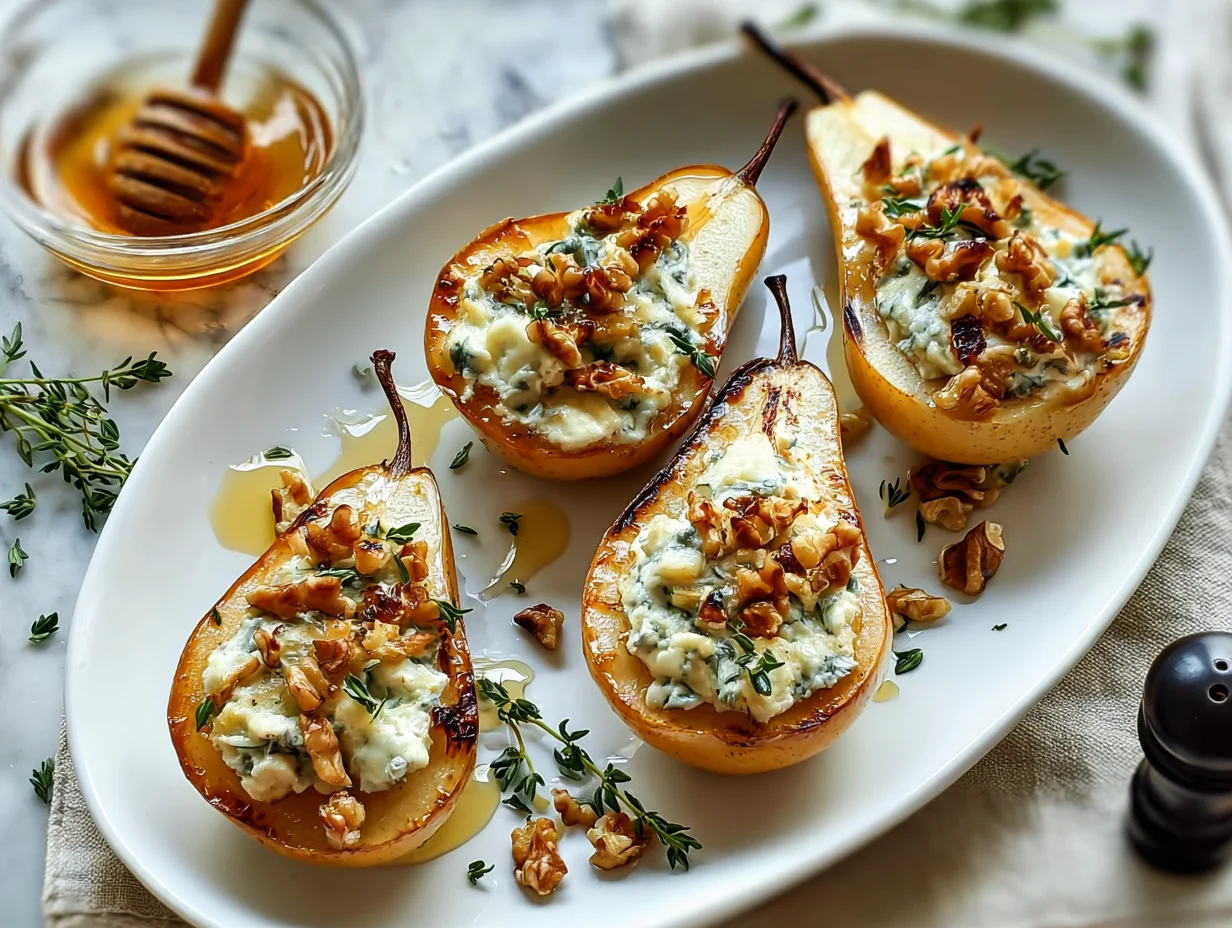
Step 7: Finish with Honey and Black Pepper
Once the pears are out of the oven, give them a few minutes to cool slightly—about 2 to 3 minutes is perfect. Then drizzle each one with a small amount of honey (about a tablespoon total across all four servings). A light touch is all you need here; the honey enhances the sweetness and gives that irresistible glossy finish.
Finally, add a sprinkle of freshly cracked black pepper over the top to cut through the richness and balance out the sweet notes.
Tips & Variations for the Best Blue Cheese Stuffed Pears
1. Choose the Right Pears
Bosc or Anjou pears work especially well in this recipe. They hold their shape during baking and offer just the right amount of sweetness without becoming mushy. Be sure they’re ripe, but not soft—think “firm with a little give.”
2. Cheese Swaps for Milder Flavor
Not everyone’s a fan of blue cheese, and that’s totally fine! Try using goat cheese for a milder, tangier option, or even ricotta for a softer, creamy bite. You could also do a mix—half blue cheese, half goat cheese—for something in between.
3. Make It a Salad Course
If you want to turn this into more of a plated appetizer or salad, serve the warm stuffed pears over a bed of arugula or spring greens, then drizzle with a little balsamic glaze or vinaigrette. The greens help offset the richness, and the presentation is absolutely stunning.
4. Elevate It for Dessert
These pears also work as a light dessert course—especially after a heavier meal. Try swapping the thyme for fresh rosemary and using candied pecans instead of raw ones. A touch more honey and maybe even a few crumbles of shortbread or graham cracker on top can tip it gently into dessert territory.
5. Add a Wine Pairing
If you’re entertaining, this dish pairs beautifully with a glass of chilled Prosecco or a sweet dessert wine like Sauternes or Moscato. The bubbles and acidity cut through the creamy cheese and the sweetness of the pears in the most delicious way.
Elegant Blue Cheese Stuffed Pears: FAQs and Final Thoughts
So far, we’ve walked through the simple steps of creating this deliciously refined Blue Cheese Stuffed Pears recipe. From selecting the right pears to adding that final drizzle of honey, every step brings a layer of flavor that feels both comforting and elevated.
Now, before we wrap things up, let’s go over a few frequently asked questions. These come up often from readers who want to try this dish but have questions about substitutions, serving ideas, or make-ahead tips. After that, I’ll share some final thoughts on why this is one of those recipes you’ll keep coming back to again and again.
FREQUENTLY ASKED QUESTIONS
1. Can I make these ahead of time?
Yes! You can prep the pears and stuff them with the cheese mixture a few hours ahead of time. Just cover and refrigerate until you’re ready to bake. Let them sit at room temperature for about 10–15 minutes before putting them in the oven to ensure even baking.
2. What’s the best pear variety for this recipe?
Bosc and Anjou pears are ideal because they’re firm and hold their shape during baking. Bartlett pears are softer and can become mushy, so if you use them, keep a close eye on the baking time.
3. Can I use a different type of cheese?
Absolutely. Goat cheese, ricotta, or even brie work great as substitutes if you’re not a fan of blue cheese. Just make sure it’s a soft cheese that melts well and complements the sweetness of the pear.
4. Are these served hot or cold?
They’re best served warm or at room temperature. Right out of the oven, the cheese is creamy and the pears are tender. Letting them cool slightly helps the flavors settle and makes for a more enjoyable bite.
5. What nuts work best here?
Chopped walnuts and pecans are both great choices. Toasting them adds a richer flavor and a little extra crunch. If you’re feeling adventurous, candied nuts can add a sweet-salty twist.
6. Is there a way to make this dish nut-free?
Yes! If you need to skip the nuts due to allergies or preference, simply leave them out. You could try using sunflower seeds or toasted pumpkin seeds (pepitas) for some crunch without the allergens.
7. Can this be served as a dessert?
Definitely. While it makes an elegant appetizer or salad topper, it also shines as a light dessert—especially with an extra drizzle of honey or a dusting of cinnamon. A small scoop of vanilla ice cream on the side wouldn’t hurt, either.
Final Thoughts: A Simple Dish That Feels Special
I love recipes like this—ones that come together quickly but taste like you put in a lot more effort. These Elegant Blue Cheese Stuffed Pears have become a go-to for me when I want something impressive without being fussy. They hit that perfect balance of sweet, savory, creamy, and crunchy, and they always leave people asking for the recipe.
Whether you’re serving them at a dinner party, adding them to a salad for a weeknight meal, or ending a cozy evening with something a little different, these pears are always a hit.
Print
Elegant Blue Cheese Stuffed Pears
- Author: David
Description
This elegant blue cheese stuffed pears recipe is a beautiful balance of sweet, savory, and creamy. Ripe pears are halved and filled with crumbled blue cheese, then lightly baked to enhance their flavor and texture. Finished with a drizzle of honey and a sprinkle of nuts, this dish works perfectly as an appetizer, salad course, or even a refined dessert.
Ingredients
2 ripe but firm pears
½ cup crumbled blue cheese
2 tablespoons chopped walnuts or pecans
1 teaspoon fresh thyme leaves
1 tablespoon honey
Black pepper to taste
Olive oil for brushing
Instructions
Preheat the oven to 375°F (190°C) and line a baking dish with parchment or lightly grease it.
Cut the pears in half lengthwise and use a spoon or melon baller to remove the core and seeds, creating a small hollow in the center of each half.
Lightly brush the cut side of each pear with olive oil and place them cut-side up in the prepared baking dish.
In a small bowl, mix the crumbled blue cheese with chopped nuts and thyme. Spoon the mixture into the hollowed-out centers of each pear half.
Bake for 15 to 18 minutes, or until the pears are just tender and the cheese is softened but not melted completely.
Remove from the oven and drizzle each stuffed pear with a little honey. Add a touch of freshly ground black pepper to enhance the flavor contrast.
Serve warm or at room temperature.
Notes
For added depth, roast the nuts before mixing them with the cheese. If you prefer a milder cheese, try goat cheese or ricotta instead of blue cheese. This dish pairs beautifully with arugula or mixed greens if served as part of a salad course. It’s also a great wine companion, especially with sparkling or dessert wines.


")

")


")

I saved your recipe, but the ingredients is missing the balsamic glaze as mentioned the recipe title on the picture.