


There’s something about brownies that just speaks to the soul, right? Whether it’s the rich, chocolatey goodness or that chewy, melt-in-your-mouth texture, brownies have a way of making everything better. But what if I told you there’s an even better way to enjoy brownies? A way that combines two of the best things in life—coffee and chocolate! Enter Frosted Coffee Brownies, a heavenly treat that’s got the depth of flavor from rich cocoa and the perfect coffee kick to elevate it to a whole new level.
I have a confession: I’m a huge fan of coffee. Not just as a morning pick-me-up, but as an ingredient that transforms a recipe into something extraordinary. So, when I discovered how well coffee pairs with brownies, I was hooked. These Frosted Coffee Brownies are soft, fudgy, and topped with a luscious coffee frosting that’ll have you coming back for more.
Now, I know what you might be thinking: “Coffee and brownies, isn’t that a little extra?” But trust me, the coffee adds a layer of complexity that perfectly complements the sweetness of the chocolate. It’s the ultimate combination of flavors, especially for those of us who are always looking for a new way to enjoy both coffee and dessert.
The best part? These brownies are super simple to make. You probably already have most of the ingredients sitting in your pantry, and the steps are straightforward—no complicated techniques here. Whether you’re baking for a special occasion or just because you need a little indulgence, this recipe will quickly become a favorite.
So, grab your baking tools, and let’s dive into making these Frosted Coffee Brownies that will wow your taste buds and impress everyone around you.
Getting Started with the Brownies
Step 1: Preheat the Oven and Prepare the Baking Dish
Before we even think about mixing ingredients, let’s get our oven preheated and the pan ready. Preheat your oven to 350°F (175°C). This is the perfect temperature for baking brownies—high enough to give you that delicious, chewy texture but low enough to prevent burning. Now, grab an 8-inch baking dish. You can use a square one or even a rectangular pan if that’s what you have. Either way, be sure to grease it with non-stick spray or line it with parchment paper and then spray it again. You don’t want your brownies to stick to the pan—trust me, that’s never fun!
Step 2: Melt the Butter
Next up: butter! In a microwave-safe bowl, melt the butter. You can do this in the microwave in 30-second increments, stirring after each interval, until the butter is fully melted. I love using butter in brownies because it gives them that rich, decadent flavor that margarine or oil just can’t match. Just be careful not to overheat it—too much heat and you might end up with a butter explosion in the microwave. Not that I would know… (okay, maybe I do!)

Step 3: Mix the Wet Ingredients
Once the butter’s melted, it’s time to bring everything together. In a large mixing bowl, combine the melted butter, granulated sugar, eggs, and vanilla extract. Stir everything together until it’s smooth and well-combined. At this stage, the batter might look a little runny, but don’t worry, we’re just getting started. The sugar and butter will come together with the eggs to form a rich, glossy base for the brownies.
Here’s a little tip: make sure to beat the eggs in well with the sugar and butter—this will give your brownies that soft, tender texture. Plus, the vanilla extract adds that sweet, aromatic touch that really brings the whole thing together. The vanilla flavor isn’t overpowering, but it subtly enhances the chocolate and coffee notes in the brownies.

Step 4: Combine the Dry Ingredients
Now let’s take care of the dry ingredients. In a separate bowl, whisk together the cocoa powder, all-purpose flour, salt, and baking powder. It’s essential to get these dry ingredients mixed evenly because you don’t want any pockets of cocoa or flour in your brownies. When adding these dry ingredients to your wet mixture, go slow and stir gently until everything is just combined. Don’t overmix the batter! Overmixing can make your brownies dense, and we want them to be nice and fudgy.
At this point, you should start to see the magic happening—the batter should be thick, smooth, and chocolaty, with just the right amount of texture. I love this part, because it feels like you’re crafting something indulgent, but it’s so easy.

Baking the Brownies and Preparing the Coffee Frosting
Alright, so we’ve made it through the first steps—preparing the batter and getting it into the pan. Now it’s time to bake these beauties and top them off with that rich coffee frosting. Trust me, the wait will be worth it!
Step 5: Bake the Brownies
At this point, your brownie batter is ready to go! All you need to do is spread the brownie batter evenly into your prepared 8-inch baking pan. This is the step where you can be as precise as you like—just use a spatula to smooth the batter into an even layer. Don’t worry too much about perfection; the batter will spread out while it bakes.
Once that’s done, pop the pan into the preheated oven (350°F or 175°C) and bake for 30-35 minutes. Keep an eye on it, though—every oven is different. You’ll know your brownies are done when you insert a toothpick into the center, and it comes out with just a few moist crumbs clinging to it. If the toothpick comes out clean, you’ve probably over-baked them, so err on the side of a few crumbs. We want these brownies to stay fudgy!
When the brownies are done, take them out of the oven and set them on a wire rack to cool completely. I know it’s tempting to dig right in, but trust me—resist the urge! If you frost them while they’re still warm, the frosting will melt and slide off, and you’ll miss out on that perfect frosting-to-brownie ratio.

Step 6: Prepare the Coffee Frosting
While your brownies are cooling, it’s the perfect time to prepare the coffee frosting. Let’s take a minute to talk about this frosting—because it is everything. It’s creamy, velvety, and packs a coffee punch that makes these brownies a little extra special. You could certainly go for a basic chocolate frosting, but the coffee just elevates the flavor and ties everything together beautifully. Trust me, this is the secret ingredient that will make people ask, “What’s in that frosting?!”
Start by mixing instant coffee granules with 2 tablespoons of heavy whipping cream in a small bowl. Set this aside for a moment while you focus on the butter. In a separate bowl, beat unsalted butter until it’s light and fluffy. I can’t stress this enough: make sure your butter is soft before you start beating it. If it’s too cold, you’ll end up with clumps in the frosting, and that’s not the vibe we’re going for.
Once your butter is fluffy, it’s time to gradually add the powdered sugar. You’ll want to add it in increments, mixing well after each addition. This step helps prevent the powdered sugar from flying everywhere, and it also ensures the frosting stays smooth and creamy. I like to use a hand mixer for this part, but a stand mixer would work great too if you have one.

Step 7: Adjust the Frosting Consistency
Once all the powdered sugar has been added, it’s time to bring in that coffee mixture. Add your coffee-cream mix to the frosting and beat until smooth. The coffee gives the frosting just the right amount of richness and depth—it’s sweet but not overly sugary, with a delightful coffee flavor that cuts through the sweetness of the brownie.
If the frosting feels a bit too thick for spreading, don’t worry. Just add more cream, one tablespoon at a time, until you reach the perfect spreading consistency. I recommend going slow here—adding cream a little at a time gives you more control over how thick or thin the frosting gets. The goal is a smooth, spreadable frosting that doesn’t run or puddle when you top your brownies.
Step 8: Frost the Brownies
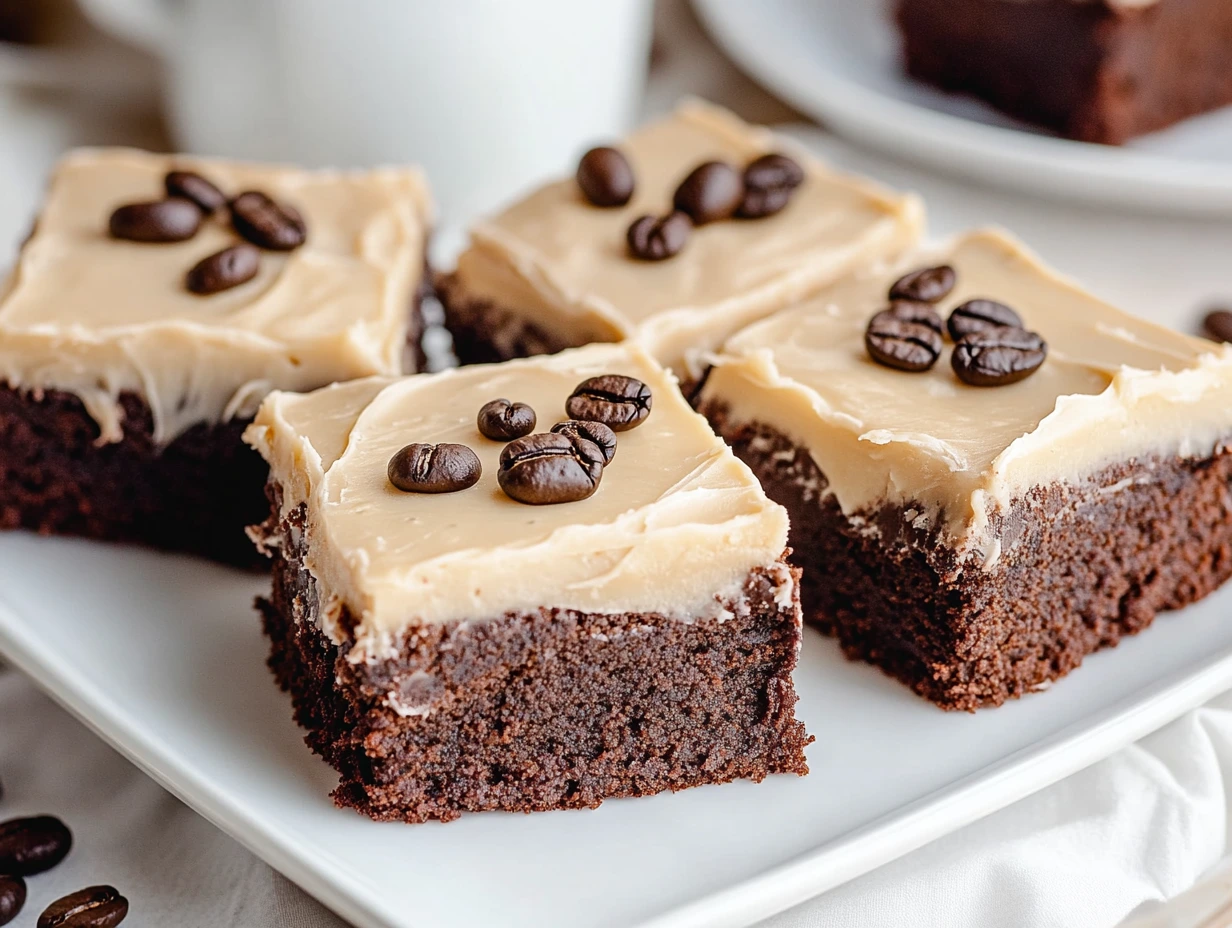
Once the brownies have completely cooled (and trust me, you don’t want to rush this), it’s time to spread that glorious coffee frosting on top. Generously spread the frosting across the surface of the brownies, ensuring every corner gets a nice coat. Be gentle, though, because you don’t want to tear into the brownies. A good offset spatula works wonders for this step, giving you an even layer with minimal effort.
Once you’ve frosted the brownies, it’s time to slice and serve! But before you dive in, let me offer a couple of extra tips to make your Frosted Coffee Brownies even more irresistible.
Extra Tips for the Perfect Frosted Coffee Brownies
- Chill the brownies: If you’re not serving them right away, pop the brownies in the fridge for a little while after frosting. This allows the frosting to firm up a bit, and it makes slicing them even easier.
- Top with chocolate shavings or cocoa powder: If you want to take these brownies over the top, sprinkle a little cocoa powder on top of the frosting or even some chocolate shavings. It adds an extra visual element and a little more chocolatey goodness.
- Make them your own: If you’re a fan of nuts, feel free to chop up some walnuts or pecans and mix them into the brownie batter before baking. The crunch will add a nice contrast to the soft, fudgy texture.
And that’s it! You’ve made it through the whole process, and now you have a pan of Frosted Coffee Brownies that’s ready to impress anyone who’s lucky enough to try them. Whether you’re making them for a special occasion, a gathering with friends, or just because you need a chocolate fix, these brownies are sure to be a hit. The combination of rich chocolate and bold coffee makes every bite something to savor.
FAQ and Conclusion
By now, you’ve mastered the art of making these Frosted Coffee Brownies, and I hope you’re as excited as I am to dig into these rich, chocolatey, coffee-infused treats. Before you start slicing, though, let’s take a moment to answer a few of the most common questions I get about these brownies, so you can make them even better.
FAQ Section
1. Can I use regular coffee instead of instant coffee for the frosting?
Yes, you can! If you have brewed coffee on hand, feel free to use it in place of the instant coffee granules. Just make sure to use about 2 tablespoons of strong brewed coffee instead of the instant granules, and reduce the heavy cream slightly to keep the frosting from becoming too runny. The key is to have the right balance of coffee and cream, so the frosting stays smooth and spreadable.
2. Can I make these brownies without coffee?
Absolutely! If you’re not a coffee fan or just prefer to skip it, you can leave out the coffee extract in the brownies and the instant coffee in the frosting. The brownies will still taste rich and chocolatey. For the frosting, you can substitute the coffee with a little vanilla extract or chocolate syrup for a mocha-like flavor. The texture and flavor will still be fantastic!
3. How can I make these brownies gluten-free?
To make these brownies gluten-free, simply swap out the all-purpose flour for a gluten-free flour blend. Make sure to use a blend that includes xanthan gum or guar gum to help with texture. Gluten-free brownies can sometimes be a little more delicate, so be sure to handle them gently when cutting. They’ll still be fudgy and delicious—just a bit more crumbly.
4. How should I store these brownies?
These Frosted Coffee Brownies will stay fresh for several days if stored properly. Keep them in an airtight container at room temperature for up to 3-4 days. If you need to store them for a longer period, you can refrigerate them, but let them come to room temperature before serving to bring back that soft, chewy texture. Alternatively, you can freeze them for up to 2 months—just make sure they’re well-wrapped to prevent freezer burn.
5. Can I make the frosting ahead of time?
Yes, you can prepare the frosting ahead of time! Store the frosting in an airtight container in the fridge for up to 3 days. When you’re ready to use it, take it out and let it come to room temperature, then give it a quick stir. If it’s too thick after being chilled, add a little extra cream to adjust the consistency.
6. How do I know when my brownies are done baking?
The best way to check if your brownies are done is to insert a toothpick into the center. It should come out with just a few moist crumbs sticking to it, but not completely wet. If the toothpick comes out clean, you may have overbaked them, so I recommend checking around 30 minutes and testing with the toothpick. Every oven is different, so it’s always a good idea to keep an eye on your brownies as they bake.
7. Can I double this recipe for a larger batch?
Yes, if you’re planning to serve a crowd, you can easily double this recipe. Just make sure to use a larger pan—something around a 9×13-inch pan would work great. Keep an eye on the baking time, as the larger batch may take a little longer to bake. I suggest checking for doneness around the 40-minute mark.
Conclusion: Why You’ll Love These Frosted Coffee Brownies
And there you have it—your Frosted Coffee Brownies are ready to be devoured! These brownies are everything you could want in a dessert: rich, fudgy, and full of flavor. The coffee frosting takes these brownies from great to extraordinary, adding that perfect balance of sweetness and bold coffee flavor. They’re sure to be a hit at any gathering, or even if you’re just treating yourself after a long day.
I’m confident that once you try these brownies, they’ll quickly become a go-to dessert in your baking rotation. Whether you’re baking for family, friends, or just because, these Frosted Coffee Brownies are the perfect blend of simple and indulgent. Plus, you can always get creative by adding in your favorite mix-ins or adjusting the frosting to suit your tastes. Who doesn’t love a recipe that’s both easy to make and endlessly customizable?
Remember, baking doesn’t have to be complicated to be delicious. With just a few simple ingredients and some love, you can create a dessert that’s guaranteed to impress. So, I challenge you—make these brownies, share them with someone you love (or keep them all to yourself, I won’t judge), and let me know how they turn out. I’m sure you’ll be as hooked as I am!
If you’re feeling inspired, drop a comment below and let me know if you made any fun variations, or share your tips for making the perfect brownies. Happy baking, and don’t forget to enjoy a cup of coffee with your brownies—they go hand in hand!
Print
Frosted Coffee Brownies
- Total Time: 45-50 minutes (including cooling)
Description
These Frosted Coffee Brownies are a perfect combination of rich chocolatey goodness and bold coffee flavor. The brownies are dense, moist, and decadent, enhanced with a layer of coffee-infused frosting that takes them to the next level. Perfect for coffee lovers and chocolate enthusiasts alike, these brownies are sure to satisfy any sweet tooth. Whether you’re looking for a mid-afternoon treat or something to serve at a gathering, these fudgy delights topped with smooth coffee frosting are the answer.
Ingredients
For the brownies:
- 1 stick unsalted butter (1/2 cup)
- 1 cup granulated sugar
- 2 large eggs
- 1 teaspoon vanilla extract
- 2 teaspoons coffee extract (or 1 tablespoon instant coffee)
- 1/3 cup unsweetened cocoa powder
- 1/2 cup all-purpose flour
- 1/4 teaspoon salt
- 1/4 teaspoon baking powder
For the coffee frosting:
- 1 1/2 teaspoons instant coffee granules
- 2–4 tablespoons heavy whipping cream
- 1/3 cup unsalted butter
- 2 cups powdered sugar
Instructions
1️⃣ Preheat the oven:
Preheat your oven to 350°F (175°C) and prepare an 8-inch baking dish by greasing it with non-stick spray or lining it with parchment paper and spraying with non-stick spray.
2️⃣ Melt the butter:
In a microwave-safe bowl, melt the unsalted butter in the microwave until fully melted.
3️⃣ Mix the wet ingredients:
In a large mixing bowl, combine the melted butter, granulated sugar, eggs, and vanilla extract. Stir until well combined and smooth.
4️⃣ Combine dry ingredients:
In a separate bowl, whisk together the cocoa powder, all-purpose flour, salt, and baking powder. Gradually add the dry ingredients to the wet ingredients, stirring until just combined.
5️⃣ Bake the brownies:
Spread the brownie batter evenly into the prepared baking pan.
Bake for 30-35 minutes, or until a toothpick inserted into the center comes out with a few moist crumbs. Allow the brownies to cool completely before frosting.
6️⃣ Prepare the coffee frosting:
In a small bowl, mix the instant coffee granules with 2 tablespoons of heavy whipping cream. Set aside.
In a separate bowl, beat the unsalted butter until light and fluffy.
7️⃣ Frosting consistency:
Gradually add the powdered sugar to the butter, mixing well after each addition.
Add the coffee mixture to the frosting and beat until smooth. If the frosting is too thick, add additional cream, 1 tablespoon at a time, until the desired spreading consistency is reached.
8️⃣ Frost the brownies:
Once the brownies are completely cool, spread the coffee frosting evenly over the top. Slice and serve.
Notes
- Coffee flavor: If you prefer a stronger coffee flavor, feel free to add more coffee extract or instant coffee to both the brownie batter and frosting.
- Storage: Store the frosted brownies in an airtight container at room temperature for up to 4-5 days. For longer storage, refrigerate them for up to 1 week.
- Substitutions: You can substitute the heavy whipping cream in the frosting with milk for a slightly lighter option, though it may affect the richness of the frosting.
- Prep Time: 10 minutes
- Cook Time: 30-35 minutes
Nutrition
- Serving Size: 12-16 brownies (depending on the size of your slices)


")

")


")
