

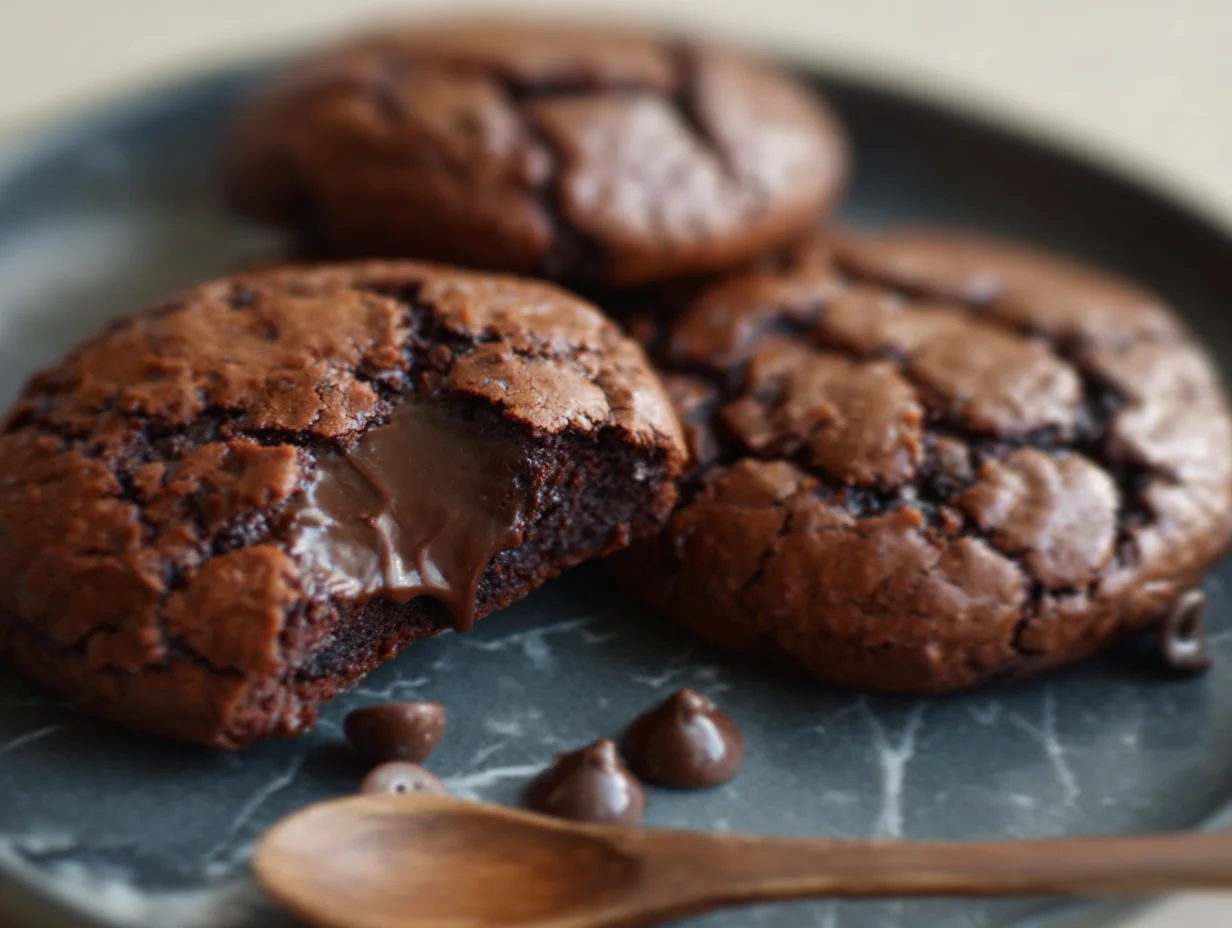
If you’re a chocolate lover (like me), you’re going to fall hard for these Fudgy Chocolate Lava Cookies. Imagine a cookie that has the crackly, brownie-like top, a chewy bite, and a warm, molten chocolate center that oozes out the moment you take that first bite. That’s exactly what we’re making today—and yes, they’re every bit as good as they sound.
These cookies walk the perfect line between indulgent dessert and cozy comfort food. They’re rich and deeply chocolatey, yet come together with everyday pantry staples. The texture? Oh wow—it’s got that irresistible crispy edge, a soft, chewy middle, and a surprise lava center that feels like a secret treasure hidden inside. They’re basically like mini molten lava cakes in cookie form. And the best part? You don’t need to be a pastry chef to pull these off.
I made these last week when we had friends over for a casual dinner, and let’s just say… the cookies stole the show. People were scraping their plates with their spoons to catch every last bit of gooey chocolate, and I got three requests for the recipe before dessert was even over. So today, I’m breaking it all down for you—from ingredients to step-by-step tips—so you can bring these decadent little treats to your own table.
Let’s get baking!

Ingredients You’ll Need
Here’s what you’ll want to gather before getting started:
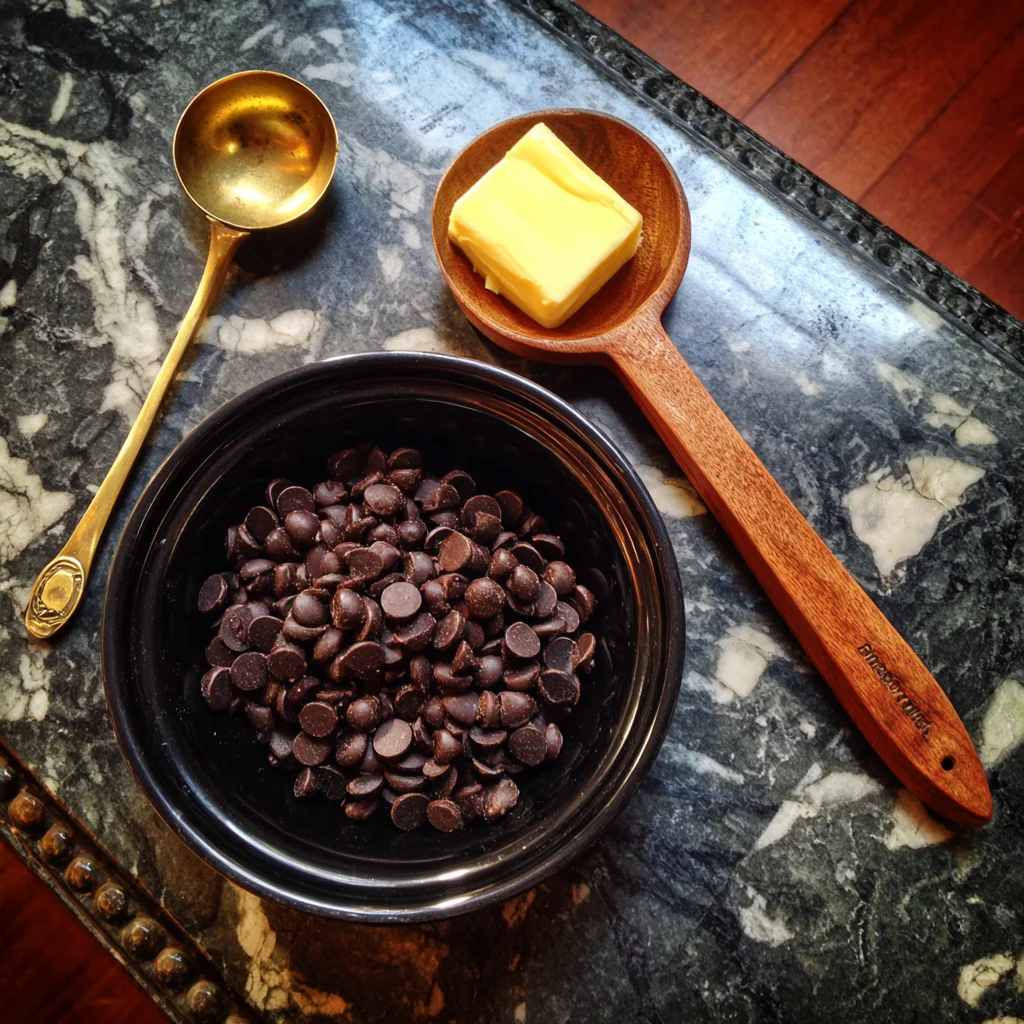
1 cup semi-sweet chocolate chips
¼ cup unsalted butter
2 large eggs
⅔ cup granulated sugar
1 teaspoon vanilla extract
¼ cup all-purpose flour
2 tablespoons unsweetened cocoa powder
½ teaspoon baking powder
¼ teaspoon salt
Chocolate chunks or squares (for the molten center)
If you want that dramatic lava effect when you break open the cookie, go with a good-quality chocolate square for the center. I’ve used dark chocolate chunks and even pieces of a high-quality chocolate bar, and both work beautifully.
STEP 1: Melt the Chocolate and Butter
Start by preheating your oven to 350°F and lining a baking sheet with parchment paper. Trust me, you’ll want to use parchment—these cookies can get sticky if the lava seeps out, and cleanup is so much easier with the liner.
In a heatproof bowl, melt the chocolate chips and butter together. I do this in the microwave using 20-second intervals, stirring in between each, until the mixture is smooth and glossy. Set it aside to cool slightly. You don’t want it piping hot when it goes into the eggs—lukewarm is perfect.
STEP 2: Whisk the Eggs, Sugar, and Vanilla
In a separate mixing bowl, beat the eggs, sugar, and vanilla together for about 2 to 3 minutes. You’re looking for a mixture that’s lightened in color and slightly thickened. This step adds air into the batter and helps give the cookies that beautiful shiny top when they bake—kind of like a good brownie.
STEP 3: Combine Wet and Dry Ingredients
Now slowly mix the slightly cooled chocolate mixture into the egg mixture. You want everything to be fully combined but don’t overmix.
Next, sift in your flour, cocoa powder, baking powder, and salt. Stir gently until you’ve got a thick, glossy batter. It’ll look more like brownie batter than traditional cookie dough, and that’s exactly what we want here.
![]()
STEP 4: Chill the Dough
This is an important step—chill your dough for 20 to 30 minutes. It helps the batter firm up just enough so you can shape it. Skipping the chill time can make the dough too sticky to work with, and the cookies might spread too much in the oven.
Once it’s chilled, we’re ready for the fun part: stuffing those cookies!
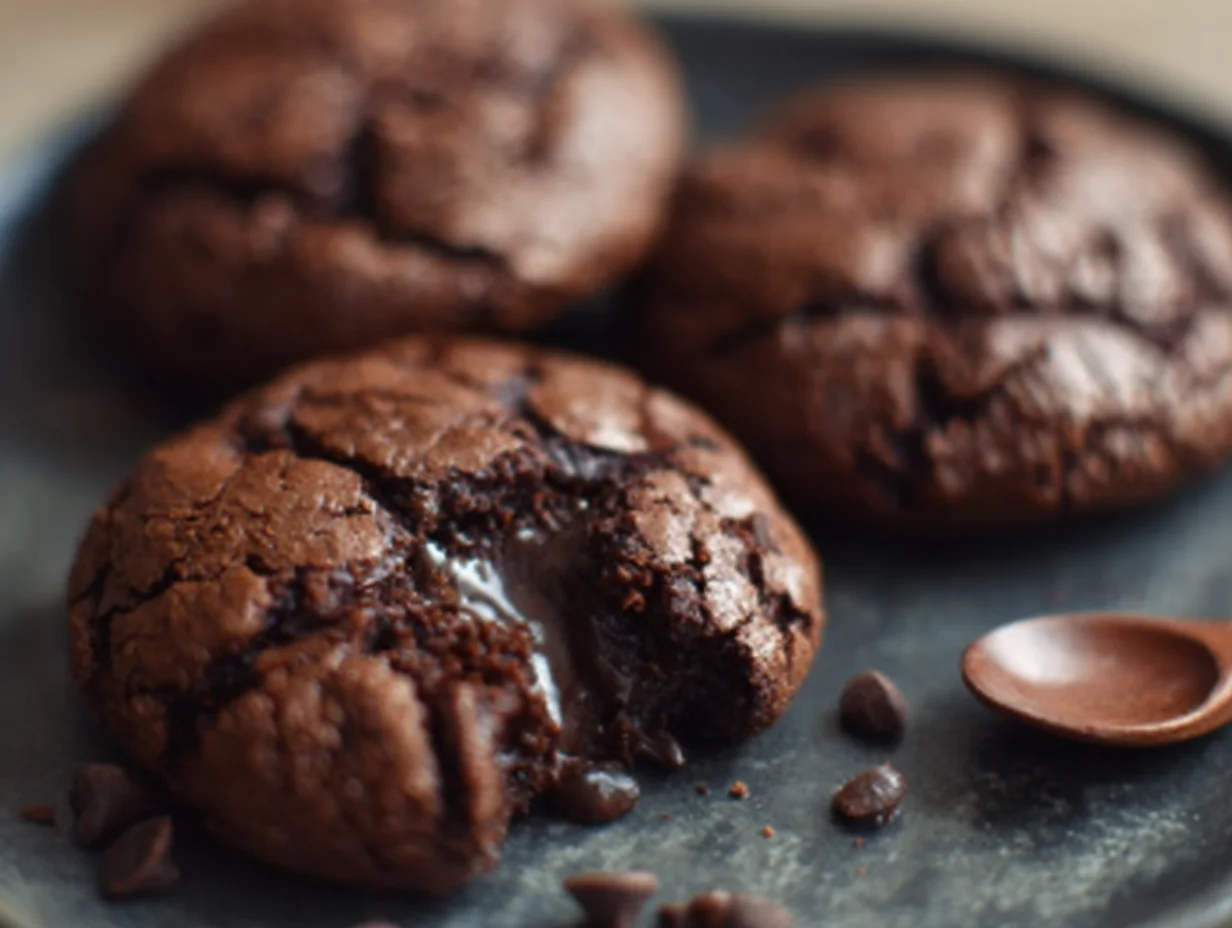
Fudgy Chocolate Lava Cookies with Gooey Center and Crackly Top
Welcome back! If you’ve chilled your dough and prepped your chocolate centers, you’re ready for the magic to really happen. This part of the process is where those decadent, bakery-worthy lava cookies start to take shape—and honestly, it’s a lot easier than you might think.
I always say this is the step where the cookies go from “nice idea” to “are you kidding me?!” status. The secret to that molten, lava-like center is in how you wrap the dough around the chocolate. I’ll walk you through it so yours turn out perfectly fudgy, gooey, and full of chocolatey drama every single time.
Let’s get to it.
STEP 5: Shape the Cookies and Add the Lava Center
Once your dough has chilled for 20 to 30 minutes, it should be much easier to handle. Using a small cookie scoop or a couple of spoons, portion out about 2 tablespoons of dough for each cookie.
Here’s how to stuff them:
Slightly flatten each scoop of dough in your palm.
Press a piece of high-quality chocolate chunk or square into the center.
Gently fold the dough around the chocolate and seal it completely.
Roll the dough into a ball so the chocolate is fully enclosed inside.
Place each cookie ball onto your prepared baking sheet, leaving at least 2 inches between them. They’ll spread just a bit, and you want to give them space to develop that signature crackly top.
STEP 6: Bake Until Crackly and Soft in the Middle
Pop the tray into your preheated oven at 350°F and bake the cookies for 9 to 11 minutes. You’ll know they’re ready when the tops are shiny, cracked, and just set around the edges. Don’t wait for the centers to look done—they should still look slightly underbaked.
This is key: If you bake them too long, the lava effect will disappear and you’ll end up with a regular (though still tasty) chocolate cookie. To keep the gooey center, take them out while the centers are still soft and slightly jiggly.
Let the cookies rest on the baking sheet for about 5 minutes before transferring them to a wire rack. This short cooling time helps them set up just enough while keeping that gooey middle intact.
STEP 7: Serve Warm (or Reheat Later!)
These cookies are hands-down the best when they’re still warm and the centers are molten. Serve them just as they are or, if you really want to take things over the top, add a scoop of vanilla ice cream right on top. The combo of warm, gooey cookie and cold, creamy ice cream is unreal.
If you’re making these ahead of time, you can totally reheat them. Just pop one in the microwave for 10 to 15 seconds, and it’ll be gooey all over again.
Tips for Success and Simple Variations
Use High-Quality Chocolate: The better the chocolate, the better the flavor and texture. Look for chocolate with at least 60% cacao for a rich, intense flavor.
Chill the Dough: Don’t skip this step. Chilling the dough keeps the cookies from spreading too much and helps hold in the lava center.
Customize the Center: You can use dark, milk, or even flavored chocolate like hazelnut or caramel-filled squares for the center. A bit of peanut butter or a mini peanut butter cup would be amazing, too.
Add a Sprinkle of Sea Salt: Right before baking, sprinkle a tiny bit of flaky sea salt on top of each cookie. It really enhances the chocolate flavor and adds a nice balance.
Freeze for Later: These cookie dough balls freeze really well. Just shape them with the chocolate center inside, then freeze on a tray. Once frozen, transfer to a zip-top bag. When you’re ready to bake, pop them straight into the oven from frozen and just add a minute or two to the bake time.
Fudgy Chocolate Lava Cookies with Gooey Center and Crackly Top
You’ve mixed, chilled, filled, and baked—and now, your kitchen smells like a chocolate dream. These Fudgy Chocolate Lava Cookies are truly something special. Whether you’re planning to wow guests at a dinner party or just want to treat yourself to a late-night chocolate fix, this recipe delivers every time.
Before we wrap things up, let’s dive into a few frequently asked questions I often get about these cookies. From storage tips to customizing the filling, I’ve got answers to help make your cookie experience as foolproof as possible.
Frequently Asked Questions
1. Can I make the dough ahead of time?
Yes! You can prepare the dough and chill it in the fridge for up to 24 hours. If you’re not baking them right away, I recommend shaping the dough balls with the chocolate centers and freezing them. When ready to bake, just pop them in the oven straight from frozen and add 1–2 extra minutes to the bake time.
2. What type of chocolate is best for the lava center?
I recommend using high-quality chocolate squares or chunks—something that melts easily and tastes great. Bittersweet or dark chocolate (around 60–70% cacao) works beautifully. You can also try flavored chocolate, like hazelnut or caramel-filled bars, for a fun twist.
3. Why did my cookies come out flat or spread too much?
This usually happens when the dough isn’t chilled long enough or the baking sheet is too warm when placing the dough balls on it. Be sure to chill your dough for at least 20–30 minutes and use a cool, parchment-lined sheet each time.
4. How do I store leftover cookies?
Store any leftover cookies in an airtight container at room temperature for up to 3 days. To reheat and get that gooey center back, microwave each cookie for about 10 to 15 seconds. They’ll be warm and soft again in no time.
5. Can I make these gluten-free?
Absolutely! Just swap the all-purpose flour for a good 1:1 gluten-free flour blend. Make sure it includes xanthan gum or another binder to help with texture. Everything else stays the same.
6. How do I know when the cookies are done?
You want the tops to be shiny and crackly with slightly set edges, but the centers should still look soft. They’ll continue to firm up as they cool on the baking sheet. Don’t overbake, or you’ll lose that molten center.
7. Can I double the recipe?
Definitely. This recipe doubles really well. If you’re baking for a crowd or want extras to freeze, go ahead and make a double batch. Just keep the same baking times and chill steps.
Final Thoughts: Make These Cookies Your Signature Dessert
If you’ve never made lava cookies before, I hope this recipe changes that. They’re easier than they look, and the payoff is huge. Rich, chocolatey, gooey in the middle, and crackly on top—every bite is like a mini celebration.
Honestly, I’ve lost count of how many times these have saved me when I needed a fast dessert that still felt fancy. They impress every single time, whether I serve them with ice cream at a dinner party or sneak one as a late-night treat straight off the cooling rack.
So go ahead—give them a try. And if you do, I’d love to hear how they turned out! Drop a comment below, share your favorite chocolate center variation, or let me know if you tried freezing a batch. Your tips might just help the next chocolate lover who stops by.
Print
Fudgy Chocolate Lava Cookies with Gooey Center and Crackly Top
- Author: David
Description
These Fudgy Chocolate Lava Cookies are rich, decadent, and loaded with deep chocolate flavor. Each cookie features a molten, gooey center that melts in your mouth, surrounded by a crisp, crackly top that gives way to a soft and chewy texture. They’re the perfect indulgent treat for chocolate lovers and an impressive yet easy dessert to serve warm with a scoop of ice cream or on their own.
Ingredients
1 cup semi-sweet chocolate chips
¼ cup unsalted butter
2 large eggs
⅔ cup granulated sugar
1 teaspoon vanilla extract
¼ cup all-purpose flour
2 tablespoons unsweetened cocoa powder
½ teaspoon baking powder
¼ teaspoon salt
Additional chocolate chunks or squares for lava center
Instructions
Preheat the oven to 350°F and line a baking sheet with parchment paper.
In a heatproof bowl, melt the chocolate chips and butter together using a microwave in 20-second intervals, stirring between each until smooth. Let cool slightly.
In a separate mixing bowl, beat the eggs, sugar, and vanilla until light and slightly thickened, about 2 to 3 minutes.
Slowly mix the melted chocolate mixture into the egg mixture until fully incorporated.
Sift in the flour, cocoa powder, baking powder, and salt. Stir gently just until the batter is combined. It will be thick and glossy, similar to brownie batter.
Chill the dough for 20 to 30 minutes to make it easier to handle.
Scoop about 2 tablespoons of dough, flatten slightly, and press a piece of chocolate into the center. Fold the dough around it to seal and roll into a ball.
Place on the prepared baking sheet, spacing each cookie a few inches apart.
Bake for 9 to 11 minutes, or until the tops are crackly and shiny but the centers are still soft. Do not overbake to maintain the lava effect.
Let the cookies rest on the baking sheet for 5 minutes before transferring to a wire rack.
Notes
Use high-quality chocolate for the best flavor and melt-in-the-middle texture. The cookies are best served slightly warm to enjoy the gooey center, but they also reheat well in the microwave for 10 to 15 seconds. If making ahead, form the dough balls and freeze them. Bake directly from frozen, adding an extra minute or two to the bake time. These cookies strike the perfect balance between a brownie and a molten cake in handheld form.


")

")


")
