

As the holiday season rolls around, there’s no better way to embrace the festive spirit than with themed treats that bring a dash of fun and flavor to any gathering. This year, Grinch Oreo Balls offer a whimsical twist on traditional holiday desserts, inspired by the iconic green character who stole Christmas but ultimately found his heart. These sweet, bite-sized treats capture the Grinch’s unmistakable green color and heartwarming story, making them perfect for holiday parties, family get-togethers, or as a delightful DIY gift for friends and neighbors.
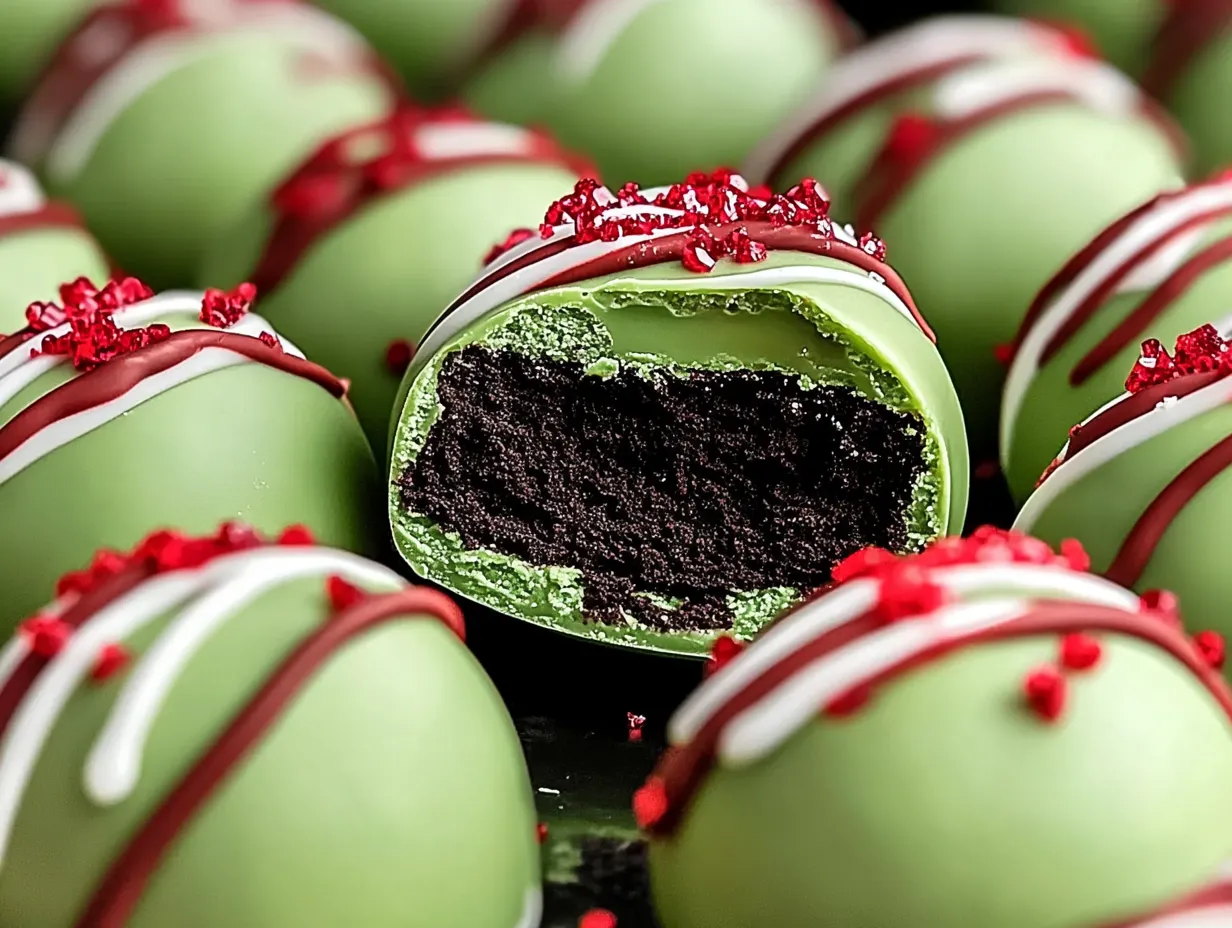
Grinch Oreo Balls are a playful, tasty spin on classic Oreo truffles. They start with a base of red velvet Oreos, adding a rich and slightly tangy flavor that’s complemented by a smooth cream cheese filling. Once formed into bite-sized balls, these treats are dipped in light green candy coating to capture the Grinch’s green hue. A red candy heart is pressed onto each truffle to symbolize the Grinch’s heart growing three sizes, giving them a festive look and a nod to the holiday story that makes them instantly recognizable.
There’s plenty to love about this recipe beyond its Grinch-inspired appearance. For one, these Oreo balls are incredibly simple to make, with just a few ingredients and easy-to-follow steps. Even young helpers in the kitchen can join in, making it an ideal family-friendly project. The decorating process adds a fun, creative element as well, allowing everyone to add their personal touch to each piece. These Grinch Oreo Balls aren’t just a tasty treat; they’re a fun and heartwarming activity that brings a smile to everyone who enjoys them, capturing the spirit of the holidays in every bite.

Ingredients Overview
Creating Grinch Oreo Balls starts with a handful of simple yet flavorful ingredients, each adding a special touch to bring this Grinch-inspired treat to life.
Key Ingredients
- Red Velvet Oreos: Red velvet Oreos are the perfect choice for this recipe, bringing a hint of cocoa and a slight tanginess from the cream cheese filling that pairs beautifully with the softened cream cheese in the mixture. The red color of the cookie crumbs also subtly enhances the festive look when paired with the Grinch-green coating.
- Cream Cheese: Cream cheese is the binding agent that gives these Oreo balls their creamy, rich texture. Using softened cream cheese is essential for smooth mixing, ensuring that it incorporates seamlessly with the Oreo crumbs to create a well-blended filling.
- Light Green Candy Melts: The green candy melts are what give these Oreo balls their signature “Grinch” look. These melts are easy to work with, and their bright green color perfectly represents the Grinch’s hue, making the truffles instantly recognizable and festive.
- Red Candy Hearts: No Grinch treat is complete without a red heart to symbolize his growing compassion. These candy hearts are a simple yet meaningful decoration that brings a pop of color and a touch of holiday cheer to each truffle.
Ingredient Substitutions and Tips
If red velvet Oreos are unavailable, classic or chocolate Oreos work well as substitutes, although they won’t add the red hue. For the candy coating, white chocolate or other candy melts can be colored green with food-safe dye. Red heart sprinkles or small red candy pearls are great alternatives to red candy hearts, ensuring each treat still captures the Grinch’s transformed spirit.
Step-by-Step Recipe Instructions
Creating Grinch Oreo Balls is simple and rewarding, with each step adding a touch of care that makes these treats both beautiful and delicious. Here’s a detailed guide to walk you through the process from start to finish.
Preparing the Baking Sheet
Begin by lining a large baking sheet with parchment paper. This simple step is crucial for several reasons: it prevents the Oreo balls from sticking to the pan, makes it easy to transfer them in and out of the refrigerator, and simplifies cleanup. The parchment paper provides a non-stick surface, allowing the candy-coated balls to set without leaving residue behind. Having your baking sheet prepared ahead of time ensures a smooth process, so you can focus on the fun parts of shaping, coating, and decorating each Grinch-inspired truffle without unnecessary interruptions.
Making Oreo Crumbs
To create the perfect filling for your Grinch Oreo Balls, start by crushing the red velvet Oreos into fine crumbs. If you have a food processor, place the cookies inside and pulse until they reach a uniform, sand-like texture. If you don’t have a food processor, you can achieve a similar result by placing the cookies in a ziplock bag and crushing them with a rolling pin. Be sure to crush them finely, as large chunks can make the mixture difficult to combine smoothly with the cream cheese. The finer the crumbs, the smoother the texture of your Oreo balls will be, making it easier to form neat, round truffles and ensuring that each bite is rich and flavorful.
Blending with Cream Cheese
In a large mixing bowl, combine the softened cream cheese with the Oreo crumbs. Using an electric hand mixer or a sturdy spatula, blend the mixture until it’s fully combined and has a smooth, consistent texture. The cream cheese binds the crumbs together, giving the filling a rich, creamy consistency that holds its shape well. Make sure there are no lumps, as they can affect the appearance and texture of the Oreo balls. Proper mixing ensures that every bite is flavorful and cohesive. The result should be a dough-like consistency, making it easy to roll and shape the Oreo balls in the next step.
Forming the Balls
To form uniformly sized Oreo balls, use a 1.5-inch cookie scoop to portion out the mixture. This not only ensures that each truffle is the same size, but also helps with consistent chilling and coating later on. After scooping, use your hands to roll each portion into a smooth ball, applying gentle pressure to form a compact, round shape. If the mixture feels too sticky, you can lightly coat your hands with a bit of water or nonstick spray. Aim for a smooth, polished finish on each ball to create a professional look, which will make the candy coating process easier and more even.
Chilling the Oreo Balls
Once all the balls are formed, place them on the prepared baking sheet and refrigerate for at least 2 hours. This step is essential for helping the Oreo balls firm up, making them easier to handle during the dipping process. Chilling not only solidifies the texture but also ensures the balls hold their shape when coated in the warm candy melts. Skipping or shortening this step can lead to Oreo balls that are too soft, causing them to break apart or become misshapen when dipped. Plan for adequate chilling time to ensure that your Oreo balls remain perfectly round and easy to work with.
Melting the Candy Coating
To prepare the light green candy coating, use a double boiler to melt the candy melts over low heat. This method provides gentle, even heat, which prevents the candy from overheating and becoming thick or clumpy. Stir the melts frequently to encourage a smooth consistency, and be mindful to keep water away from the candy, as even a small amount of moisture can cause the candy to seize and harden. If you don’t have a double boiler, you can also use a microwave-safe bowl, heating the candy melts in short, 15-30 second bursts and stirring in between. Once the candy melts are fully smooth and pourable, set aside about ½ cup for drizzling and keep the rest warm for dipping.
Dipping the Oreo Balls
For an even candy coating, use a fork or toothpick to dip each chilled Oreo ball into the melted green candy coating. Allow the excess coating to drip off by gently tapping the fork on the edge of the bowl. This helps avoid pooling at the base of each Oreo ball and ensures a smooth, even coating. Carefully place each dipped ball back onto the parchment-lined baking sheet. Repeat this process for each Oreo ball, ensuring they’re fully coated and evenly spaced to prevent them from touching as they set. Work with one ball at a time to maintain a clean, professional look for each truffle.
Adding Drizzle and Heart Decoration
For an optional decorative drizzle, place the reserved candy melts in a microwave-safe piping bag and melt them on a low microwave setting, stirring at intervals to ensure a smooth consistency. Once melted, snip a tiny corner off the piping bag and use it to drizzle a thin, decorative line over each coated Oreo ball. This adds a delicate touch that enhances the festive look. After drizzling, quickly press a red candy heart onto the top of each truffle while the drizzle is still soft, so it adheres well. The red heart symbolizes the Grinch’s “growing heart” and adds a delightful pop of color that brings the Grinch theme to life. If desired, you can add a second layer of drizzle over the heart for extra decoration. This step not only adds aesthetic appeal but also creates a memorable detail that makes these treats stand out.
Setting and Serving
Once all Oreo balls are coated, drizzled, and decorated, place them back in the refrigerator to set for about 15-20 minutes, or until the candy coating is completely firm. These Grinch Oreo Balls can be served chilled or at room temperature, making them versatile for holiday events or casual gatherings. For storage, keep them in an airtight container in the refrigerator to maintain freshness and texture, where they’ll last for up to a week. Whether you’re presenting them on a dessert platter or packing them as a holiday gift, these Grinch-inspired treats are sure to spread holiday cheer.
Tips and Tricks for Perfect Grinch Oreo Balls
Achieving a polished look and smooth texture for your Grinch Oreo Balls is simple with a few helpful tips.
How to Get a Smooth Candy Coating
To create an even, smooth candy coating, make sure the Oreo balls are well-chilled before dipping. Chilled truffles help the candy coating adhere without melting or sliding. When dipping, use a fork or toothpick to lower each ball into the candy melts, then gently tap the fork on the edge of the bowl to allow excess coating to drip off. This technique minimizes lumps and avoids pooling at the bottom of each truffle. For the best results, ensure the candy melts are fully smooth before you begin dipping, so each Oreo ball gets a sleek, even finish.
Troubleshooting Candy Melt Issues
Candy melts can sometimes seize or become too thick, making it difficult to coat the Oreo balls. If this happens, add a small amount of vegetable oil or shortening to the melts and stir until the consistency is smooth. This helps thin the candy without affecting its color or setting properties. If your melts seize up from accidental water exposure, adding oil can also restore a workable texture. Always melt the candy slowly, either using a double boiler or in short microwave bursts, to avoid overheating, which can cause clumping.
Decorating Ideas and Variations
For a unique twist, consider adding holiday-themed decorations like snowflake sprinkles, edible glitter, or colored sugar crystals to the coating. To adapt this recipe for other holidays, try using different colors of candy melts and sprinkles – for example, red and pink for Valentine’s Day or pastel colors for Easter. You can also experiment with different Oreo flavors, such as mint for a fresh, wintry taste or golden Oreos for a more neutral, buttery flavor. These small changes allow you to customize Grinch Oreo Balls for various occasions while keeping them festive and fun.
Serving and Storage Suggestions
Best Ways to Serve Grinch Oreo Balls
Grinch Oreo Balls are a festive addition to any holiday gathering. For an eye-catching presentation, arrange them on a decorative platter lined with green or red holiday-themed napkins. You can also serve them in individual mini cupcake liners, which add a pop of color and make them easy for guests to pick up. If gifting, pack the Oreo balls in a holiday-themed tin or a clear cellophane bag tied with a festive ribbon for a charming, handmade touch.
Storage Tips
To keep your Grinch Oreo Balls fresh, store them in an airtight container. Place layers of parchment paper between the rows to prevent them from sticking together. For optimal freshness, keep them refrigerated, where they’ll stay delicious for up to a week. If you prefer to serve them at room temperature, simply take them out of the fridge about 30 minutes before serving.
Make-Ahead Instructions
Grinch Oreo Balls are an excellent make-ahead treat, perfect for holiday prep. They can be made up to a week in advance and stored in the refrigerator without losing flavor or texture. If you want to prepare them even earlier, you can freeze the uncoated Oreo balls for up to a month, then dip and decorate them closer to your event. This way, they’re always fresh and ready for the holidays.
Frequently Asked Questions (FAQ)
How long can I store Grinch Oreo Balls?
Grinch Oreo Balls can be stored in the refrigerator for up to a week in an airtight container to maintain their freshness and texture. If you’d like to keep them even longer, they can be stored in the freezer for up to a month. For frozen Oreo balls, allow them to thaw in the refrigerator before serving.
Can I use regular Oreos instead of red velvet?
Yes, you can use regular Oreos in place of red velvet if you prefer or if red velvet Oreos are unavailable. While the red velvet adds a festive color and slightly tangy flavor, classic or chocolate Oreos work well as a substitute and will still taste delicious with the cream cheese filling and green candy coating.
What can I use if I don’t have candy melts?
If candy melts aren’t available, white chocolate chips or almond bark can be used as a substitute. You can add a few drops of green food coloring to achieve the Grinch’s signature color. Just be sure to use oil-based food coloring, as water-based colorings can cause chocolate to seize.
Can I freeze Grinch Oreo Balls?
Yes, Grinch Oreo Balls freeze well. You can freeze them uncoated for up to a month and then coat and decorate them just before serving. If they are already coated, place them in a single layer inside a freezer-safe container and thaw them in the fridge when you’re ready to enjoy.
How do I prevent candy coating from cracking?
Candy coating can sometimes crack when it’s exposed to rapid temperature changes. To avoid this, make sure the Oreo balls are not too cold when dipping. Let them sit for a few minutes after refrigeration before dipping them in the warm candy melts. This gradual adjustment in temperature helps prevent cracks and keeps the coating smooth and intact.

Grinch Oreo Balls
- Author: Christophe
Description
These festive Grinch Oreo Balls are a fun, no-bake treat with red velvet Oreo and cream cheese filling, coated in light green candy melts, and topped with a red candy heart. Perfect for holiday parties and gifting!
Ingredients
- 24.4 ounces Red Velvet Oreos (2 packages, about 44 cookies)
- 8 ounces cream cheese, softened to room temperature
- 15 ounces light green candy melts
- Red candy hearts
Instructions
1️⃣ Prepare the Baking Sheet: Line a large baking sheet with parchment paper and set it aside.
2️⃣ Make Oreo Crumbs: Place the Oreo cookies in a food processor and pulse until they form fine crumbs. (Alternatively, crush them in a ziplock bag with a rolling pin if you don’t have a food processor.)
3️⃣ Blend with Cream Cheese: In a large mixing bowl, add the softened cream cheese and mix with an electric hand mixer until smooth. Then, add the Oreo crumbs to the cream cheese and mix until fully combined.
4️⃣ Form the Balls: Using a 1.5-inch cookie scoop, scoop the mixture and roll each portion into a smooth ball with your hands. Place the balls onto the prepared baking sheet.
5️⃣ Chill: Refrigerate the Oreo balls for at least 2 hours to firm up before dipping. This helps them keep their shape during coating.
6️⃣ Melt the Candy Coating: Set aside about ½ cup of the candy melts for the drizzle. Melt the remaining candy melts in a double boiler over low heat, stirring frequently until smooth. (Avoid overheating or letting any water get into the candy melts, as this can cause them to seize.)
7️⃣ Dip the Balls: Using a fork or toothpick, dip each chilled Oreo ball into the melted candy coating. Tap the fork gently on the edge of the bowl to remove excess coating, then place the coated ball back onto the baking sheet.
8️⃣ Add Drizzle and Heart Decoration: For an optional drizzle, place the reserved candy melts in a microwave-safe piping bag and melt on a low setting (defrost setting) in 30-second intervals, kneading between intervals until smooth. Snip a tiny corner off the bag and drizzle over the coated balls. Immediately press a red candy heart on top of each Oreo ball before the drizzle sets.
9️⃣ Set and Serve: Place the decorated Oreo balls back in the refrigerator to set completely, about 15–20 minutes. Serve chilled or at room temperature.
Notes
- Storage: Store in an airtight container in the refrigerator for up to 1 week.
- Variation: Substitute green candy melts with white candy melts and add a few drops of green food coloring if you can’t find light green melts.
- Holiday Touch: For extra holiday flair, add a dusting of edible glitter or sprinkles before the candy coating sets.


")

")


")
