

Halloween is the perfect time to indulge in festive, creative treats, and nothing embodies that spooky fun like Halloween Whoopie Pies. These delightful dessert sandwiches combine soft, cake-like cookies with creamy, sweet filling, creating a treat that’s both delicious and whimsical. What makes them particularly special for Halloween is their endless customization potential. Whether you’re making classic Whoopie Pies or transforming them into spooky spider-themed desserts with candy eyes and licorice legs, there’s no limit to the creative possibilities.
Whoopie Pies are easy to make, fun to decorate, and a great project to enjoy with kids or for Halloween parties. Their rich chocolate flavor paired with the vibrant orange icing offers a classic Halloween color palette, while the soft texture makes them an irresistible sweet treat. Whether you’re hosting a party or just looking for a spooky snack, these Halloween Whoopie Pies are sure to be a hit with everyone.
Halloween Whoopie Pies are the ultimate treat for celebrating the spooky season, offering both fun and creativity in every bite. Their soft, cake-like texture paired with a rich filling makes them a delicious treat that both kids and adults love. The versatility of Whoopie Pies lies in their customization—whether you want to create classic versions with a sprinkle of edible glitter or go all out with spider-themed decorations using black licorice and candy eyes, the possibilities are endless. This makes them perfect for anyone looking to add a little creative flair to their Halloween baking.
Beyond their visual appeal, Whoopie Pies are incredibly portable, making them ideal for Halloween parties or gatherings. Unlike more delicate treats, they hold their shape well and can be served without worrying about smudging decorations or messing up costumes. Their individual size also makes them easy for guests to grab and enjoy without the need for utensils.
These spooky treats are also a hit with children, thanks to their fun designs and the opportunity to get hands-on during the decoration process. Whether you’re looking for a Halloween party centerpiece or a treat to hand out to trick-or-treaters, Halloween Whoopie Pies bring the festive spirit to any celebration, making them a must-have for the holiday.

The ingredients for Halloween Whoopie Pies are designed to be simple yet effective, providing rich flavors and eye-catching decorations perfect for the holiday season.
- Devil’s Food Cake Mix: Using a Devil’s Food cake mix as the base makes this recipe approachable for both beginners and seasoned bakers. The mix creates a rich, deep chocolate flavor that perfectly contrasts with the sweet vanilla icing. The pre-measured mix also ensures consistency and saves time, making it a reliable option for busy bakers.
- Instant Chocolate Fudge Pudding: Adding instant pudding mix to the batter enhances the texture of the Whoopie Pies. It brings extra moisture and a fudgy consistency to the cakes, giving them a decadent bite. The pudding also helps prevent the pies from drying out, ensuring they stay soft and chewy.
- Vanilla Icing: The smooth, sweet vanilla icing not only complements the intense chocolate flavor but also serves as a blank canvas for decoration. It creates the perfect balance of sweetness and acts as the “glue” that holds the pies together, while offering versatility for creative decorating with food coloring and sprinkles.
- Black Licorice and Candy Eyes: These fun Halloween-specific decorations transform the Whoopie Pies into spooky treats. Black licorice is perfect for creating spider legs, while candy eyes give them a playful, eerie personality, making them ideal for kids’ parties or festive gatherings.
- Edible Glitter/Sprinkles: These finishing touches enhance the festive feel, adding sparkle or texture to the Whoopie Pies. They give the pies a polished, spooky look that stands out at Halloween events.
- Orange Food Coloring Gel: This is key to giving the icing its iconic Halloween orange color. A few drops of vibrant food coloring instantly turn the vanilla icing into a festive element that visually pops against the dark chocolate of the pies.
Before starting your Halloween Whoopie Pies, it’s essential to set up your workspace properly. Begin by preheating your oven to 350°F (175°C) to ensure it reaches the correct temperature for even baking. While the oven heats, prepare your baking sheets by lining them with parchment paper or Silpat mats. This step is crucial for preventing the pies from sticking and allows for easy removal without damaging their shape. Proper preparation ensures a smooth baking process, prevents overbaking or uneven cooking, and helps you focus on creating perfectly shaped Whoopie Pies every time.
To start mixing the batter for your Halloween Whoopie Pies, combine the Devil’s Food cake mix, water, vegetable oil, eggs, and instant chocolate fudge pudding mix in a large mixing bowl. Begin by adding all the dry ingredients, then pour in the water, oil, and eggs. Using an electric mixer, start mixing on low speed to prevent splattering and to combine the ingredients gently. Once everything is incorporated, increase to medium speed and beat the batter for 2-3 minutes until it becomes smooth and lump-free.
For the perfect texture, make sure to scrape down the sides of the bowl as you mix to ensure all ingredients are fully blended. Mixing at medium speed helps create a consistent texture without overworking the batter, which could result in dense cakes. A smooth, well-mixed batter will yield soft, fluffy Whoopie Pies with a rich, fudgy flavor that’s perfect for Halloween.
Shaping your Halloween Whoopie Pies is an important step for achieving consistent, well-formed cakes. Whether you’re making large or small pies, it’s crucial to use the right amount of batter and ensure proper spacing on the baking sheets.
- For larger Whoopie Pies, use 2 tablespoons of batter per pie. You can measure this out with a standard cookie scoop or tablespoon to ensure uniform size. Drop each portion onto the prepared baking sheets, leaving at least 2 inches of space between each scoop. This allows the batter to spread naturally without the pies merging together during baking.
- For smaller Whoopie Pies, use 1 tablespoon of batter for each pie. Follow the same process, spacing them at least 1½ inches apart. This creates cute, bite-sized pies that are perfect for parties or as mini treats.
When shaping, you can gently smooth the tops of the batter mounds with a spoon or spatula to help achieve more uniform, rounded pies. This extra touch will give your Whoopie Pies a polished, professional look once baked. Proper spacing and even scooping are key to preventing overcrowding on the baking sheets and ensuring the pies bake evenly, resulting in perfectly shaped and delicious Whoopie Pies.
Once your Whoopie Pies are shaped, it’s time to bake them.
- For large Whoopie Pies, bake for 9-10 minutes at 350°F (175°C).
- For smaller Whoopie Pies, reduce the baking time to 7-8 minutes.
It’s important to keep a close eye on them, as even a minute too long can affect the texture. To test for doneness, gently press the tops of the pies. If they spring back lightly when touched, they are perfectly baked. This ensures that they remain soft and cake-like on the inside.
Be cautious not to overbake, as this can result in dry, crumbly Whoopie Pies. Overbaked pies lose their soft texture and can become too firm to hold the filling properly. It’s better to slightly underbake them than to risk them drying out. Once they’re done, remove the pies from the oven and let them cool on the baking sheets for a few minutes before transferring them to a wire rack to cool completely.
Allowing your Whoopie Pies to cool completely on wire racks before decorating is crucial for both texture and presentation. When the pies are fresh from the oven, they are soft and delicate. Transferring them to wire racks helps them cool evenly and prevents the bottoms from becoming soggy due to trapped heat.
Cooling fully is also essential because if the pies are even slightly warm, the icing will melt and become runny, leading to a messy, uneven filling. Decorating cool pies ensures that the icing holds its shape, resulting in a clean, polished look, perfect for spooky Halloween designs.
To create the perfect Halloween orange icing, start by placing your vanilla icing in a mixing bowl. Add a few drops of orange food coloring gel at a time and stir thoroughly to blend the color evenly. Gel food coloring is ideal because it provides vibrant color without altering the icing’s consistency, unlike liquid food coloring which can make the icing runny.
Continue adding small amounts of coloring until you achieve your desired shade of orange. Be cautious not to add too much at once—build the color gradually to maintain the icing’s thick, spreadable texture for decorating your Whoopie Pies perfectly.
To assemble your Halloween Whoopie Pies, take one of the cooled pies and place it flat side up. Using a piping bag or a spatula, spread a generous amount of the orange icing onto the flat surface. If you’re piping, start in the center and work outward in a spiral, leaving a small border around the edges to prevent overflow when pressed. If spreading with a spatula, aim for a thick, even layer about ¼ inch thick.
For the perfect balance of flavor, apply enough icing for a rich filling without overwhelming the pies. Next, take another pie and gently press its flat side down on top of the iced pie, creating a sandwich. Be sure to press lightly to avoid squeezing out the icing. The result should be a neat, well-filled Whoopie Pie, where the icing peeks just slightly from the edges, giving you the perfect bite of both cake and filling.
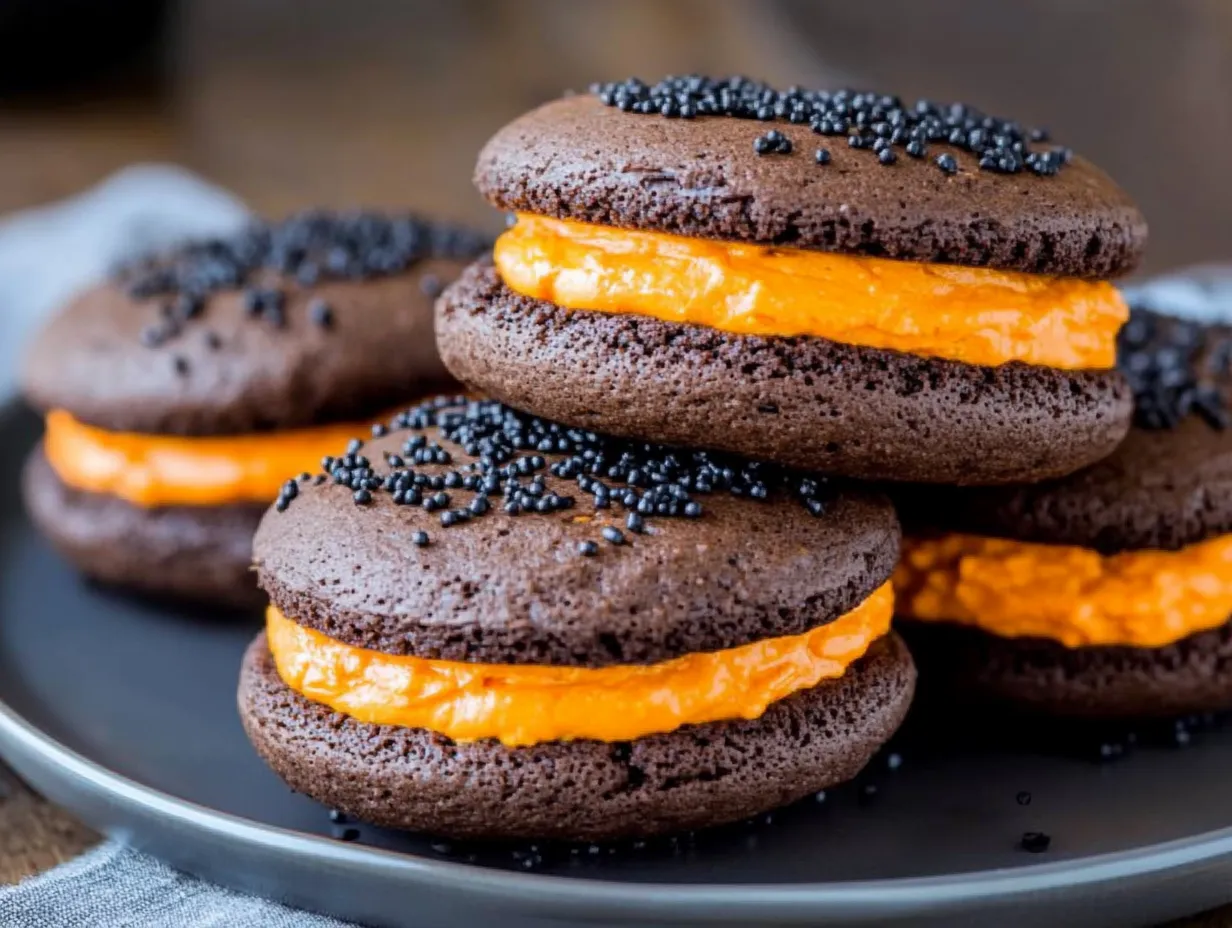
Classic Decoration:
For a simple yet spooky touch, sprinkle edible black glitter or black sprinkles on top of your assembled Whoopie Pies. To apply, hold the pies over a tray to catch any excess glitter or sprinkles, then lightly dust or sprinkle over the tops. The black glitter gives a dark, eerie shimmer, while the sprinkles add texture and contrast, enhancing the Halloween theme.
Stenciling Technique:
To create intricate designs like bats, pumpkins, or ghosts, use Halloween-themed stencils and powdered sugar. Place the stencil gently over the top of a Whoopie Pie, making sure it lies flat. Use a fine-mesh sieve to dust powdered sugar evenly over the stencil. Slowly lift the stencil off to reveal the crisp, spooky design. To avoid disturbing the pies, hold the stencil securely in place and dust lightly to prevent the sugar from smudging or falling too heavily.
Spider Whoopie Pies Option:
For a fun spider effect, cut black licorice into small strips to create spider legs. Use six to eight legs per pie, attaching them to the sides of the Whoopie Pie by gently pressing the ends into the icing. Use a small dab of icing as glue to secure candy eyes on the top of the pie, giving the spider a playful, creepy appearance.
For a variation, you can use melted chocolate to pipe spider legs directly onto parchment paper. Once the chocolate hardens, carefully lift the legs and attach them to the Whoopie Pie with icing. This method adds a rich, chocolatey touch to the design and offers a more delicate, artistic look.
To keep your Halloween Whoopie Pies fresh, store them in an airtight container. If you plan to enjoy them within a day or two, they can be kept at room temperature. For longer storage, place the container in the refrigerator, where they will stay fresh for up to 5 days. If you want to prepare them further in advance, they can also be frozen. To freeze, wrap each Whoopie Pie individually in plastic wrap, then place them in a freezer-safe bag or container. They will last in the freezer for up to 2 months—just thaw them at room temperature before serving.
For a festive presentation at parties, arrange the Whoopie Pies on a Halloween-themed platter. You can add extra decorations around the platter, such as candy corn or mini pumpkins, to enhance the spooky atmosphere.
For the best texture and flavor, serve the pies slightly chilled or at room temperature. This keeps the icing firm and ensures the pies retain their soft, moist consistency.
Frequently Asked Questions (FAQs)
Can I make the batter ahead of time?
Yes, you can prepare the batter a few hours in advance and store it in the refrigerator. To do this, cover the mixing bowl tightly with plastic wrap or transfer the batter to an airtight container. However, it’s important not to let the batter sit for too long—ideally no more than 4 hours—because the leavening agents (such as baking powder in the cake mix) will start to lose their effectiveness, which can affect the rise and texture of the Whoopie Pies. When ready to bake, let the batter sit at room temperature for about 15 minutes before scooping and baking.
Can I freeze Whoopie Pies?
Yes, Whoopie Pies freeze well. To freeze, first wrap each Whoopie Pie individually in plastic wrap to prevent freezer burn. Then, place the wrapped pies in a large, freezer-safe container or zip-top bag. They can be stored in the freezer for up to 2 months. When you’re ready to enjoy them, thaw the Whoopie Pies at room temperature for a few hours or overnight in the refrigerator. This will ensure they retain their soft, moist texture and delicious flavor.
Can I use homemade cake batter instead of boxed mix?
Absolutely! If you prefer to make the batter from scratch, you can use a rich chocolate cake recipe. Look for recipes that call for cocoa powder and melted butter to replicate the deep flavor of Devil’s Food cake. For added moisture, you can also include a spoonful of instant pudding mix or sour cream in the batter. The key is to ensure the batter is thick enough to hold its shape while baking, so your Whoopie Pies don’t spread too thin.
How do I get the perfect Whoopie Pie shape?
For perfectly shaped Whoopie Pies, use a cookie scoop to measure equal portions of batter. This ensures each pie is the same size, which helps with even baking and gives them a uniform look. Make sure to leave at least 1½ to 2 inches of space between each scoop to allow the pies to spread without touching. Smoothing the tops with a spatula or spoon before baking can also help achieve a rounded, professional look.
What are other fun ways to decorate these Whoopie Pies for Halloween?
Get creative with your decorations! In addition to orange icing, you can use other Halloween colors like purple, green, or black by mixing food coloring into the icing. Edible paint can be used to draw spooky faces or designs on the tops of the pies. You can also experiment with different toppings, such as gummy worms or mini candy bones, to give your Whoopie Pies a ghoulish twist. Adding candy corn or melted chocolate spider webs are other fun ways to amp up the Halloween theme!
Halloween Whoopie Pies are the perfect combination of delicious flavor and festive fun, making them a must-have treat for the spooky season. Their rich chocolatey base and vibrant orange icing are a hit with both kids and adults, while their versatility allows for endless decorating possibilities. From simple sprinkles to spooky spiders, these treats are easy to customize for any Halloween party or celebration. Don’t hesitate to get creative with your designs—whether using candy eyes, licorice legs, or unique icing colors, Halloween Whoopie Pies are a fun, delicious way to bring spooky spirit to your dessert table!
Print
Halloween Whoopie Pies
- Author: Christophe
Description
These Halloween Whoopie Pies are the perfect blend of chocolatey goodness and festive fun! Soft Devil’s Food cake cookies are sandwiched with orange-tinted vanilla icing, creating a spooky treat that’s both delicious and visually striking. With the added touch of black sprinkles and creative decorations like candy eyes and licorice spider legs, these Whoopie Pies are sure to be a hit at any Halloween gathering. Perfect for both kids and adults, they’re easy to make and a delight to eat!
Ingredients
- 1 (15.25 oz) box Devil’s Food cake mix
- ¾ cup water
- ½ cup vegetable oil
- 3 large eggs
- 1 (4-serving size) box chocolate fudge instant pudding
- 2 (16 oz) tubs vanilla cake icing
- Orange food coloring gel
- Edible black glitter or black sprinkles
- Powdered sugar (optional for stenciling)
- Black licorice (for spider legs)
- Candy eyes (for decoration)
Instructions
1️⃣ Preheat the oven: Set your oven to 350°F (175°C). Prepare baking sheets with Silpat mats or parchment paper for easy removal.
2️⃣ Prepare the batter: In a large mixing bowl, combine the Devil’s Food cake mix, water, vegetable oil, eggs, and chocolate fudge instant pudding mix. Beat on medium speed until the batter is smooth and well-blended.
3️⃣ Shape the Whoopie Pies:
- For larger Whoopie Pies: Drop 18 evenly-sized scoops of batter (about 2 tablespoons each) onto the prepared baking sheets, shaping them into rounds.
- For smaller pies: Make 36 smaller batter circles (about 1 tablespoon each).
4️⃣ Bake: Bake for 7-10 minutes, depending on the size of your Whoopie Pies, or until the tops spring back lightly when touched. Be careful not to overbake.
5️⃣ Cool: Once baked, let the pies cool completely on wire racks before decorating.
6️⃣ Color the icing: In a bowl, mix the vanilla icing with a few drops of orange food coloring gel until the desired vibrant orange shade is achieved. Stir well to ensure even color.
7️⃣ Assemble: Pipe or spread a generous amount of the orange icing on the flat side of one Whoopie Pie. Top with another pie, flat side down, to create a sandwich.
8️⃣ Decorate:
- Classic Whoopie Pies: Sprinkle edible black glitter or sprinkles on top for a spooky touch.
- Stenciling Option: For a fun effect, place Halloween-themed stencils (bats, pumpkins, etc.) on top of the Whoopie Pies and dust with powdered sugar for a cool design.
9️⃣ Spider Whoopie Pies (Optional):
- Cut black licorice into short pieces to create spider legs. Attach 6-8 legs to the sides of the Whoopie Pie using extra icing as glue.
- Use candy eyes to bring your spider to life by sticking them onto the top of the Whoopie Pie with a small dab of icing.
Notes
- Stenciling Idea: For an easy stenciling design, place Halloween-themed paper cutouts (such as bats or pumpkins) on top of the pies, lightly sift powdered sugar over the top, then carefully remove the stencil to reveal the shape.
- Spider Design: To make the spider legs more stable, chill the Whoopie Pies briefly after assembling to help the icing set.


")

")


")
