

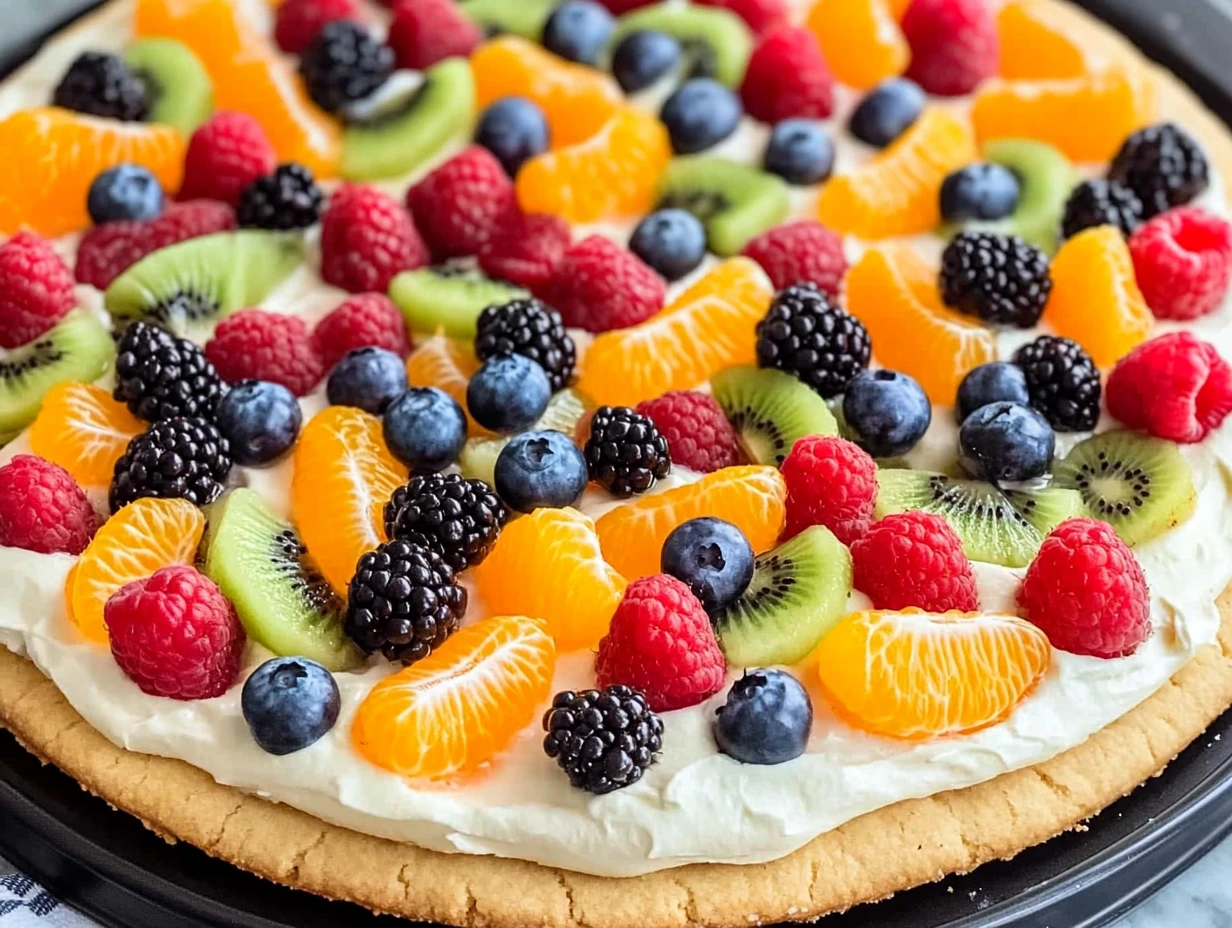
There’s just something so magical about a dessert that looks like art but tastes like pure summer bliss. That’s exactly what this Homemade Fruit Pizza delivers — a refreshing, colorful treat that’s not only beautiful but also incredibly easy to make. Whether you’re hosting a summer BBQ, bringing a dessert to a baby shower, or just want to brighten up your weekend, this fruit pizza will be a total showstopper.
I first made this for a Fourth of July potluck a few years back, and let me tell you — it disappeared within minutes! It’s one of those desserts that feels light and indulgent all at once. The soft sugar cookie crust acts like a chewy canvas for the tangy cream cheese frosting and juicy, sweet fruit toppings. And the best part? You don’t need any special baking skills to pull this off. If you can press cookie dough into a pan and slice some fruit, you’ve basically got this covered.
Let’s dive into Part 1 of the recipe — and trust me, you’ll want to make this your go-to dessert all summer long.
Ingredients You’ll Need
For the crust:
1 package (16.5 oz) refrigerated sugar cookie dough
For the frosting:
1 package (8 oz) cream cheese, softened
1/3 cup granulated sugar
1/2 teaspoon vanilla extract
For the topping:
Assorted fresh fruits such as:
Strawberries
Blueberries
Kiwi
Grapes
Mandarin oranges
Pineapple
Optional: 1/4 cup apricot preserves for a glossy fruit glaze
STEPS: Making the Cookie Crust and Creamy Frosting
Step 1: Prepare the crust
Start by preheating your oven to 350°F (175°C). Grab a 12-inch pizza pan or tart pan — either one works perfectly for this dessert. Open your package of refrigerated sugar cookie dough and press it evenly into the pan, making sure to spread it all the way to the edges for a smooth, uniform crust.
Pop it in the oven and bake for 12 to 15 minutes. You’re looking for that perfect golden-brown finish that tells you it’s just right. Once it’s done, set it aside and let it cool completely. This part’s important — if the crust is still warm, the frosting will melt and get a little messy.

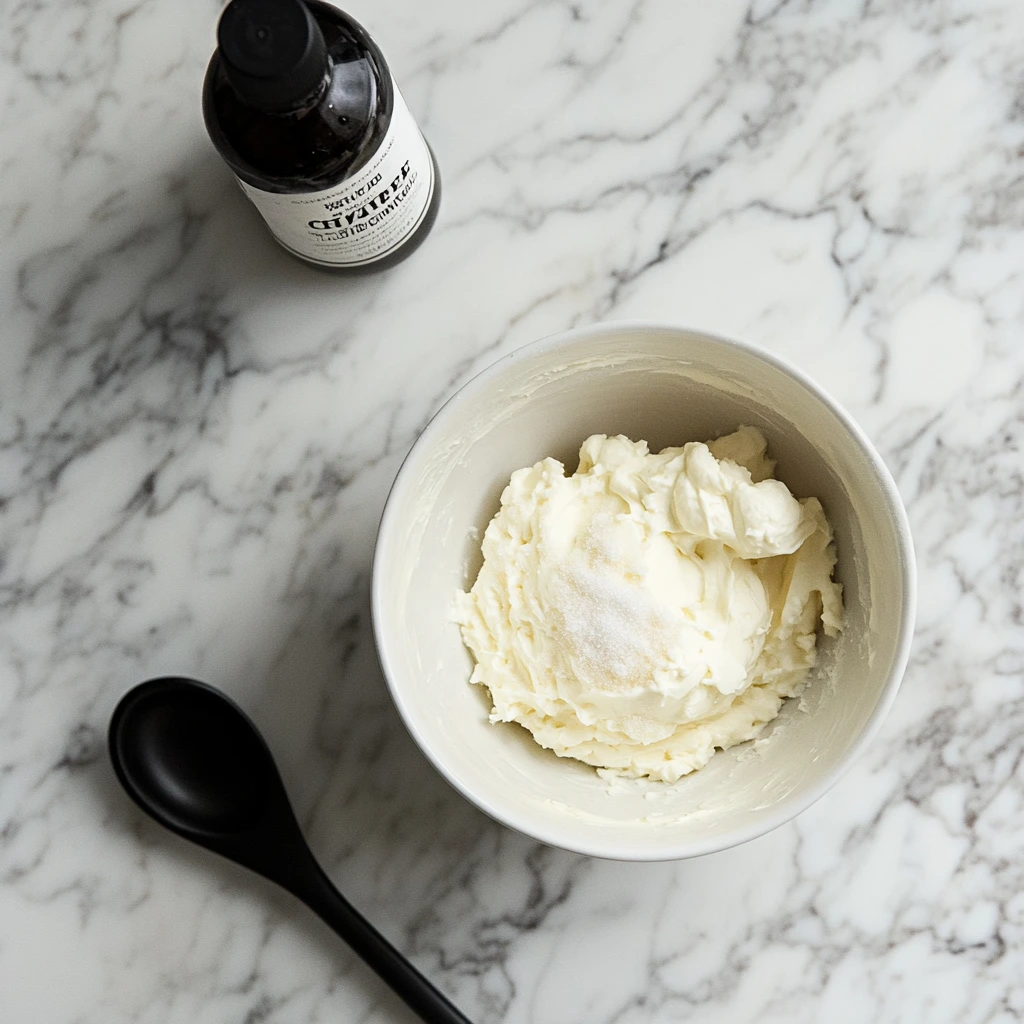
Step 2: Make the frosting
While the crust is cooling, it’s time to whip up that rich, creamy frosting. In a medium bowl, beat together the softened cream cheese, granulated sugar, and vanilla extract. Mix until it’s smooth, creamy, and fluffy. This luscious layer will be the perfect contrast to the juicy fruit and sweet cookie base.
Step 3: Spread the frosting
Once your cookie crust has cooled down, spread the cream cheese mixture evenly over the top. You can use an offset spatula or the back of a spoon to get a nice, even layer. Make sure to get all the way to the edges, because nobody should miss out on that creamy goodness.
Decorating Your Fruit Pizza and Tips for a Stunning Finish
Now that your crust is baked and the frosting is perfectly spread, it’s time for the real fun—the fruit! This is where you get to be creative. Whether you’re going for a rainbow look, a floral pattern, or just a casual, colorful mix, decorating your fruit pizza is a great chance to put your own spin on it.
One of the things I love most about this dessert is that it’s both beautiful and low-stress. There’s no pressure to be perfect here. The fruit does most of the work for you with its natural color and texture. That said, I do have a few favorite combinations and some helpful tricks that make this dessert pop and hold up a little longer.
Let’s get into the next steps to bring it all together.
STEPS: Add the Fruit and Glaze for the Finishing Touch
Step 4: Prep and arrange the fruit
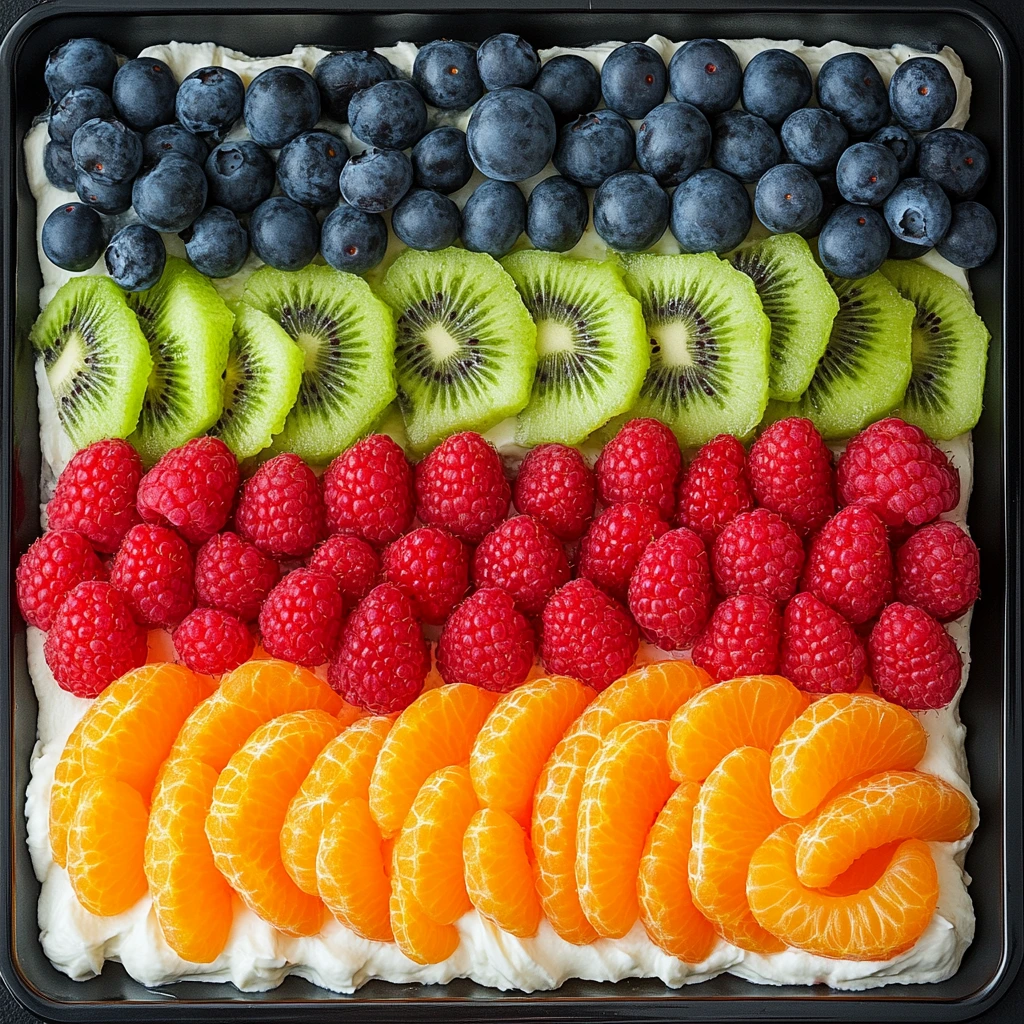
Start by washing and drying all your fruit thoroughly. This is important—wet fruit can make your frosting runny and the cookie base soggy over time. Once everything’s dry, slice your larger fruits like strawberries, kiwi, and pineapple into bite-sized pieces or thin rounds.
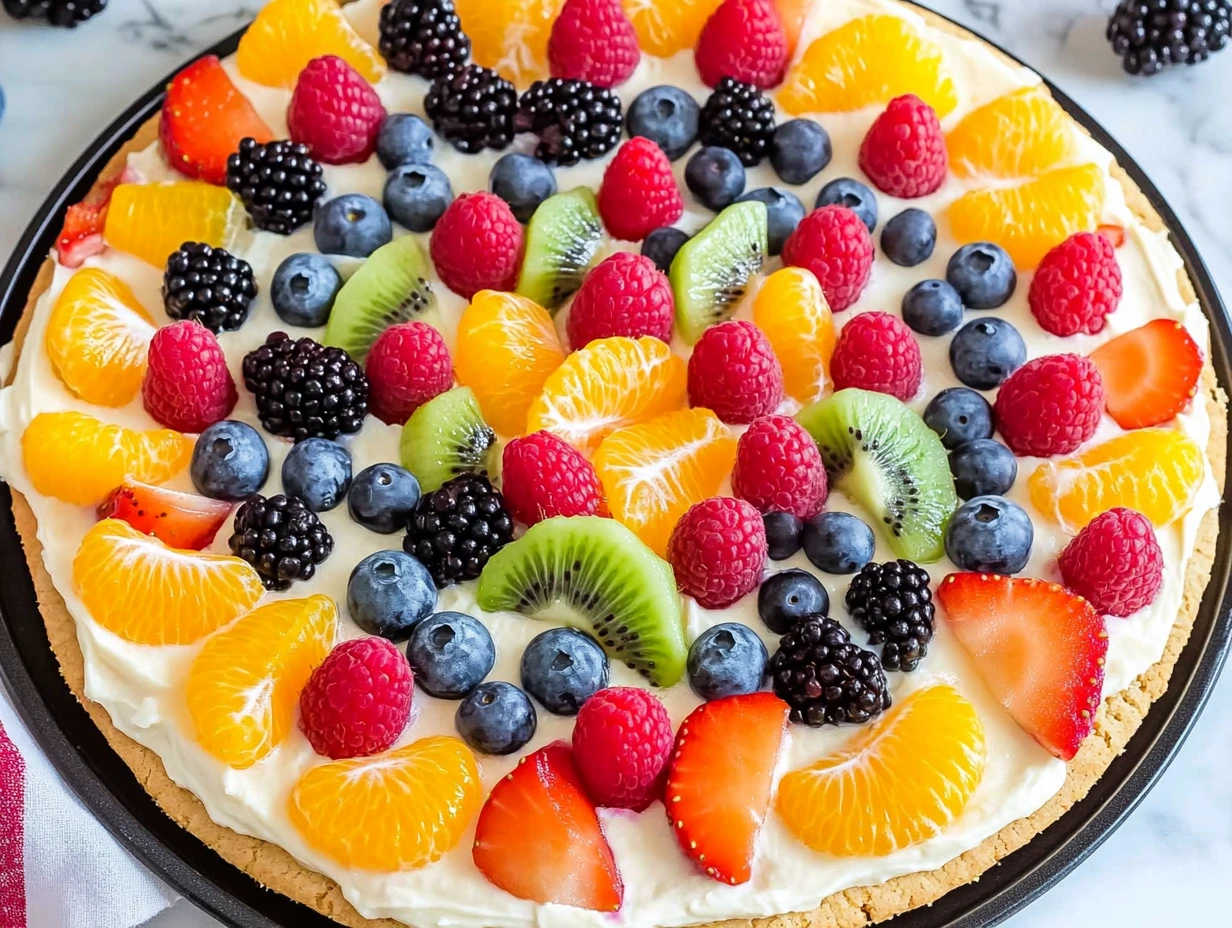
Now comes the artistic part. Begin arranging the fruit over the frosted cookie base. You can start from the center and work your way out in circles or rows, or simply scatter the fruit randomly for a more casual look. I usually go with a spiral pattern, layering strawberries, kiwi slices, blueberries, and mandarin oranges in alternating colors for that bright, festive look.
Step 5: Optional fruit glaze
If you want that beautiful, shiny finish (like the kind you see in bakery windows), a light fruit glaze does the trick. All you need is about 1/4 cup of apricot preserves. Warm it in the microwave or on the stovetop just until it loosens up a bit, then gently brush it over the fruit using a pastry brush. It not only makes everything look more vibrant but also helps keep the fruit from drying out.
Step 6: Chill and serve
Once your fruit pizza is fully decorated, place it in the refrigerator for at least an hour. This helps the frosting firm up and allows all the flavors to meld together. When you’re ready to serve, slice it like you would a pizza and enjoy!
Helpful Tips and Customizations
Here are a few tricks I’ve picked up after making this fruit pizza more times than I can count:
Use a tart pan with a removable bottom if you want a more refined look. It makes slicing and serving cleaner and prettier.
Lemon zest in the crust or frosting can add a refreshing zing that pairs beautifully with the fruit.
Use seasonal fruits for the freshest flavor and best prices. In the summer, I love using berries and stone fruits. In the winter, mandarin oranges and kiwi shine.
Dry the fruit well. Seriously, take a few extra minutes to pat everything dry with paper towels. It makes a big difference in how long your fruit pizza stays fresh.
Don’t overdo the fruit. As tempting as it is to pile it on, less is sometimes more. A lighter layer lets the frosting and crust come through with every bite.
Plan to serve it the same day. While it holds up for a few hours in the fridge, fruit pizza is best enjoyed fresh. The longer it sits, the more moisture the fruit releases, which can soften the crust.
Decorating Your Fruit Pizza and Tips for a Stunning Finish
Now that your cookie crust is baked and your creamy frosting is spread evenly, it’s time to move on to the part that really makes this dessert pop — the fresh fruit! This step is where your creativity shines, and the colors and textures come alive. Whether you prefer a neat, symmetrical design or a casual, scattered look, the fruit topping will add that irresistible fresh and tangy contrast to the sweet cookie and smooth frosting.
Let’s get into the next steps to complete your homemade fruit pizza.
STEPS: Arrange the Fruit and Add the Glaze
Step 4: Prepare and arrange the fruit
First things first — wash your fruit thoroughly and pat it dry with paper towels. This extra step is crucial because excess moisture can make the cream cheese frosting soggy and runny. After drying, slice larger fruits like strawberries, kiwi, and pineapple into thin pieces or bite-sized chunks. Smaller fruits like blueberries and grapes can be left whole.
When you’re ready to decorate, start by placing fruit in the center of the pizza and work your way outward in a circular pattern or rows. You can create rings of color by alternating different types of fruit, or mix and match for a more freeform look. For example, try a ring of kiwi slices followed by a ring of strawberries, then scatter blueberries and grapes to fill in the gaps. This not only looks stunning but also ensures every bite has a mix of flavors.
Step 5: Optional glaze for a glossy finish
If you want your fruit to shine and stay fresh longer, a glaze can make all the difference. Warm about 1/4 cup of apricot preserves in a small bowl — just enough to loosen it up so it’s easy to brush. Using a pastry brush, gently coat the fruit with the warm glaze. This adds a lovely gloss and helps seal in the freshness without overpowering the fruit’s natural flavors.
Step 6: Chill before serving
Once your fruit is beautifully arranged and glazed, place the fruit pizza in the refrigerator for at least 1 hour. Chilling helps the frosting firm up and allows the flavors to meld together, making it easier to slice and serve without everything sliding around.
Tips for the Perfect Fruit Pizza
Choose fresh, vibrant fruit: Opt for fruits that are ripe but firm for the best texture and presentation.
Pat fruit dry: This prevents the frosting from becoming soggy and keeps the crust crisp.
Add zest or extracts: For a twist, try adding a teaspoon of lemon zest or a few drops of almond extract to the frosting or dough before baking.
Use a tart pan: A tart pan with a removable bottom makes slicing and serving easier, especially if you want clean edges.
Serve the same day: Fruit pizza is best enjoyed the day you make it, as fruit can release juices over time and soften the crust.
Be creative: Feel free to swap out fruits based on what’s in season or what you have on hand. Peaches, raspberries, or mango would all be delicious additions.
Fruit Pizza FAQ and Final Thoughts
By now, you’ve baked the perfect sugar cookie crust, whipped up that creamy frosting, and arranged a colorful medley of fresh fruit on top. This homemade fruit pizza is not only a feast for the eyes but also a refreshing, crowd-pleasing dessert that’s perfect for nearly any occasion. Before you dig in, let’s answer some of the most common questions I get about this recipe, plus wrap things up with a few final tips.
Frequently Asked Questions
1. Can I make the fruit pizza ahead of time?
You can prepare the crust and frosting a day in advance and keep them covered separately in the fridge. Assemble the fruit topping on the day you plan to serve it to keep the fruit fresh and prevent the crust from getting soggy.
2. What if I don’t have refrigerated sugar cookie dough?
No worries! You can make your own sugar cookie dough from scratch or use any ready-made dough you prefer. Just press it into the pan and bake as directed.
3. Can I use other fruits?
Absolutely! The beauty of this recipe is its flexibility. Feel free to use any fresh fruits you love or have on hand — peaches, raspberries, mango, blackberries, or even pomegranate seeds can all add a unique twist.
4. How do I store leftover fruit pizza?
Cover the fruit pizza with plastic wrap and refrigerate. It’s best eaten within 24 hours to prevent the crust from becoming soggy and the fruit from losing its texture.
5. Can I make this gluten-free?
Yes! Substitute the sugar cookie dough with a gluten-free variety or bake a gluten-free cookie crust from scratch. Just make sure your ingredients are certified gluten-free if needed.
6. What’s the best way to slice the fruit pizza?
Use a sharp serrated knife and slice gently in a back-and-forth motion to avoid smashing the fruit or frosting. Letting the pizza chill before slicing helps keep the layers intact.
7. Is the apricot glaze necessary?
The glaze is optional but highly recommended if you want a glossy finish and longer-lasting freshness on your fruit. You can skip it if you prefer a more natural look or if you don’t have preserves on hand.
Final Thoughts
Making a homemade fruit pizza is one of those simple pleasures that feels special every time. From the buttery sugar cookie crust to the tangy cream cheese frosting and the burst of fresh fruit flavors, it’s a dessert that brings smiles and compliments at any gathering.
Don’t be intimidated by the decorating part — the more colorful and varied your fruit, the better it looks. And don’t hesitate to experiment with different fruits or add a little twist to the frosting with lemon zest or almond extract. It’s your dessert, so make it your own.
Print
Homemade Fruit Pizza
- Author: David
Description
Homemade Fruit Pizza is a colorful, refreshing dessert made with a soft cookie crust, creamy frosting, and a beautiful arrangement of fresh fruit. It’s a crowd-pleaser that combines the fun of decorating with the delicious contrast of sweet, tangy, and creamy flavors. Perfect for summer gatherings, holidays, or anytime you want a dessert that looks as good as it tastes.
Ingredients
For the crust:
1 package (16.5 oz) refrigerated sugar cookie dough
For the frosting:
1 package (8 oz) cream cheese, softened
1/3 cup granulated sugar
1/2 teaspoon vanilla extract
For the topping:
Assorted fresh fruits such as strawberries, blueberries, kiwi, grapes, mandarin oranges, and pineapple
Optional: 1/4 cup apricot preserves for glaze
Instructions
Preheat the oven to 350°F (175°C). Press the sugar cookie dough evenly into a 12-inch pizza pan or tart pan to form the crust. Bake for 12–15 minutes or until golden brown. Let it cool completely.
In a bowl, beat the softened cream cheese, sugar, and vanilla extract until smooth and creamy.
Spread the cream cheese mixture evenly over the cooled cookie crust.
Arrange the sliced fruit over the frosting in a decorative pattern, starting from the center and working outward.
If desired, warm the apricot preserves slightly and brush it lightly over the fruit to add shine and help preserve freshness.
Chill in the refrigerator for at least 1 hour before slicing and serving.
Notes
Use fruits that are fresh and vibrant for the best presentation and flavor. Pat fruits dry to prevent excess moisture on the cream cheese layer. You can also customize the cookie crust by adding a dash of lemon zest or almond extract for extra flavor. This dessert is best enjoyed the day it’s made, as the fruit can start to soften and release juice over time.


")

")


")
