

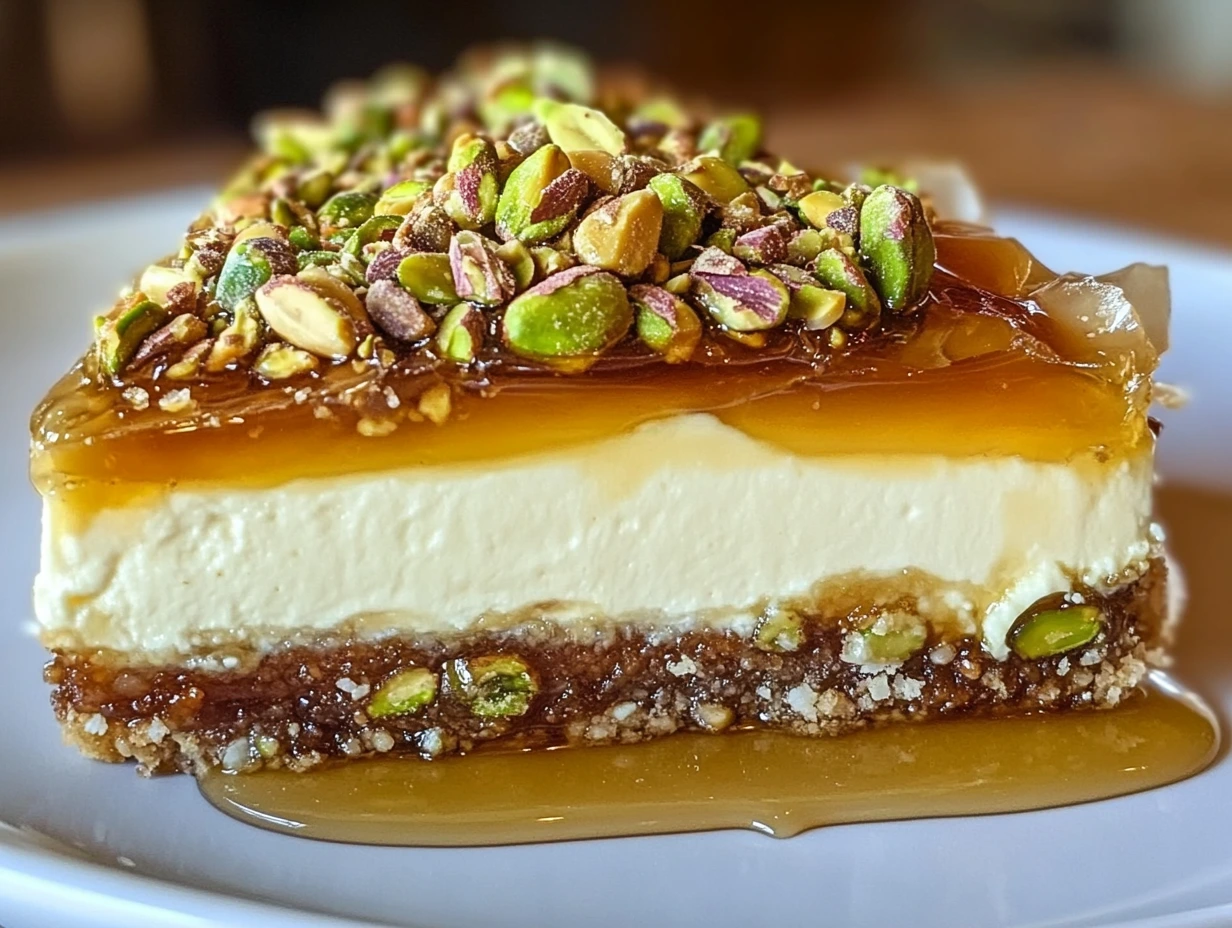
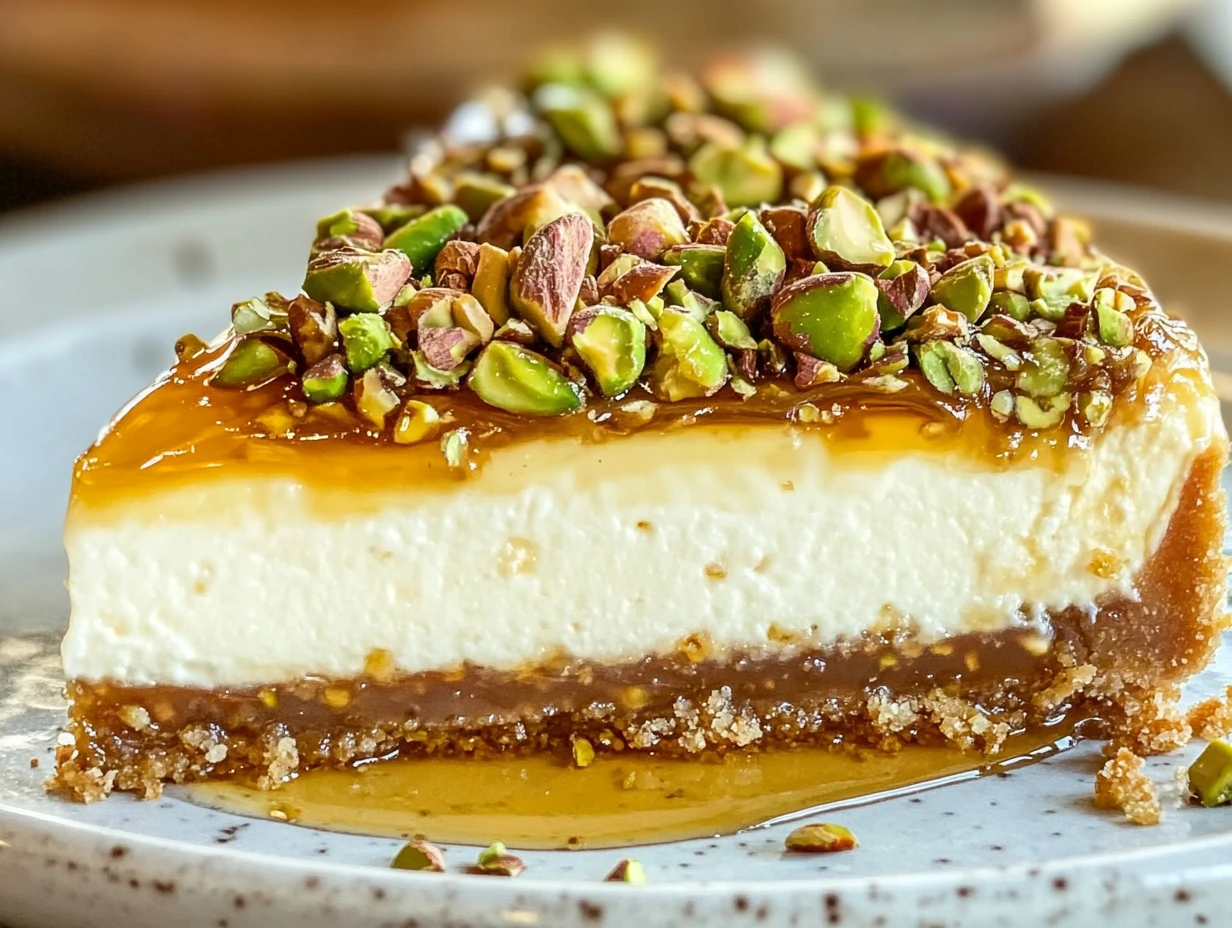
Imagine a dessert that brings together the sweet, flaky goodness of baklava and the creamy, indulgent texture of cheesecake. Sounds like a dream, right? Let me introduce you to Honey Pistachio Baklava Cheesecake, a show-stopping dessert that’s perfect for any occasion. Whether you’re a fan of Middle Eastern-inspired flavors or simply love a rich cheesecake, this recipe is bound to become a new favorite. Plus, it’s easier to make than you think—promise!
Why You’ll Fall in Love with This Recipe
I still remember the first time I tasted this cheesecake; it was like a flavor explosion in my mouth. The crispy layers of buttery phyllo, the crunch of spiced nuts, and the luscious cheesecake filling topped with honey and pistachios—it’s the best of both worlds. Perfect for impressing guests or treating yourself, this recipe strikes a balance between exotic and comforting. Trust me, this Honey Pistachio Baklava Cheesecake will be your go-to dessert for every celebration!
The Recipe: Let’s Dive Into the Details!
Prepping the Base
The first step in creating this masterpiece is all about building a solid, flavorful base. Think of this as the stage for the cheesecake to shine!
Step 1: Preheat and Prep Your Pan
Before you even think about layering the phyllo, let’s get the basics right. Preheat your oven to 350°F (175°C). Then, line the base of an 8- or 10-inch springform pan with parchment paper and give the sides a light grease. Trust me, this little prep step will save you from the heartbreak of sticking pastry later on!
Step 2: The Phyllo Magic
Working with phyllo pastry is easier than you might think. Yes, it’s delicate, but here’s a little tip: Keep a damp kitchen towel over the unused sheets to prevent them from drying out.
- Take 10 sheets of phyllo pastry, brushing each with a generous layer of melted butter as you go. Stack them into the prepared pan one at a time, gently pressing to fit. Don’t worry if they’re not perfectly even—rustic edges add character.
- Trim any overhang for a clean fit, then bake the phyllo stack for about 12 minutes or until golden and crisp. Let it cool slightly while you move on to the next step.

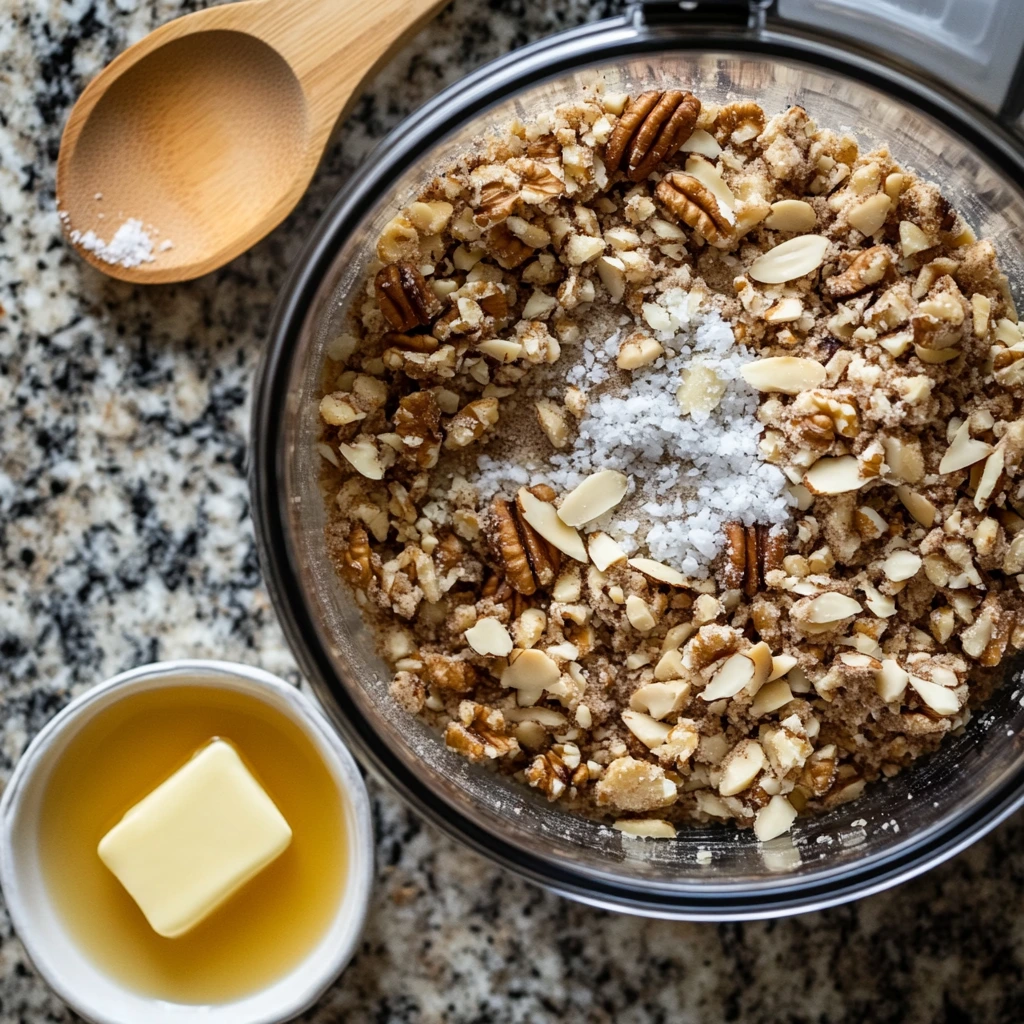
Step 3: Nutty Goodness
This is where the baklava vibes kick in! Grab a food processor and combine roasted walnuts, roasted almonds, ground cinnamon, and a pinch of salt. Pulse until you get a crumbly texture—not too fine; you want that crunch! Mix in 2 tablespoons of melted butter, then spread this aromatic nut mixture evenly over your baked phyllo base. It’s like a crunchy, spiced hug for your cheesecake filling.
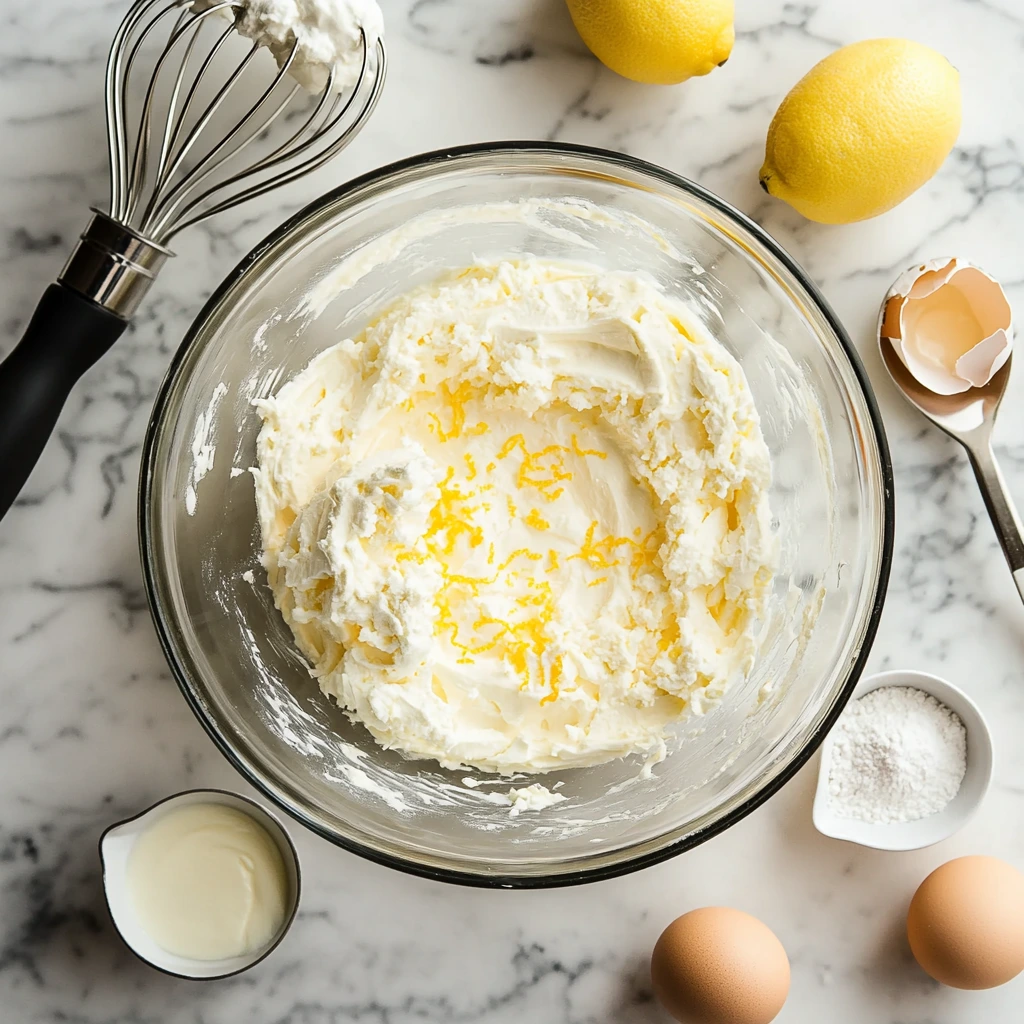
Cheesecake Filling: Creamy, Dreamy Heaven
Let’s talk cheesecake—a smooth, tangy filling that perfectly complements the sweet, nutty base. The trick here is to get all your ingredients to room temperature for the silkiest texture.
Ingredients to Love
You’ll need cream cheese, granulated sugar, vanilla, lemon zest, lemon juice, eggs, cornstarch, and a dollop of Greek yogurt (or sour cream). This combination creates the ultimate creamy and tangy flavor with just the right sweetness.
Pro Tip: Beat the cream cheese and sugar first until completely smooth. Then, add the eggs one at a time. This ensures no lumps and gives you that silky consistency. Fold in the Greek yogurt last for an extra layer of creaminess.
Building and Baking Your Honey Pistachio Baklava Cheesecake
Now that you’ve prepped your buttery phyllo base and the nutty layer is in place, it’s time to bring everything together with the creamy cheesecake filling. This step is where the magic happens. From baking to perfecting the honey pistachio topping, you’ll see your dessert transform into a masterpiece that tastes as good as it looks.
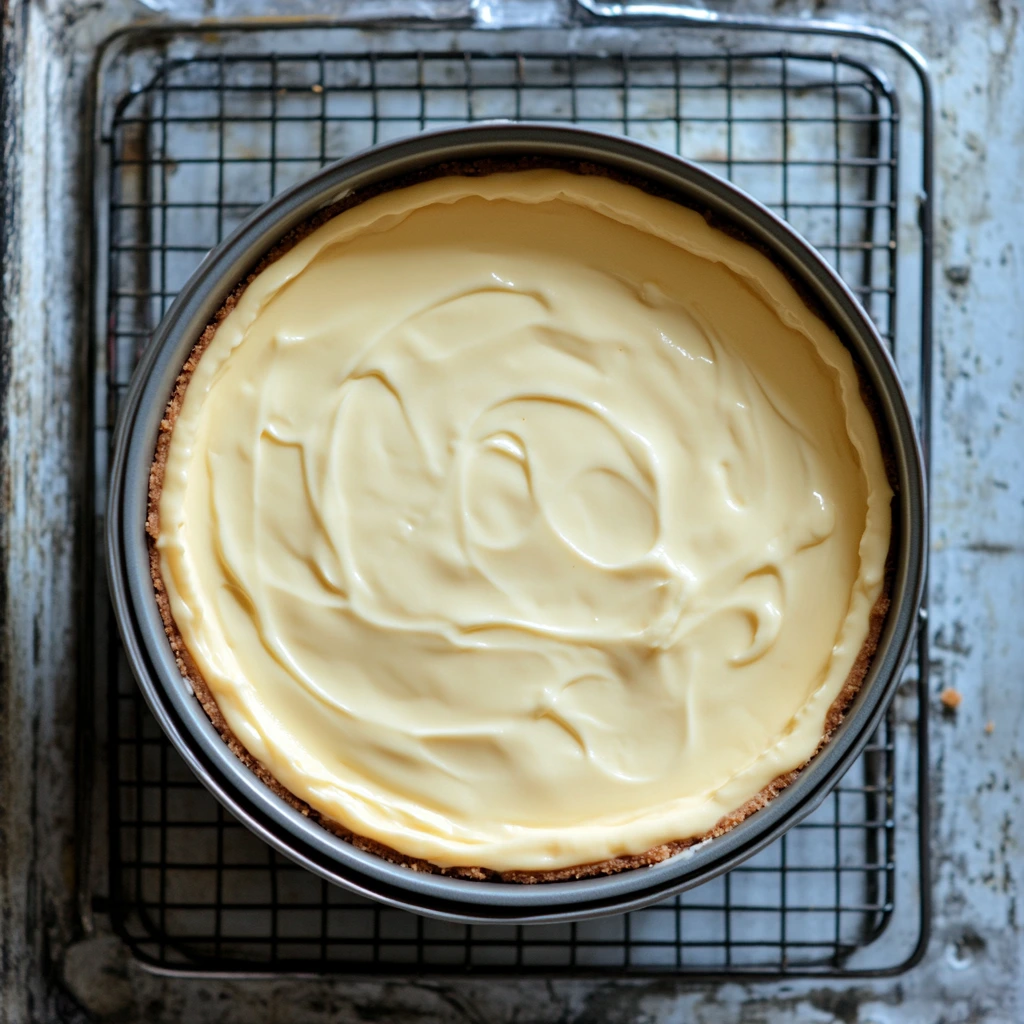
Step 4: Pour and Smooth the Cheesecake Filling
With your cheesecake filling ready (silky smooth, no lumps!), carefully pour it over the nut layer in your springform pan. Use a spatula to spread the filling evenly, smoothing out the top for that classic cheesecake finish. The creamy texture combined with the crunchy nut layer creates a heavenly contrast in every bite.
Pro Tip: To avoid cracks in your cheesecake, gently tap the pan on your countertop a few times before baking. This helps release any trapped air bubbles in the filling, ensuring a smooth, even bake.
Step 5: Bake It to Perfection
Baking a cheesecake is all about patience. Place your pan on the middle rack of your preheated oven and bake at 350°F (175°C) for about 45 minutes. You’re looking for the edges to be set and slightly puffed, while the center should still have a subtle jiggle—this means it’s just right.
But here’s the secret to avoiding a dry cheesecake: once the bake time is up, turn off the oven and leave the cheesecake inside for an additional 50 minutes. This gradual cooling process helps the filling set without overcooking.
Pro Tip: If you’re worried about the edges browning too much, loosely cover the top of your cheesecake with foil halfway through baking.
Step 6: Cool Completely Before Topping
After its time in the oven, transfer the cheesecake to a wire rack and let it cool completely. This step is crucial—topping a warm cheesecake can lead to a runny mess. (And we definitely don’t want that!) Plan to leave it on the counter for at least 2-3 hours, or speed things up by popping it in the fridge for a few hours once it’s no longer warm.
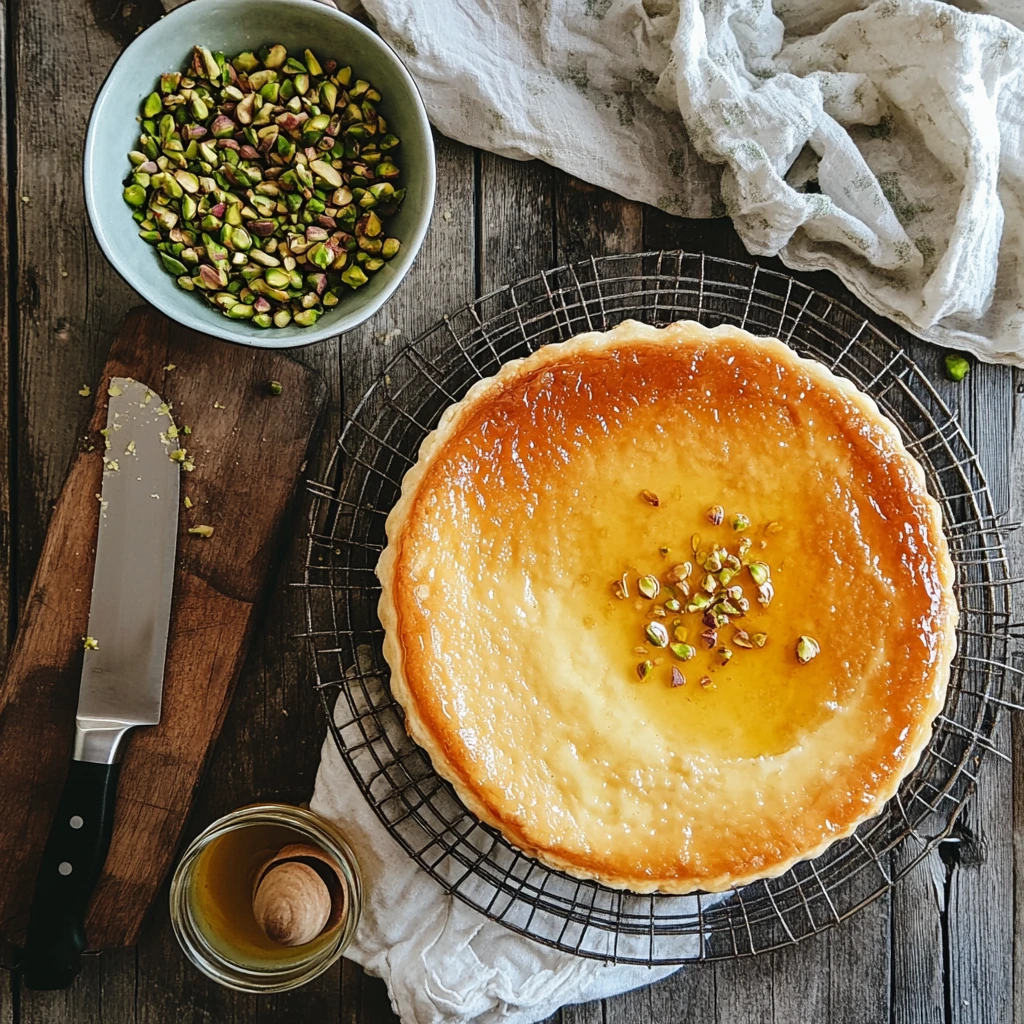
The Topping: A Sweet Finale
The star of this recipe, the honey pistachio topping, brings the whole dessert together with a touch of elegance. Sweet, nutty, and aromatic, this topping adds texture, color, and a flavor profile reminiscent of classic baklava.
Step 7: Honey Pistachio Bliss
Here’s how to make the topping that will have everyone asking for seconds:
- Combine the Honey Mixture: In a small bowl, whisk together 1 cup of honey, 1 tablespoon of lemon juice, and a splash of rosewater (optional, but so worth it for that floral note!). If your honey is thick, warming it slightly can make mixing easier.
- Chop the Pistachios: Coarsely chop 1 cup of unsalted, shelled pistachios. You want a nice mix of small pieces and larger chunks for texture.
- Assemble: Once your cheesecake has completely cooled, pour the honey mixture over the top in an even layer. Use a spoon or spatula to spread it gently, ensuring the entire surface is covered. Then, generously sprinkle the chopped pistachios over the honey glaze.
Step 8: Chill Before Serving
For the best texture and flavor, chill your fully assembled cheesecake for at least 2-4 hours before serving. This gives the topping time to set and the flavors to meld beautifully. The result? A dessert that’s creamy, crunchy, and irresistibly sticky-sweet.
Optional Extra: Feeling indulgent? Drizzle a bit of extra honey over each slice just before serving. It adds a glossy finish and an extra hint of sweetness.
Serving Suggestions and Variations
- Pair It with Coffee or Tea: This cheesecake shines when paired with a hot cup of Turkish coffee or spiced chai. The warm spices complement the nutty, honeyed flavors perfectly.
- Add a Garnish: For an extra pop of color and flavor, sprinkle some edible rose petals or a light dusting of ground cinnamon over the pistachios.
- Try Different Nuts: Not a pistachio fan? Swap them for toasted hazelnuts, pecans, or even more walnuts and almonds for a twist.
FAQs and Finishing Touches
By now, your Honey Pistachio Baklava Cheesecake is chilling beautifully in your fridge, and your kitchen smells like a Mediterranean bakery. You’re almost ready to slice into this masterpiece, but before we wrap up, let’s address some frequently asked questions to help you troubleshoot and elevate this dessert. Then, we’ll bring it all home with some final thoughts to make your cheesecake experience unforgettable!
FAQ: Your Honey Pistachio Baklava Cheesecake Questions Answered
1. Can I make this cheesecake ahead of time?
Absolutely! In fact, it’s better to prepare it a day in advance. Cheesecake tastes even better after resting in the fridge overnight, as the flavors have more time to develop. Add the topping just before serving to keep the pistachios crunchy.
2. What if I don’t have rosewater?
No worries! While rosewater adds a subtle floral note, it’s not essential. You can skip it or replace it with a splash of orange blossom water or even vanilla extract for a different twist.
3. How do I prevent the cheesecake from cracking?
Cracks happen when the cheesecake cools too quickly or when air bubbles are trapped in the batter. To avoid this:
- Use room-temperature ingredients for the filling.
- Tap the pan on the counter to release air bubbles before baking.
- Let the cheesecake cool gradually in the oven after turning it off.
4. Can I use pre-made phyllo cups instead of layering the sheets?
Definitely! If you’re short on time, you can line the pan with pre-made phyllo cups or shells. Just make sure to arrange them tightly and press them into the base to create a cohesive crust.
5. What if I don’t have a springform pan?
While a springform pan makes removing the cheesecake easier, you can use a regular 8- or 10-inch round cake pan lined with parchment paper. Be extra careful when lifting the cheesecake out after chilling—it helps to run a knife around the edges first.
6. Can I freeze this cheesecake?
Yes, you can freeze it without the topping. Wrap it tightly in plastic wrap and then foil before freezing. When ready to serve, thaw it in the fridge overnight and add the honey and pistachio topping fresh.
7. How should I store leftovers?
Store leftover cheesecake in an airtight container in the fridge for up to 4-5 days. To keep the topping fresh, you can store it separately and add it just before serving.
Conclusion: Sweet Success with Every Bite
Congratulations, you’ve just mastered a dessert that’s as impressive as it is delicious! The Honey Pistachio Baklava Cheesecake combines two beloved treats into one unforgettable dessert. It’s creamy, crunchy, nutty, and just the right amount of sweet—a true crowd-pleaser that’ll have your guests begging for the recipe.
Here’s what makes this cheesecake so special:
- Layers of Flavor: From the buttery phyllo to the spiced nut layer, the creamy cheesecake filling, and the honey pistachio topping, every bite is a delightful journey.
- Perfect for Any Occasion: Whether you’re serving it for a festive dinner, a potluck, or a quiet night in, this cheesecake steals the show.
- Customizable: From swapping nuts to adding different spices, the recipe invites creativity while staying true to its roots.
So, what are you waiting for? Grab a knife, cut into that perfectly chilled cheesecake, and let the compliments roll in. Don’t forget to share your creation with family and friends, and feel free to tweak the recipe with your own personal touches. Trust me, this dessert will become a new tradition in your home.
Print
Honey Pistachio Baklava Cheesecake
- Total Time: 2 hours 30 minutes
Description
A luscious fusion of two beloved desserts—baklava and cheesecake! This indulgent treat features layers of buttery phyllo pastry, a nutty baklava-inspired crust, and a tangy, creamy cheesecake filling, topped with fragrant honey, rosewater, and pistachios.
Ingredients
For the Base:
- 10 sheets phyllo pastry (thawed)
- 2 sticks unsalted butter (melted, approx. 1 cup)
- 1 cup roasted walnuts
- 1 cup roasted almonds
- 1 tsp ground cinnamon
- ¼ tsp salt
- 2 tbsp melted butter
Cheesecake Filling:
- 500g (2 packages) cream cheese (room temperature)
- 1 cup granulated sugar
- Pinch of salt
- 2 tsp vanilla extract
- 1 tbsp lemon zest
- 1 tbsp lemon juice
- 1 tbsp cornstarch
- 3 large eggs (room temperature)
- 250g strained Greek yogurt (or sour cream)
Topping:
- 1 cup shelled pistachios (unsalted, coarsely chopped)
- 1 cup honey
- 1 tbsp lemon juice
- Splash of rosewater
Optional Garnish:
- Additional honey for drizzling
Instructions
1️⃣ Preheat and prep: Preheat your oven to 350°F (175°C). Line the base of an 8- or 10-inch springform pan with parchment paper and lightly grease the sides.
2️⃣ Prepare the phyllo base: Brush each sheet of phyllo pastry with melted butter and layer them one at a time into the prepared springform pan, pressing gently to fit. Trim any overhanging edges for a neat fit. Bake the phyllo base for 12 minutes or until golden and crisp. Set aside to cool slightly.
3️⃣ Make the nut layer: In a food processor, pulse the walnuts, almonds, cinnamon, and salt until crumbly but not too fine. Mix in 2 tablespoons of melted butter. Spread this nut mixture evenly over the baked phyllo base.
4️⃣ Prepare the cheesecake filling: In a large bowl, beat the cream cheese, granulated sugar, and salt until smooth. Add vanilla extract, lemon zest, lemon juice, and cornstarch, and mix until combined. Beat in the eggs one at a time, ensuring each is fully incorporated before adding the next. Fold in the Greek yogurt (or sour cream) until the mixture is smooth and creamy.
5️⃣ Assemble and bake: Pour the cheesecake filling over the nut layer, smoothing the top with a spatula. Bake on the middle rack for 45 minutes, or until the edges are slightly puffed and the center has a slight jiggle. Turn off the oven and leave the cheesecake inside for an additional 50 minutes to set gradually.
6️⃣ Cool and add toppings: Remove the cheesecake from the oven and let it cool completely on a wire rack. Combine honey, lemon juice, and a splash of rosewater in a small bowl. Once the cheesecake is cooled, spread the honey mixture over the top and sprinkle generously with the chopped pistachios.
7️⃣ Serve and enjoy: Drizzle with extra honey for added sweetness if desired. Slice and savor this delectable dessert, marrying the flavors of baklava with the creamy texture of cheesecake!
Notes
- Use a sharp knife to cut through the phyllo pastry cleanly when serving.
- Refrigerate the cheesecake for at least 2 hours before adding the topping for the best texture.
- To prevent cracking, ensure your ingredients are at room temperature and avoid overmixing.
- Prep Time: 30 minutes
- Cook Time: 1 hour 45 minutes
Nutrition
- Serving Size: 10-12


")

")


")
