

If you’re anything like me, the mere mention of Kool-Aid instantly sparks childhood memories of sticky summer hands and neon-colored smiles. But what if I told you that you can take that nostalgic flavor and turn it into something even more magical—like homemade Kool-Aid Taffy? This isn’t just any taffy. It’s soft, chewy, bursting with fruity flavor, and so much fun to make, especially if you’re looking for a hands-on kitchen project that the whole family can get in on.
Now, I’ll be honest—taffy might sound a little intimidating if you’ve never made candy before. But trust me, this recipe is totally doable and doesn’t require a candy-making degree. With just a handful of pantry staples, a packet of unsweetened Kool-Aid, and a bit of elbow grease, you’ll be well on your way to creating vibrant, flavorful taffy that looks just as good as it tastes.
I made a batch of cherry Kool-Aid taffy the other weekend, and not only did my kitchen smell like a candy store, but it instantly transported me back to the days of riding bikes and sipping Kool-Aid straight from the pitcher. Plus, my kids absolutely loved getting their hands in on the action (especially the pulling part). If you’re planning a party, looking for a fun weekend project, or just in need of a cheerful bite of nostalgia, this is the recipe for you.
Let’s get started!
Ingredients You’ll Need
1 cup granulated sugar
2 tablespoons light corn syrup
½ cup water
1 (0.15 oz) packet unsweetened Kool-Aid powder (any flavor)
½ teaspoon baking soda
Optional: Food coloring to enhance the color
STEP 1: Prep Your Cooling Surface
Before you start cooking anything, take a moment to prep your cooling area. Lightly grease a baking sheet or a large plate with cooking spray or a bit of butter. This will be where you pour out your hot taffy mixture to cool down before the fun part—pulling! Having this ready ahead of time saves you from scrambling once the mixture is at that perfect temperature.
STEP 2: Heat the Sugar Mixture
In a medium saucepan, combine the sugar, corn syrup, and water. Set the heat to medium and gently stir the mixture just until the sugar dissolves completely. You’ll notice it turn clear and smooth.
Now here’s an important tip: once the sugar is fully dissolved, stop stirring. I know, it’s tempting, but hands off the spoon from here on out! Clip a candy thermometer to the side of the pan and let the mixture come to a boil undisturbed. You’re aiming for a temperature between 250°F and 260°F—this is known as the “soft-ball stage” in candy-making terms. It’s what gives your taffy that perfect chewy texture.

STEP 3: Add Flavor and Color
Once your mixture hits the right temp, immediately remove the saucepan from the heat. Carefully stir in the packet of Kool-Aid and the baking soda. Be prepared—the mixture will foam up and bubble a bit. This is totally normal and part of the reaction with the baking soda.
At this point, if you want a really bold color (especially if you’re using a lighter Kool-Aid flavor like lemonade or grape), go ahead and add a drop or two of food coloring. It’s optional, but it really makes those pieces pop once they’re wrapped up.
STEP 4: Cool Before You Pull
Now comes the wait—but just a short one. Pour the hot mixture onto your greased baking sheet or plate and let it sit for about 5 to 10 minutes. You want it cool enough to handle safely but still warm and pliable. Trust your fingers on this one. Too hot, and you’ll burn yourself. Too cool, and it’ll be too stiff to stretch.
Once it’s just right, grease your hands with a bit of butter or cooking spray. This will keep the sticky taffy from clinging to your fingers. Then it’s time for the fun part—pulling the taffy!
Kool-Aid Taffy: A Chewy, Fruity Throwback Treat You’ll Love Making at Home
Welcome back! In Part 1, we got the Kool-Aid taffy mixture prepped, cooked to the perfect soft-ball stage, flavored it up, and let it cool just enough to handle. Now comes the most fun and crucial part of the whole process—pulling the taffy. This is where the texture and look of your taffy really come to life.
If you’ve never pulled taffy before, don’t stress. It’s easier than you might think, and kind of addictive once you get going. Just make sure your hands are greased, your surface is clean, and you’ve got about 10-15 minutes of time to devote to the process. Trust me, it’s worth it.
STEP 5: Pull the Taffy
Now that your mixture is cool enough to handle, go ahead and pick it up. It’ll still be warm and pliable, kind of like a soft dough. Start stretching the taffy by pulling it apart and then folding it back onto itself. Repeat this motion—stretch and fold, stretch and fold.
As you work, you’ll notice a few things happen:
The taffy becomes lighter in color (almost pastel, depending on your flavor)
The texture becomes firmer but still pliable
The finish becomes glossy and smooth
This step is key. Pulling incorporates air into the mixture, which gives it that signature chewy, fluffy texture. The process usually takes about 10 to 15 minutes, and while it might sound like a mini workout, it’s honestly really satisfying—especially if you’ve got helpers in the kitchen. Pass it back and forth like a stretchy baton!
STEP 6: Shape and Cut the Taffy
Once your taffy is fully pulled and you’re happy with the texture, roll it out into a long rope about ½-inch thick. It doesn’t have to be perfect, just aim for a consistent thickness so your pieces end up roughly the same size.
Use a sharp knife or kitchen scissors to snip the rope into bite-sized pieces—around 1-inch long works great. If your scissors start sticking, a little spritz of cooking spray helps a lot.
STEP 7: Wrap It Up
This step makes your taffy look professional and keeps it from turning into one big sticky blob in your container. Cut small squares of wax paper or plastic wrap, place a piece of taffy in the center, and twist both ends closed like a classic candy wrapper.
If you’re planning to gift these or serve them at a party, this is where you can get creative with fun paper or labels. But even plain wax paper does the job beautifully.
STEP 8: Store and Enjoy
Once all your taffy pieces are wrapped, place them in an airtight container. They’ll keep well at room temperature for up to two weeks—although let’s be real, they probably won’t last that long.
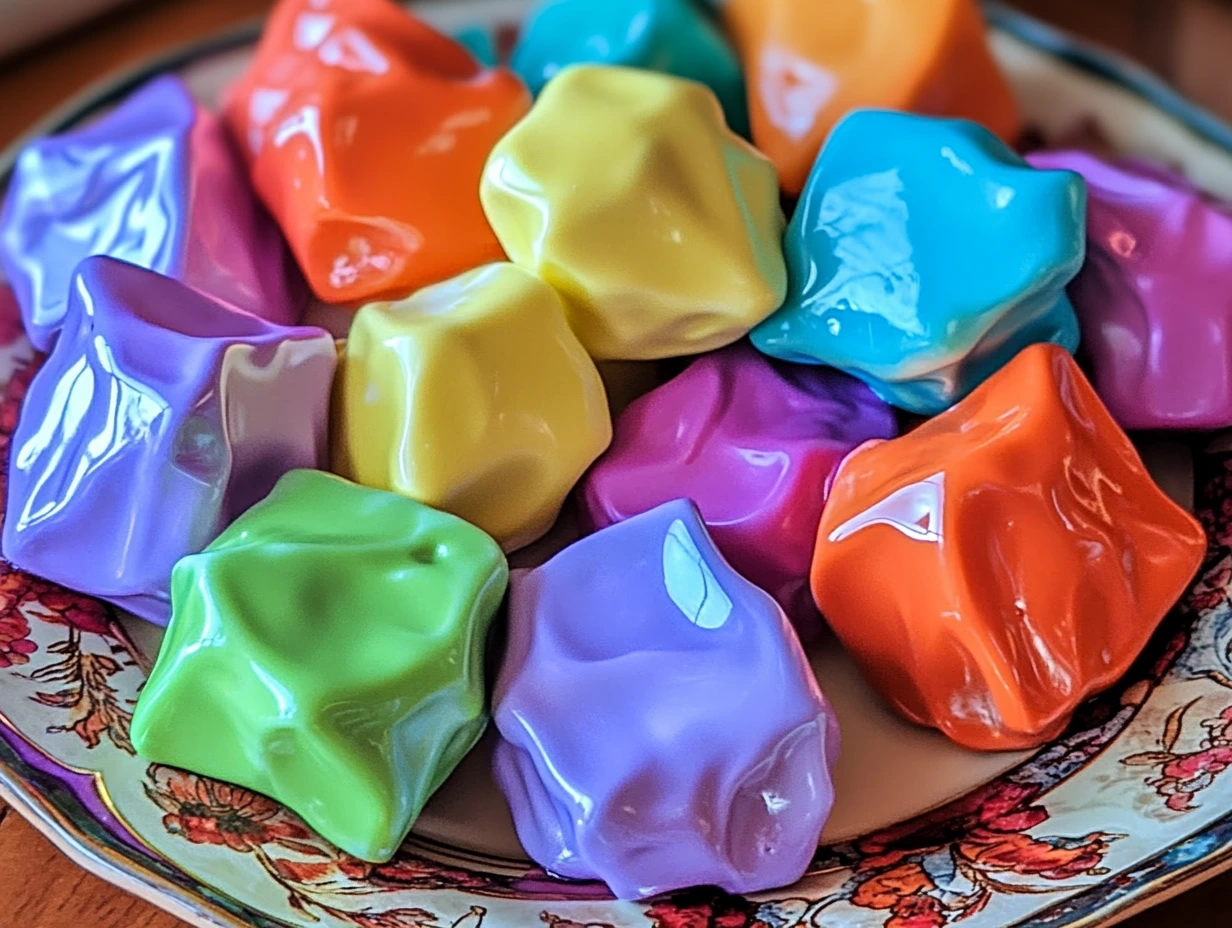
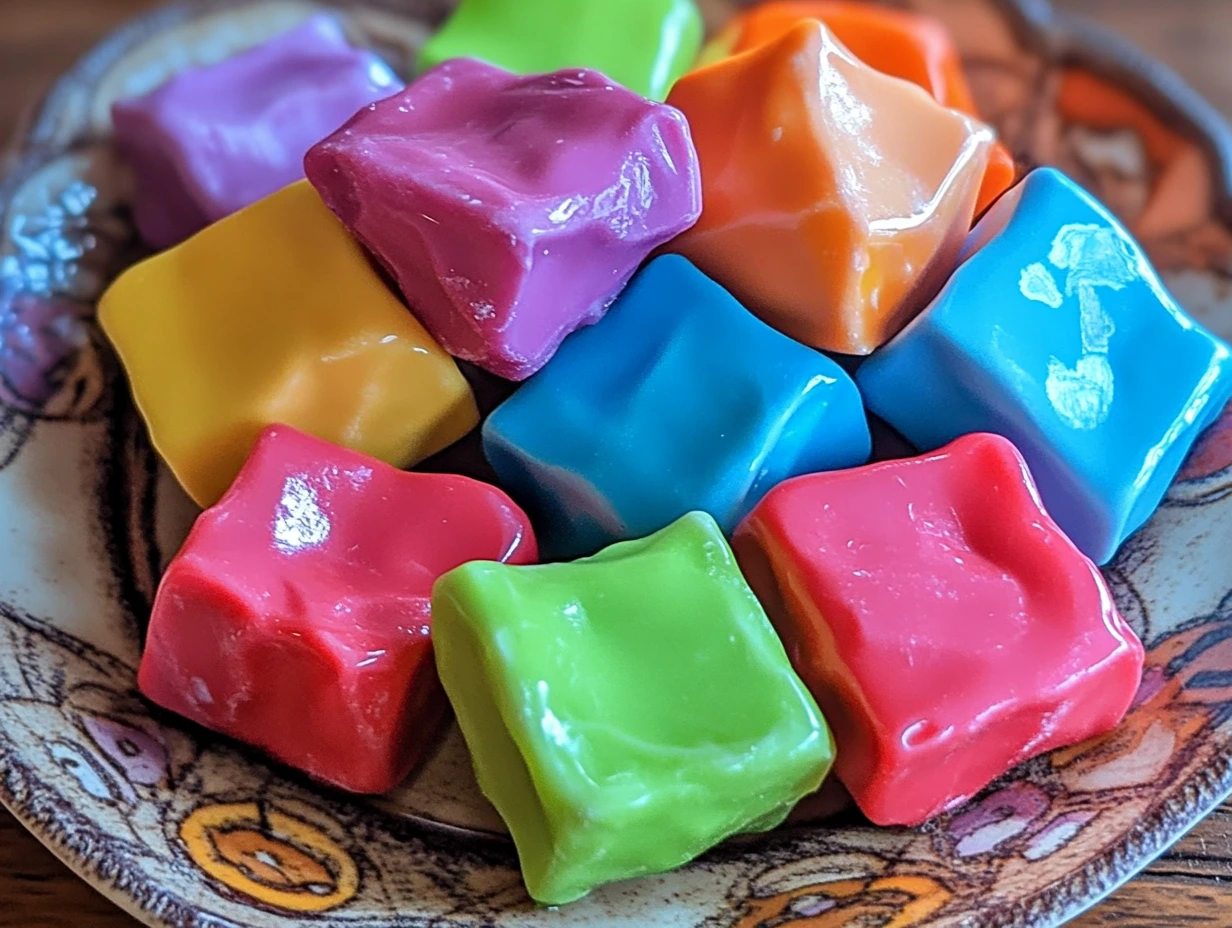
They make the perfect sweet treat for lunchboxes, goodie bags, or just an after-dinner nibble. And if you make a few different batches in different Kool-Aid flavors, you can end up with a rainbow of fruity goodness that looks as fun as it tastes.
Taffy-Making Tips and Flavor Variations
Want to get creative with your Kool-Aid taffy? Here are a few ideas and helpful tips that can take your batch to the next level:
Mix up the flavors: Try grape, cherry, tropical punch, lemonade—basically any Kool-Aid flavor you love. Each one brings a totally different personality to your candy.
Add food coloring: Some Kool-Aid flavors have a natural punch of color, but if you want to go bolder, a drop or two of gel food coloring really makes things pop.
Tag-team pulling: If you’ve got more than one person helping out, divide the taffy into two pieces and work simultaneously. Not only does it make the process faster, but it’s a lot more fun.
Flavor twist: Add a touch of vanilla or a dash of citric acid for a flavor boost. Citric acid can add a bit of tartness that makes the fruit flavor even more vibrant—just use a pinch!
Sticky situation? Keep your hands and tools lightly greased throughout the process. Butter works great, but cooking spray is even easier for quick touch-ups.
Kool-Aid Taffy: A Chewy, Fruity Throwback Treat You’ll Love Making at Home
Alright, candy makers—we’ve stirred, pulled, cut, and wrapped our way through a delicious batch of Kool-Aid Taffy. If you’ve made it this far, you’re probably feeling pretty proud of yourself (as you should be!). But I know that even with a clear recipe, there are always a few lingering questions, especially when it comes to homemade candy. So let’s take a minute to answer some of the most common questions people have when making taffy from scratch.
FAQ: Your Kool-Aid Taffy Questions Answered
1. What if my taffy turns out too hard or brittle?
This usually means the sugar mixture was cooked past the soft-ball stage (260°F). Use a candy thermometer and remove the pan from heat as soon as it hits 250–260°F. Even a few degrees over can lead to a hard texture.
2. My taffy didn’t firm up—what went wrong?
If your taffy stays too soft and sticky, the sugar mixture probably didn’t reach the correct temperature. Make sure your candy thermometer is accurate and clipped properly to avoid undercooking.
3. Can I make this without a candy thermometer?
Technically, yes—you can test for the soft-ball stage by dropping a bit of the hot mixture into cold water. It should form a soft, pliable ball that flattens when pressed. Still, a candy thermometer makes it much easier and more reliable.
4. How do I keep the taffy from sticking to everything?
Grease is your best friend here. Lightly grease your hands, scissors, and any tools you’re using with butter or cooking spray to prevent sticking during the pulling and cutting process.
5. Can kids help with this recipe?
Yes—but only with the cooled steps. The boiling sugar mixture is extremely hot and not safe for young helpers. But once it’s cooled and ready for pulling or wrapping, kids can absolutely join in the fun.
6. Can I double the recipe?
You can, but keep in mind that a larger batch may be harder to manage when it’s time to pull the taffy. If you’re working with helpers, doubling works great. If you’re solo, you might want to stick with one batch at a time.
7. What’s the best way to store leftover taffy?
Individually wrapped pieces should go into an airtight container at room temperature. Avoid refrigerating—it can make the taffy too hard and sticky once it returns to room temp.
Conclusion: Why You’ll Keep Coming Back to This Recipe
There’s something seriously satisfying about making your own candy—especially when it’s as colorful and flavorful as this Kool-Aid Taffy. It’s nostalgic, it’s hands-on, and it’s a guaranteed crowd-pleaser whether you’re making it for a party, a holiday treat, or just a fun afternoon activity.
I’ve made this recipe in a dozen different flavors now, and every time, I’m reminded how easy it is to turn simple ingredients into something that feels a little magical. It’s the kind of recipe that sparks conversation, gets your hands moving, and fills your kitchen with the smell of childhood.
So go ahead—grab your favorite Kool-Aid packet, round up a helper or two, and whip up a batch of your own. And when you do, I’d love to hear how it turned out! Leave a comment with your favorite flavor combo, any twists you tried, or questions you still have. Sharing is part of the fun.
Happy taffy pulling!
Print
Kool-Aid Taffy
- Author: David
- Total Time: 35–40 minutes
Description
Kool-Aid Taffy is a colorful, chewy, and sweet homemade candy that brings bold fruit flavors and a playful pop of color to your snack table. Using unsweetened Kool-Aid powder, this old-fashioned taffy gets a nostalgic twist with the flavors you loved as a kid—plus it’s a fun, hands-on kitchen project perfect for parties or gifting.
Ingredients
1 cup granulated sugar
2 tablespoons light corn syrup
½ cup water
1 (0.15 oz) packet unsweetened Kool-Aid powder (any flavor)
½ teaspoon baking soda
Optional: Food coloring to enhance the color
Instructions
1️⃣ Lightly grease a baking sheet or large plate with cooking spray or butter and set it aside. This will be your cooling surface and helps prevent the taffy from sticking once it’s poured out.
2️⃣ In a medium saucepan over medium heat, combine the sugar, corn syrup, and water. Stir gently just until the sugar has dissolved completely. Stop stirring once dissolved and bring the mixture to a boil. Clip a candy thermometer to the side of the pan and let it cook undisturbed until it reaches 250°F to 260°F, the soft-ball stage.
3️⃣ Once the desired temperature is reached, remove the pan from heat. Immediately stir in the Kool-Aid powder and baking soda. The mixture will foam and bubble slightly—this is a normal reaction from the baking soda. Add a drop or two of food coloring if you want a more vivid color.
4️⃣ Pour the hot mixture onto your prepared surface and allow it to cool for about 5 to 10 minutes, just until it’s cool enough to safely handle. Grease your hands with a bit of butter or cooking spray to prevent sticking, then begin pulling and stretching the taffy. Stretch and fold repeatedly until the mixture becomes lighter in color, firmer, and glossy. This step takes about 10 to 15 minutes and is essential for creating that classic chewy taffy texture.
5️⃣ Once your taffy is ready, roll it into a long rope and cut it into bite-sized pieces using kitchen scissors or a sharp knife. Wrap each piece individually in wax paper or plastic wrap to keep them from sticking together.
6️⃣ Store the wrapped pieces in an airtight container at room temperature for up to 2 weeks. Enjoy a burst of fruity, chewy sweetness whenever you need a pick-me-up.
Notes
You can use any flavor of Kool-Aid, so feel free to mix it up with different batches for a rainbow of colors and tastes. The pulling step is not just fun—it’s what gives the taffy its soft and chewy bite. Kids can help with wrapping once the taffy is cut, making this a fun kitchen activity for all ages.
- Prep Time: 10 minutes
- Cook Time: 15–20 minutes
Nutrition
- Serving Size: 30 pieces


")

")


")
