

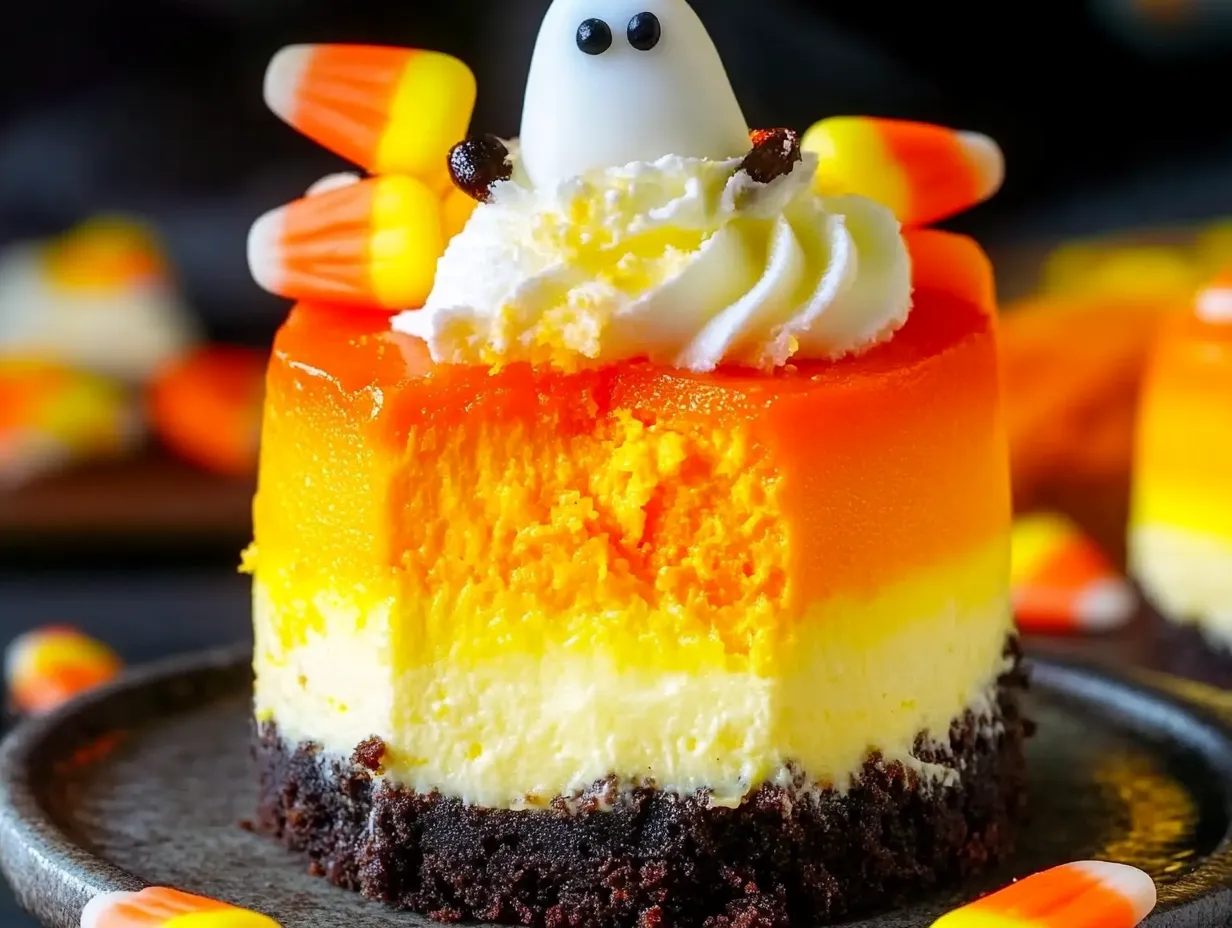
Halloween is just around the corner, and what better way to celebrate than with these festive and fun Mini Candy Corn Cheesecakes? Perfect for spooky parties or cozy autumn gatherings, these mini desserts combine the classic look of candy corn with the rich, creamy flavor of cheesecake. Imagine serving bite-sized treats with layers of bright yellow, orange, and white, instantly bringing a Halloween vibe to your dessert table. These cheesecakes aren’t just adorable—they’re delicious, too, offering a playful twist on a traditional favorite.
Each mini cheesecake boasts a decadent and tangy cream cheese filling, balanced by the sweetness of a crunchy Oreo cookie crust. The contrasting textures of the smooth, silky cheesecake and the firm, crumbly base make for an irresistible treat. To top it off, a fluffy swirl of orange-tinted whipped cream adds the perfect finishing touch, making these cheesecakes as fun to eat as they are to look at.
One of the best things about these mini cheesecakes is their convenient, individual serving size. Mini desserts are ideal for parties, allowing guests to easily grab a single portion without the hassle of cutting and serving a full-sized cake. Plus, they offer built-in portion control, which is especially helpful when indulging in rich treats during festive occasions. These mini candy corn cheesecakes will definitely be the star of your Halloween spread, delivering both flavor and festive flair in every bite.

Ingredients Breakdown
Crust Ingredients
The crust of these mini candy corn cheesecakes begins with crushed Oreo cookies, a perfect foundation for adding texture and flavor. The crunchy, chocolatey crumbs complement the creamy cheesecake, creating a delightful contrast. Oreo crumbs are ideal because their fine texture easily binds together when mixed with melted butter. The butter acts as the glue, holding the crust together while it bakes, resulting in a firm, non-crumbling base for your cheesecakes.
To achieve the perfect crust, make sure the Oreo crumbs are finely ground, which helps them pack tightly. When pressing the mixture into the cupcake liners, use the back of a spoon or a flat surface to press down firmly and evenly. This step ensures that the crust stays compact and doesn’t fall apart when the cheesecakes are served.
Filling Ingredients
The cheesecake filling is made from a combination of cream cheese, sugar, flour, and sour cream, each playing a crucial role in achieving a smooth and creamy texture. Cream cheese provides the rich, tangy base, while sugar adds sweetness to balance the tartness. The small amount of flour helps to stabilize the filling and prevents it from cracking during baking. Sour cream enhances the creaminess and adds a subtle tang that brightens the overall flavor.
Eggs are essential for binding the ingredients together and providing structure to the cheesecake. They help the filling set while baking, giving the cheesecake its soft yet firm texture. Vanilla extract rounds out the flavor, adding a warm, aromatic note that complements the sweetness and tanginess of the filling.
Gel Icing Colors
For the vibrant candy corn effect, gel icing colors are the preferred choice over liquid food coloring. Gel colors are more concentrated, allowing you to achieve bold hues without altering the batter’s consistency. This stability is key to keeping the layers defined and preventing a watery or overly thin batter.
Whipped Cream Topping
The whipped cream topping is the finishing touch that elevates these mini cheesecakes. Cold heavy whipping cream is essential for achieving the perfect stiff peaks, as it whips up best when chilled. Adding powdered sugar sweetens the cream while also helping to stabilize it, ensuring it holds its shape once piped. A hint of vanilla extract enhances the flavor.
To maintain consistency when adding color to the whipped cream, use gel icing colors, as they won’t affect the texture. Start with a small amount and add more as needed until you achieve the desired orange hue, ensuring the cream stays light and fluffy for a picture-perfect finish.
Step-by-Step Instructions
1. Preheat and Prepare the Cupcake Liners
Begin by preheating your oven to 325°F (162°C). Preheating the oven is crucial because it ensures a consistent baking temperature from the moment you place the cheesecakes inside. This step helps the crust bake evenly and allows the cheesecakes to rise properly without any sudden temperature fluctuations that could cause cracks.
While the oven is preheating, prepare your cupcake pan by lining it with cupcake liners. To ensure easy removal of the mini cheesecakes later, lightly spray each liner with non-stick baking spray. This will prevent the cheesecakes from sticking to the liners, allowing for a smooth, clean presentation when you’re ready to serve them.
2. Making the Oreo Crust
In a medium bowl, mix together 1 ½ cups (201g) of finely crushed Oreo crumbs and 2 tablespoons (41g) of melted butter. The butter will bind the crumbs together, forming a cohesive base for the cheesecakes. Stir the mixture until all the crumbs are evenly coated with the butter.
Divide the Oreo mixture evenly between the cupcake liners, adding about 2 tablespoons of the crust to each one. To press the crumbs firmly and evenly into the bottom, use the back of a spoon or a small glass. Pressing firmly ensures the crust holds together well and won’t crumble when the cheesecake is served.
3. Baking the Crust
Bake the Oreo crusts in the preheated oven for 5 minutes. This brief blind baking step is essential for firming up the base before adding the cheesecake filling. The short bake time allows the butter to solidify and bind the crumbs, creating a sturdy foundation for the creamy filling. Once baked, remove the crusts from the oven and set them aside to cool slightly while you prepare the cheesecake filling.
4. Preparing the Cheesecake Filling
Reduce the oven temperature to 300°F (148°C) after the crusts have baked. This lower temperature will help the cheesecakes cook more slowly and evenly, preventing cracks from forming during baking.
In a large mixing bowl, combine 12 oz (339g) of room-temperature cream cheese, ½ cup (104g) of sugar, and 2 tablespoons (16g) of all-purpose flour. Using a hand mixer or a stand mixer on low speed, beat the mixture until smooth and creamy. It’s important to mix slowly to avoid incorporating too much air, which can cause the cheesecakes to puff up and crack as they bake. Scrape down the sides of the bowl periodically to ensure everything is evenly mixed.
5. Adding Sour Cream, Vanilla, and Eggs
Next, add ½ cup (115g) of sour cream and 1 ½ teaspoons of vanilla extract to the cream cheese mixture. Continue mixing on low speed until just combined, ensuring the mixture stays smooth and uniform.
Add 2 large eggs to the filling, but do so one at a time. Beat on low speed after each addition, and be sure to scrape down the bowl to maintain an even texture. Adding eggs one at a time helps to gently incorporate them without overmixing, which can lead to cracks in the cheesecake once baked.
6. Coloring the Batter
Once the filling is smooth, divide the batter evenly into three separate bowls. Leave one portion of the batter white. In the second bowl, add a small amount of yellow gel icing color, and in the third bowl, add orange gel icing color. Stir gently until the colors are evenly mixed. Gel icing colors are ideal because they provide vibrant hues without thinning the batter.
For the best candy corn effect, aim for bright, clear layers of yellow, orange, and white that mimic the iconic candy’s look. Add coloring gradually, mixing until you achieve the desired intensity.
7. Layering the Cheesecakes
To create the candy corn layers, begin by spooning about 1 tablespoon of the yellow batter into each cupcake liner, covering the Oreo crust. Next, spoon 1 tablespoon of the orange batter over the yellow layer, and finally, top it off with a spoonful of the white batter. The liners should be mostly full by the time you’ve added all three layers.
For neat layers, gently spread each one with the back of a spoon or a small spatula before adding the next. This will help create a clean, defined look as the cheesecakes bake.
8. Baking the Cheesecakes
Bake the layered cheesecakes at 300°F (148°C) for about 15 minutes, or until the centers are set. You’ll know the cheesecakes are done when they jiggle slightly in the middle but are firm around the edges. Overbaking can cause cracks, so be sure to check them carefully.
Once the cheesecakes are done, turn off the oven but leave them inside with the door closed for another 10 minutes. This slow cooling process helps to prevent the sudden temperature change that can lead to cracks.
9. Cooling and Chilling
After the cheesecakes have sat in the turned-off oven, crack the oven door open slightly and allow them to cool inside for an additional 15-20 minutes. Gradual cooling ensures that the cheesecake texture remains smooth and free of cracks.
Once the cheesecakes have cooled down in the oven, transfer them to the refrigerator to chill completely. Let them chill for at least 2-3 hours, or until they are fully set. Cooling in the fridge helps firm up the texture and allows the flavors to meld together for the best result when serving.
Making and Decorating the Whipped Topping
Whipping the Cream
To begin making the whipped topping, pour ½ cup (120ml) of cold heavy whipping cream into a large mixing bowl. Using a hand mixer or stand mixer fitted with a whisk attachment, whip the cream on medium-high speed. Gradually add 5 tablespoons (36g) of powdered sugar and ½ teaspoon of vanilla extract as the cream begins to thicken. Continue whipping until stiff peaks form, meaning the cream holds its shape when you lift the whisk.
For the best results, make sure the heavy cream is cold, as chilled cream whips up faster and holds its shape better. If the cream starts to soften or lose its shape, place it back in the refrigerator to firm up before continuing. Avoid overwhipping, which can cause the cream to break and turn grainy or curdled. Once stiff peaks are reached, stop mixing immediately.
Adding Color to Whipped Cream
To give your whipped topping a festive look, use a small amount of orange gel icing color. Gel colors are perfect for this purpose because they are concentrated, allowing you to achieve vibrant hues without thinning out the cream.
Add a drop of orange gel icing to the whipped cream and gently fold it in using a spatula. Start with a small amount of color and gradually increase it until you reach the desired orange tint. Be sure to fold the color in gently to maintain the cream’s light, fluffy texture.
Piping the Whipped Cream
Once the whipped cream is tinted, transfer it to a piping bag fitted with your desired piping tip. For a simple and elegant look, use a large round or star tip to create smooth swirls or rosettes on top of the chilled cheesecakes.
For a Halloween touch, consider adding fun, themed decorations such as ghost toppers, candy corn pieces, or spooky sprinkles. These decorations not only enhance the festive appeal but also make each cheesecake look like a mini work of art perfect for any Halloween celebration!
Serving, Storing, and Tips for Success
Serving Suggestions
These Mini Candy Corn Cheesecakes are best served chilled, making them a perfect refreshing treat for Halloween parties or autumn gatherings. Arrange the cheesecakes on a festive serving tray for a stunning visual display, and consider adding spooky touches such as Halloween-themed plates or napkins. To enhance the holiday atmosphere, pair these cheesecakes with other seasonal desserts like caramel apples, pumpkin pie, or a Halloween candy spread for an indulgent dessert table.
For an extra festive presentation, add more decorative elements like edible googly eyes, mini chocolate bats, or candy corn pieces scattered around the platter.
Storage Instructions
To keep your cheesecakes fresh, store them in the refrigerator in an airtight container. This is essential for maintaining both texture and flavor, as the cheesecake filling can dry out or absorb other odors in the fridge if left uncovered. The whipped cream topping also holds up better in a sealed container, staying light and fluffy for longer.
These mini cheesecakes will stay fresh for up to 2-3 days when properly stored. For the best results, avoid leaving them at room temperature for extended periods before serving, especially if decorated with whipped cream.
Pro Tips for Perfect Cheesecakes
To prevent cracks in your cheesecake, mix the filling on low speed to avoid incorporating too much air. Gradual cooling—first in the oven and then in the fridge—also helps prevent cracks and keeps the texture smooth.
For vibrant color layers, use gel food coloring in small amounts to avoid over-saturation. When adding whipped cream, keep it stable by whipping it to stiff peaks and using it immediately to pipe beautiful, defined swirls that will hold their shape.
Creative Variations and FAQs
Fun Variations of Mini Candy Corn Cheesecakes
Different Crust Options
While the Oreo crust is a delicious option, you can experiment with other crust bases to create different flavor profiles. Graham cracker crumbs offer a classic, buttery foundation, adding a more neutral, mildly sweet taste that lets the cheesecake filling shine. Ginger snaps bring a warm, spicy flavor perfect for fall, while Biscoff cookies provide a caramelized, cinnamon-like depth that pairs beautifully with creamy cheesecake.
Flavor Twists for the Cheesecake Filling
To take your mini cheesecakes to the next level, consider adding flavor variations to the filling. Pumpkin puree can give the cheesecakes an autumn-inspired twist, making them perfect for a Halloween-Thanksgiving crossover treat. Caramel swirls can be gently folded into the batter for a rich, sweet accent. You can also experiment with different extracts like almond, maple, or cinnamon to add a unique flavor dimension to the filling.
Decorative Ideas Beyond Candy Corn
If you want to go beyond the candy corn theme, there are endless options for decorating these mini cheesecakes with other Halloween-inspired touches. Try adding edible googly eyes to create spooky monsters, or sprinkle mini chocolate bats and sugar skulls on top. You can even use spooky sprinkles shaped like ghosts, witches, and pumpkins to bring extra Halloween fun to your dessert table.
Can I make these cheesecakes ahead of time?
Yes! You can make the mini cheesecakes 1-2 days ahead. Store them in the refrigerator in an airtight container until ready to serve. This makes them convenient for parties or busy schedules.
Can I freeze mini cheesecakes?
Absolutely. Freeze the cheesecakes without the whipped cream topping. When ready to serve, thaw them in the refrigerator overnight and add the whipped cream just before serving.
How do I prevent cracks in my cheesecake?
To avoid cracks, mix the filling slowly, don’t overbeat the eggs, and cool the cheesecakes gradually by turning off the oven and leaving the door slightly open.
Can I use liquid food coloring instead of gel?
Gel food coloring is preferred because it gives vibrant color without thinning the batter. If you only have liquid coloring, use it sparingly to avoid altering the texture.
What can I use if I don’t have cupcake liners?
If you don’t have cupcake liners, you can grease a non-stick muffin pan thoroughly to ensure the cheesecakes release smoothly.
Conclusion: Why These Mini Candy Corn Cheesecakes Are a Must for Halloween
These Mini Candy Corn Cheesecakes are the perfect addition to any Halloween celebration. They’re not only visually stunning with their candy corn-inspired layers, but they’re also fun and easy to make. From the crunchy Oreo crust to the creamy, vibrant cheesecake filling and the festive whipped cream topping, every bite is packed with flavor. Their individual size makes them great for serving at parties, while the recipe’s flexibility allows for creative variations and decorations.
Whether you’re hosting a Halloween party or just want to surprise your family with a seasonal treat, these mini cheesecakes are a surefire way to add some festive flair. Don’t be afraid to get creative—try new flavors, colors, and toppings to make them uniquely yours.
Print
Mini Candy Corn Cheesecakes
- Author: Christophe
Description
These Mini Candy Corn Cheesecakes are a fun and festive Halloween dessert, perfect for adding a sweet, seasonal twist to your celebration! Featuring a creamy, rich cheesecake filling layered in the iconic colors of candy corn—yellow, orange, and white—these bite-sized treats sit on a buttery Oreo crust. Topped with fluffy whipped cream and spooky decorations like ghost toppers, these mini cheesecakes are not only delicious but also a visual delight. They’re ideal for Halloween parties and can be made ahead of time for an easy, crowd-pleasing dessert!
Ingredients
Crust:
- 1 ½ cups (201g) Oreo crumbs
- 2 tbsp (41g) butter, melted
Filling:
- 12 oz (339g) cream cheese, room temperature
- ½ cup (104g) sugar
- 2 tbsp (16g) all-purpose flour
- ½ cup (115g) sour cream
- 1 ½ tsp vanilla extract
- 2 large eggs
- Yellow gel icing color
- Orange gel icing color
Topping:
- ½ cup (120ml) cold heavy whipping cream
- 5 tbsp (36g) powdered sugar
- ½ tsp vanilla extract
- Orange gel icing color
- Ghost toppers (optional)
Instructions
1️⃣ Preheat the oven: Set your oven to 325°F (162°C). Line a cupcake pan with cupcake liners and lightly spray the liners with non-stick baking spray.
2️⃣ Make the crust: In a medium bowl, combine the Oreo crumbs and melted butter. Divide the mixture evenly between the cupcake liners, adding about 2 tablespoons of the crust to each. Press the crumbs firmly into the bottom of each liner.
3️⃣ Bake the crust: Bake the crusts for 5 minutes, then remove them from the oven. Let the crusts cool slightly while you prepare the filling.
4️⃣ Prepare the filling: Reduce the oven temperature to 300°F (148°C). In a large mixing bowl, beat the cream cheese, sugar, and flour on low speed until smooth and combined. Scrape down the sides of the bowl to ensure even mixing.
5️⃣ Add the wet ingredients: Add the sour cream and vanilla extract to the mixture. Continue mixing on low speed until combined. Add the eggs one at a time, beating slowly and scraping down the bowl after each addition to avoid incorporating too much air (which can cause cracks).
6️⃣ Color the batter: Divide the cheesecake batter evenly into three separate bowls. Leave one portion white, color one portion yellow, and the last portion orange using gel icing colors.
7️⃣ Layer the cheesecakes: Spoon about 1 tablespoon of yellow batter into each cupcake liner, followed by 1 tablespoon of orange batter, and finish with the white batter on top. The liners should be mostly full by the time all layers are added.
8️⃣ Bake: Bake the cheesecakes for about 15 minutes, until set. Once done, turn off the oven and leave the cheesecakes inside with the door closed for another 10 minutes.
9️⃣ Cool gradually: Crack the oven door and allow the cheesecakes to cool inside for another 15-20 minutes. Then, transfer them to the refrigerator to cool completely.
🔟 Whip the topping: In a large bowl, combine the heavy whipping cream, powdered sugar, and vanilla extract. Whip on high speed until stiff peaks form. Add a small amount of orange gel icing color to tint the whipped cream.
1️⃣1️⃣ Decorate: Pipe the whipped cream onto the tops of the chilled cheesecakes. Add ghost toppers or other spooky decorations, if desired.
1️⃣2️⃣ Chill & serve: Store the cheesecakes in an airtight container in the refrigerator until ready to serve. They are best enjoyed within 2-3 days.
Notes
- You can customize the colors to match your Halloween theme, but the candy corn-inspired layers create a fun seasonal look.
- Pro tip: For cleaner layers, tap the pan gently on the counter after adding each color to help the batter spread evenly.


")

")


")
