

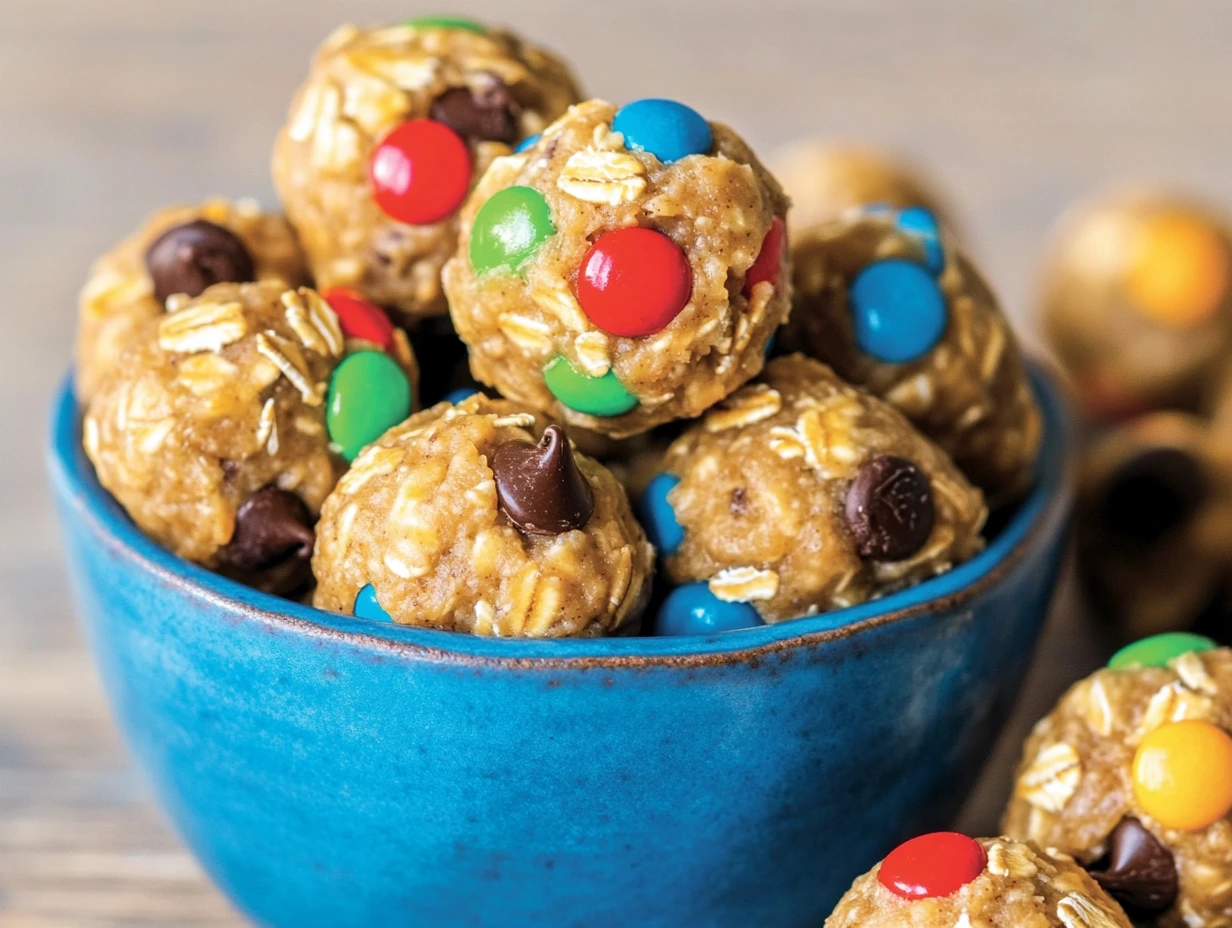
Let’s talk about one of the easiest and most addictive treats you’ll ever whip up in your kitchen—Monster Cookie Balls. These little bites are like a portable version of your favorite monster cookies, minus the baking and the mess. They’re chewy, sweet, loaded with peanut butter and oats, and have that pop of color from mini M&Ms that makes them completely irresistible.
Now, I’ll be honest—I’m a total sucker for anything no-bake. Especially when it involves peanut butter and chocolate. I started making these when I needed something quick and fun for my kids’ lunchboxes that wouldn’t melt by noon or crumble into a thousand pieces. Let me tell you, they were a hit right from the start. They also double as a great mid-day snack for adults (because yes, I stash a few in the fridge just for me).
These Monster Cookie Balls are one of those recipes you’ll find yourself coming back to again and again. They’re done in under 15 minutes, don’t require turning on the oven, and can be customized depending on what you’ve got in your pantry. Let’s dive in!
What Makes Monster Cookie Balls So Great?
Here’s why I keep coming back to this recipe:
No-bake = no oven required. Perfect for hot days or quick prep.
Pantry-friendly. You probably have most of these ingredients on hand right now.
Kid-approved. These are colorful, chewy, and fun—basically snack perfection.
Protein-packed. Thanks to the peanut butter and oats, these are as satisfying as they are tasty.
Freezer-friendly. You can make a big batch and keep them ready to grab and go.
Whether you need a quick snack between meetings, a pre-gym bite, or something sweet after dinner that won’t derail your day, these monster cookie balls check all the boxes.

Ingredients You’ll Need
Before we get into the step-by-step, here’s everything you’ll need to make about 24 cookie balls:
2½ cups quick oats
2 cups peanut butter
½ cup honey
½ cup mini M&Ms
¼ cup mini white chocolate chips
¼ cup semi-sweet chocolate chips
1 teaspoon vanilla extract
Quick note: If you’re aiming to make these gluten-free, just be sure to use certified gluten-free oats. And if you’ve only got regular rolled oats, those will work in a pinch, but I recommend giving them a quick pulse in a food processor to break them down a bit for better texture.
Step-by-Step Instructions
Step 1: Mix Everything Together
Grab a large mixing bowl and toss in all your ingredients: the oats, peanut butter, honey, mini M&Ms, white and semi-sweet chocolate chips, and vanilla extract. Use a sturdy wooden spoon to mix everything together. The mixture will be thick and a little sticky—that’s totally normal. If you find it tough to stir, don’t be afraid to get in there with clean hands. It’s messy, but effective (and kind of fun).
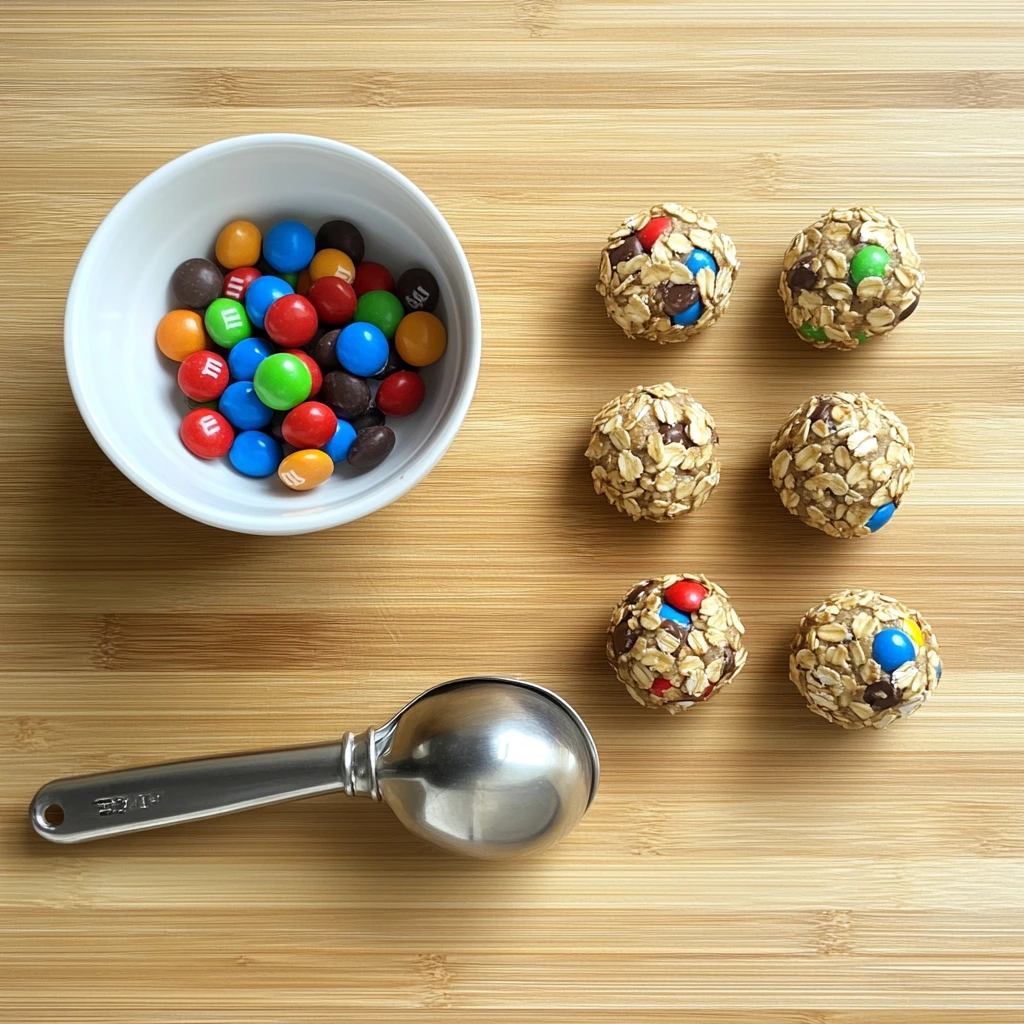
Step 2: Roll Into Balls
Once your mixture is well combined, use a cookie scoop or measuring spoon to portion out about 1½ tablespoons of dough. Roll each portion between your hands to form smooth, even balls.
If the mixture feels too sticky to work with, you can lightly wet your hands or chill the bowl in the fridge for about 10 minutes before rolling.
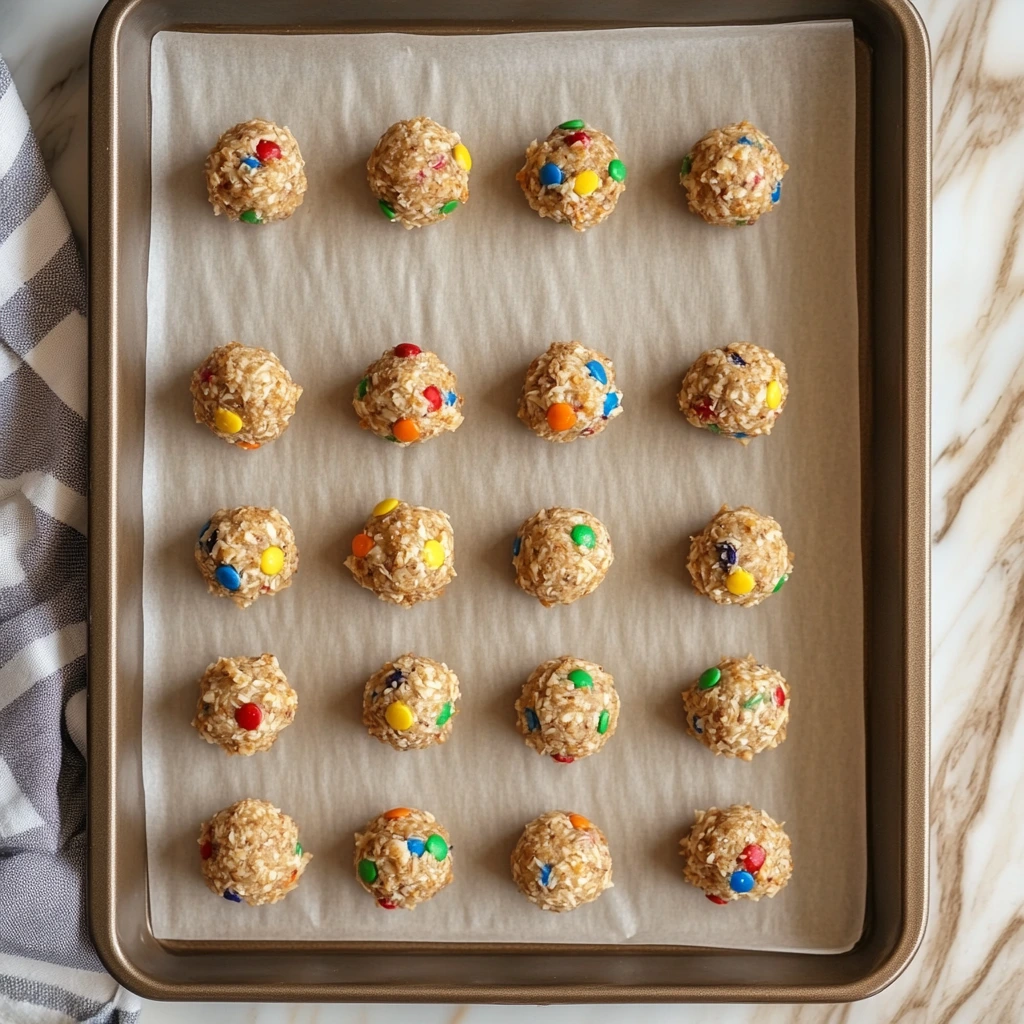
Step 3: Set on a Tray
Line a baking sheet with parchment paper so your cookie balls don’t stick, and arrange them on the tray with a little space in between each one.
How to Finish and Customize Your Monster Cookie Balls
Alright, so you’ve mixed up your dough and rolled out your little cookie balls—now it’s time to let them set and talk about how to make these your own. This is the part where things get even easier (if you can believe it), and where you can start thinking about all the ways to tweak the recipe based on your cravings or what you’ve got on hand.
If you’re like me and always looking for that sweet treat that’s just enough to satisfy a craving without going overboard, these are perfect. Plus, the fact that they store well in the fridge or freezer means you can always have a batch ready to go. Trust me, once you get into the habit of making these, you’ll wonder how you ever lived without them.
Let’s pick up right where we left off—with the final steps.
Steps Continued
Step 4: Chill the Cookie Balls
Once all the cookie balls are rolled and sitting pretty on your parchment-lined tray, pop them into the refrigerator. You’ll want to chill them for at least 30 minutes. This helps them firm up so they hold their shape and get that perfect chewy texture.
You can absolutely leave them in the fridge longer—overnight is totally fine. In fact, I like to make a batch after dinner, stick them in the fridge, and they’re perfect the next day to toss into lunchboxes or grab as a snack.
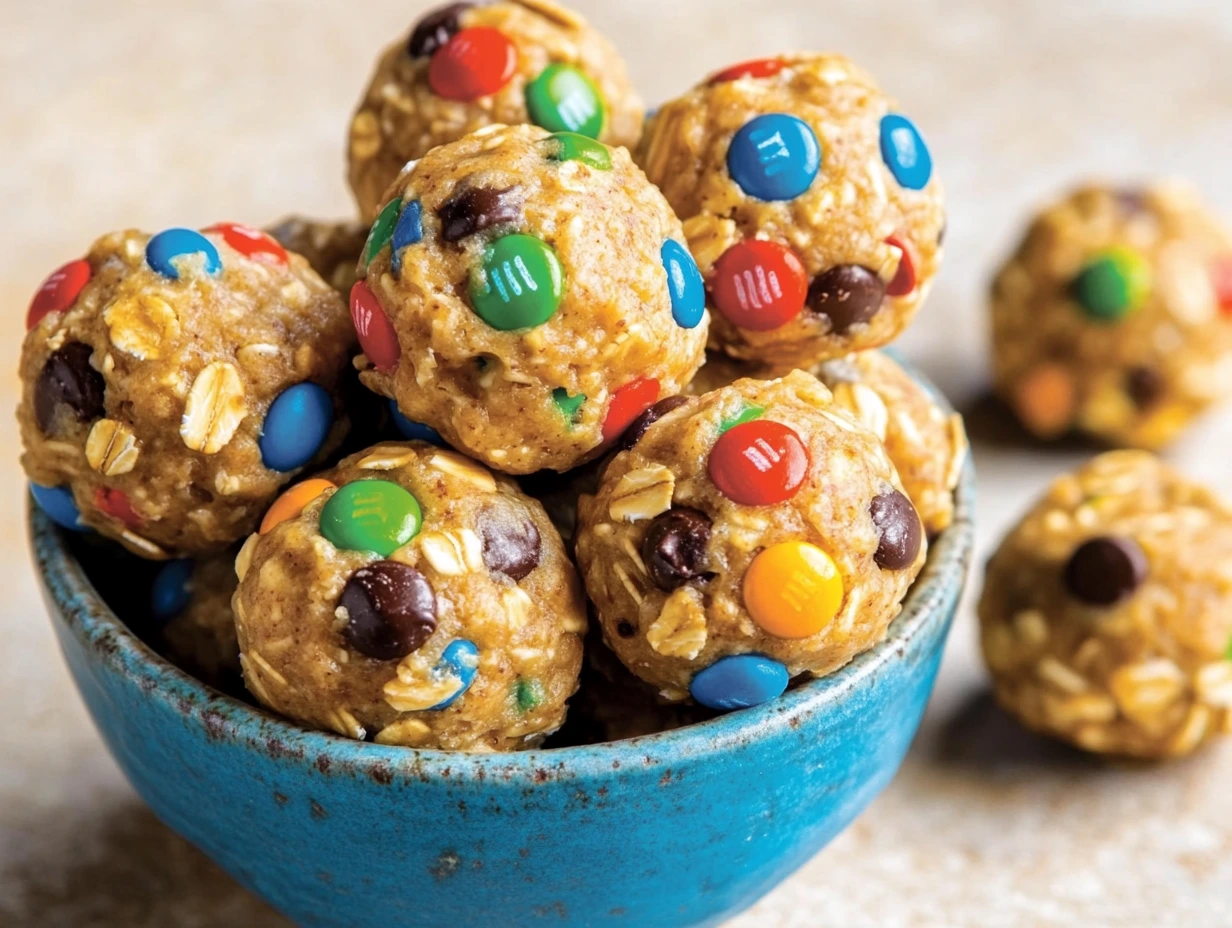
Step 5: Enjoy and Store
After chilling, your monster cookie balls are ready to go! You can enjoy them straight from the fridge or let them sit at room temp for a few minutes if you like them a bit softer.
For storage, keep them in an airtight container in the fridge. They’ll stay fresh for up to a week. You can also freeze them if you’re making a big batch—just store in a freezer-safe container or bag and let them thaw for a few minutes before eating. Super convenient for busy weeks!
Tips, Tricks, and Easy Variations
This recipe is super forgiving and flexible, so don’t be afraid to make it your own. Here are a few fun ideas:
Swap the nut butter: You can easily use almond butter, cashew butter, or even sunflower seed butter if you need a nut-free version for school lunches.
Add crunch: Crushed pretzels or chopped nuts (like peanuts or almonds) are a great way to add some crunch.
Try dried fruit: Toss in some chopped dried cranberries, raisins, or dried cherries for a little sweet-tart balance.
Make it chocolatey: Add a tablespoon of cocoa powder to the mix if you’re a chocolate lover looking for that brownie-bite vibe.
Boost the protein: Stir in a scoop of your favorite protein powder. Just note that you may need a bit more honey or nut butter to keep the texture right.
You really can’t mess these up—as long as the mixture is thick enough to roll into balls and holds together, you’re golden.
Why These Cookie Balls Work for So Many Occasions
What I love most about this recipe is how versatile it is. Here are a few of my favorite ways to enjoy these little guys:
Lunchbox snack: They hold up well in containers and are just sweet enough to feel like a treat.
Post-workout fuel: Thanks to the oats, peanut butter, and honey, they’ve got a great balance of carbs and protein.
Dessert bites: A couple of these after dinner totally satisfies that sweet tooth.
Make-ahead treat: They’re perfect for meal prepping snacks ahead of a busy week or keeping in the freezer for unexpected cravings.
And let’s be real—any snack that doesn’t require baking, cleanup, or fancy ingredients is a win in my book.
Monster Cookie Balls FAQ and Final Thoughts
Before we wrap things up, I want to answer some of the most common questions people have when they’re making Monster Cookie Balls for the first time. Whether you’re wondering about substitutions, storage tips, or how to tweak the recipe for dietary needs, I’ve got you covered.
Let’s dive into the FAQ section!
Frequently Asked Questions
Can I use old-fashioned rolled oats instead of quick oats?
Yes, you can! The texture will be a bit heartier and more rustic. If you prefer a smoother bite, pulse the rolled oats in a food processor a few times before mixing them into the dough.
What kind of peanut butter works best?
Creamy peanut butter (either natural or regular) works best for binding everything together. If you use natural peanut butter, just make sure to stir it well before measuring to avoid oily or dry spots in the dough.
Are these gluten-free?
They can be! Just be sure to use certified gluten-free oats. All the other ingredients are typically gluten-free, but always double-check labels to be safe.
Can I freeze Monster Cookie Balls?
Absolutely. Store them in a freezer-safe container or zip-top bag and freeze for up to 2–3 months. When you’re ready to eat, just let them thaw at room temperature for 5–10 minutes.
How long do they last in the fridge?
They’ll stay fresh in an airtight container in the fridge for up to one week. If you’re meal prepping or making a double batch, freezing is your best bet to make them last even longer.
What can I use instead of honey?
Maple syrup or agave nectar are great substitutes if you’re avoiding honey. Keep in mind the texture might be slightly different, but it should still hold together just fine.
Can I leave out the M&Ms or chocolate chips?
Of course! If you want to cut back on sugar or use what you have on hand, feel free to skip them or sub in things like chopped nuts, shredded coconut, or even flaxseeds for a more wholesome twist.
Final Thoughts: Why You’ll Keep Coming Back to This Recipe
If you’ve made it this far, you can probably tell I’m a little obsessed with these Monster Cookie Balls. And honestly, once you make them, you’ll understand why. They’re the kind of treat that checks all the boxes: quick, easy, satisfying, and endlessly customizable.
Whether you’re a busy parent packing lunches, someone trying to meal prep better snacks, or just in the mood for something sweet that doesn’t require an oven, this recipe is going to be your new go-to. No special equipment, no complicated steps—just mix, roll, chill, and enjoy.
And the best part? Everyone loves them. Kids, adults, picky eaters—they disappear fast in my house.
If you try these Monster Cookie Balls, I’d love to hear how they turned out! Drop a comment, share any creative mix-ins you tried, or let me know how you made them your own. Recipes like this are all about having fun and finding what works for you.
Print
Monster Cookie Balls
- Author: David
- Total Time: 45 minutes
Description
Monster Cookie Balls are the no-bake, bite-sized version of your favorite monster cookies—packed with peanut butter, oats, chocolate chips, and colorful mini M&Ms. These chewy, protein-packed treats are perfect for snack time, lunchboxes, or a quick dessert fix. They’re simple to make, don’t require an oven, and can be prepped in under 15 minutes.
Ingredients
2½ cups quick oats
2 cups peanut butter
½ cup honey
½ cup mini M&Ms
¼ cup mini white chocolate chips
¼ cup semi-sweet chocolate chips
1 teaspoon vanilla extract
Instructions
1️⃣ In a large mixing bowl, combine all the ingredients: quick oats, peanut butter, honey, M&Ms, white chocolate chips, semi-sweet chocolate chips, and vanilla extract. Mix well using a wooden spoon. The mixture will be thick and sticky—feel free to use your hands for easier mixing.
2️⃣ Using a cookie scoop or measuring spoon, portion out about 1½ tablespoons of the mixture. Roll each portion into a ball between your hands until smooth.
3️⃣ Place the formed balls onto a baking sheet lined with parchment paper to prevent sticking.
4️⃣ Refrigerate the tray for about 30 minutes to allow the cookie balls to set and firm up.
5️⃣ Once chilled, remove from the refrigerator and enjoy immediately. Store leftovers in an airtight container in the fridge for up to one week.
Notes
You can customize these cookie balls by swapping in different mix-ins like crushed pretzels, chopped nuts, or dried fruit. For a gluten-free option, make sure to use certified gluten-free oats. These also freeze well—just thaw for a few minutes before eating. Perfect for meal prep or an on-the-go energy boost.
- Prep Time: 15 minutes
- Cook Time: 30 minutes
Nutrition
- Serving Size: About 24 balls


")

")


")
