

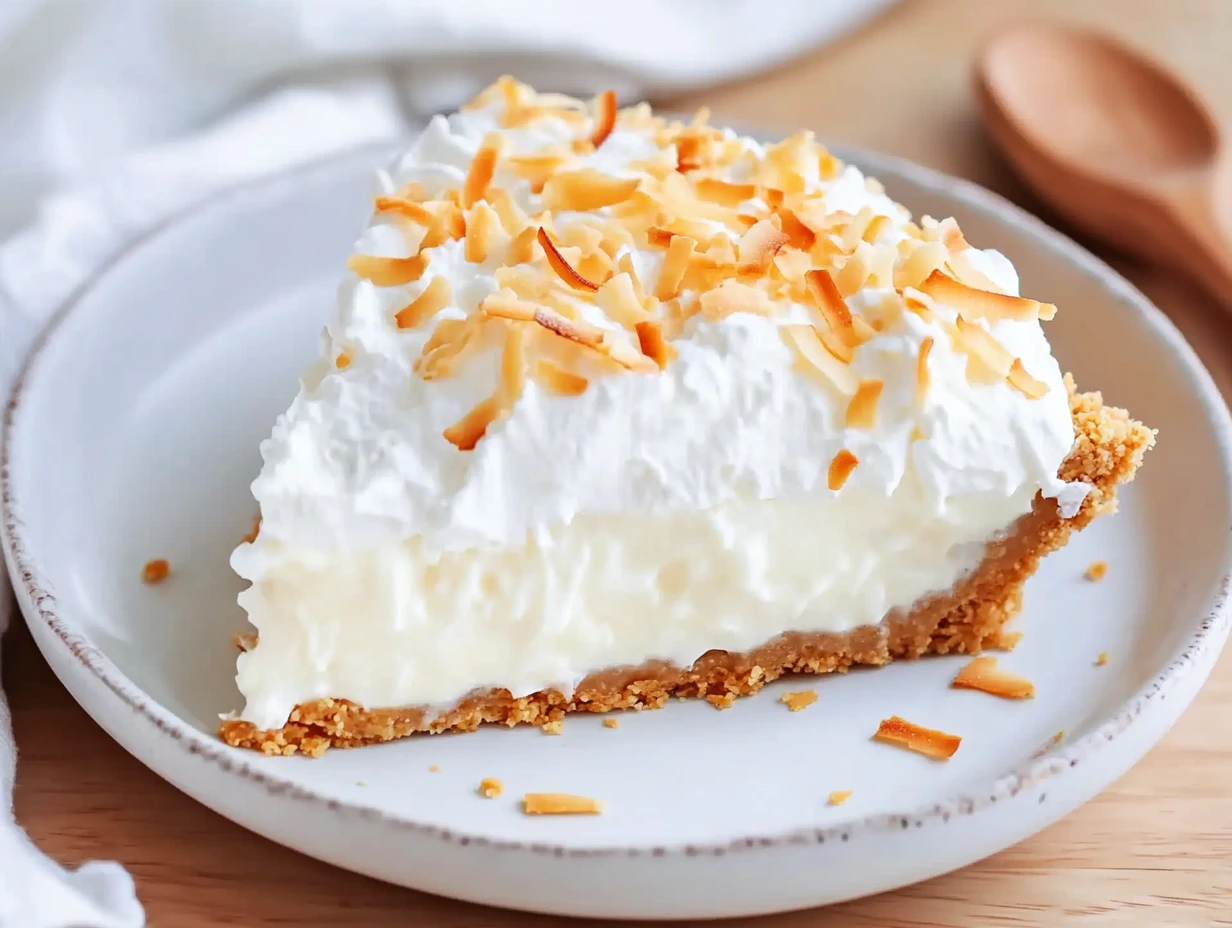
When summer temperatures hit their peak and turning on the oven feels like a personal betrayal, no bake desserts become absolute lifesavers. And let me tell you, this No Bake Coconut Cream Pie is exactly what you want chilling in your fridge right now.
It’s one of those crowd-pleasing, make-ahead desserts that tastes like it took way more effort than it actually did. You’ve got a buttery graham cracker crust, a luxuriously smooth coconut custard made with real coconut milk, and a fluffy whipped cream folded right in to keep things light and airy. And let’s not forget the toasted coconut sprinkled on top—that’s the texture and flavor booster that makes every bite feel like a tiny island getaway.
I made this pie recently for a family BBQ and didn’t even get a slice. Everyone was raving about it, and by the time I turned around—poof! Gone. So yeah, you might want to make two.
Let’s dive into the first part of this easy, dreamy recipe that’s perfect for summer or really any time you need a no-fuss dessert that feels special.

STARTING WITH THE CRUST AND CUSTARD
This pie is all about layers of flavor and texture, and we’re starting from the bottom up with a crisp, buttery graham cracker crust. Here’s how to make sure your base holds up beautifully to that creamy filling.
Ingredients for the Crust
1 ½ cups graham cracker crumbs
⅓ cup granulated sugar
6 tablespoons unsalted butter, melted
Steps: Make the Crust
Combine the crust ingredients
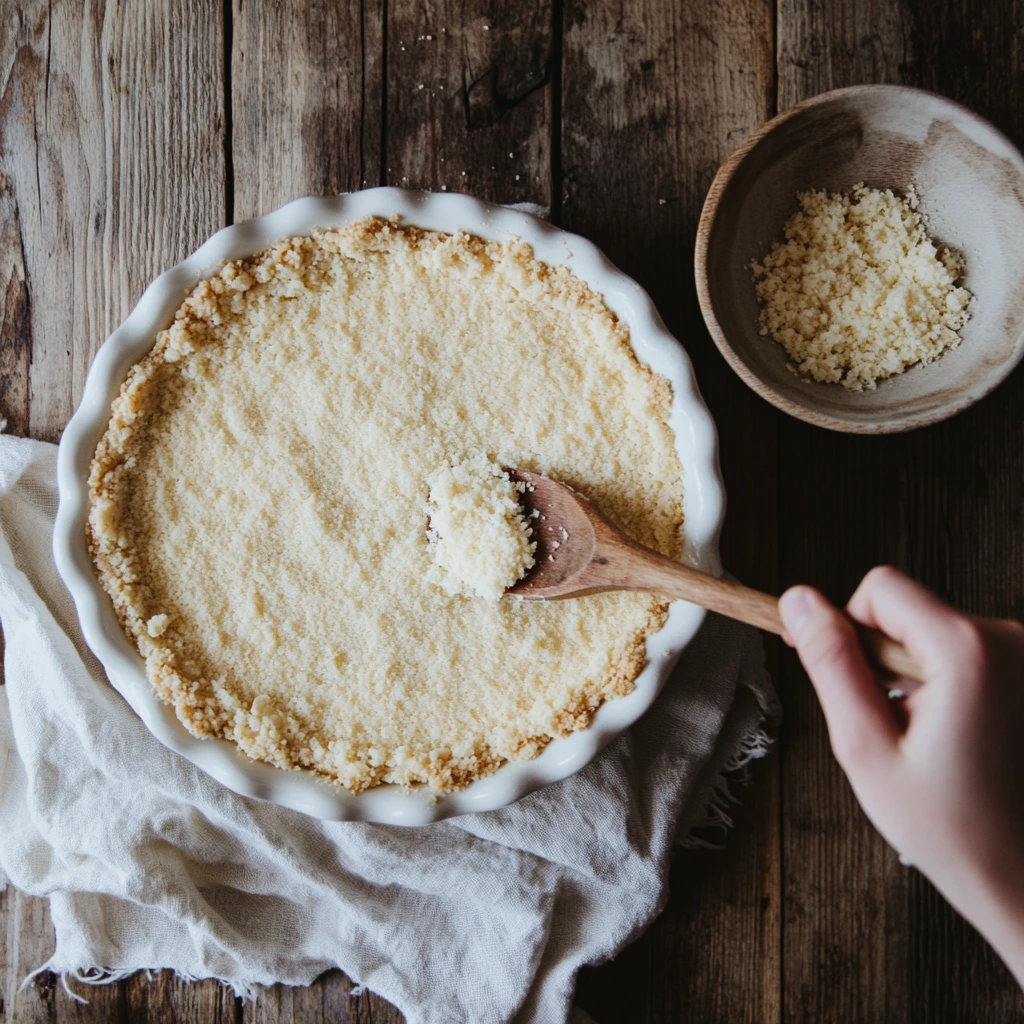
In a medium mixing bowl, stir together the graham cracker crumbs and sugar. Pour in the melted butter and mix until the crumbs are evenly coated and resemble wet sand.Press into the pan
Take your 9-inch pie pan and press the crumb mixture firmly into the bottom and up the sides. Use the back of a spoon or the bottom of a flat measuring cup to really pack it in—this helps the crust hold together.Chill to set
Pop the crust in the refrigerator for at least 30 minutes. This step is key because it allows the butter to firm up and helps the crust stay crisp when we add that rich filling.
Now while that’s chilling, it’s time to whip up the star of the show: the coconut custard. And don’t worry—it sounds fancy, but I promise it’s simple if you take it step by step.
Ingredients for the Filling
1 envelope unflavored gelatin
¼ cup cold coconut milk
1 cup coconut milk, divided
¾ cup granulated sugar
3 large egg yolks
1 teaspoon pure vanilla extract
Steps: Make the Custard Base
Bloom the gelatin
In a small saucepan, sprinkle the gelatin over ¼ cup of cold coconut milk. Let it sit for a few minutes until it looks like thick jelly. This process is called blooming and it ensures your gelatin dissolves smoothly.Dissolve and heat gently
Once bloomed, turn the heat to low and stir gently until the gelatin completely dissolves—don’t let it boil. When smooth, whisk in the remaining ¾ cup of coconut milk, the sugar, and the egg yolks.Thicken over heat
Keep stirring constantly over low heat. You’re looking for the mixture to thicken slightly—just enough to coat the back of a spoon. This is your signal that the custard has reached the right consistency. Again, don’t let it boil or you’ll end up with scrambled eggs instead of silky pudding.Strain and cool
Once thickened, pour the custard through a fine-mesh sieve into a clean bowl. This catches any bits of cooked egg and gives you that ultra-smooth texture. Stir in the vanilla extract and let it cool to room temperature.
No Bake Coconut Cream Pie: A Cool & Creamy Tropical Dessert
Welcome back! In Part 1, we made the buttery graham cracker crust and cooked up a silky coconut custard that’s just waiting to be transformed into something magical. If you’re already imagining that chilled, creamy slice with the coconut flakes on top—you’re not alone.
Now it’s time to take that cooled custard and elevate it into the final, fluffy filling. This next part is where the magic really happens: folding in freshly whipped cream and toasted coconut to give the pie its dreamy texture. This is what takes the dessert from a basic custard tart to a no-bake masterpiece you’ll want to make on repeat.
Let’s finish this pie!
WHIPPING, FOLDING, AND ASSEMBLING THE PIE
This is the easiest and most satisfying part of the whole process. You’re just a few simple steps away from the fridge doing the rest of the work for you.
Remaining Ingredients for the Filling
1 cup heavy whipping cream, chilled
½ cup sweetened shredded coconut, toasted
You’ll also want some extra toasted coconut for garnishing before serving, but we’ll get to that in a bit.
Steps: Whip and Fold the Cream
Chill your mixing tools
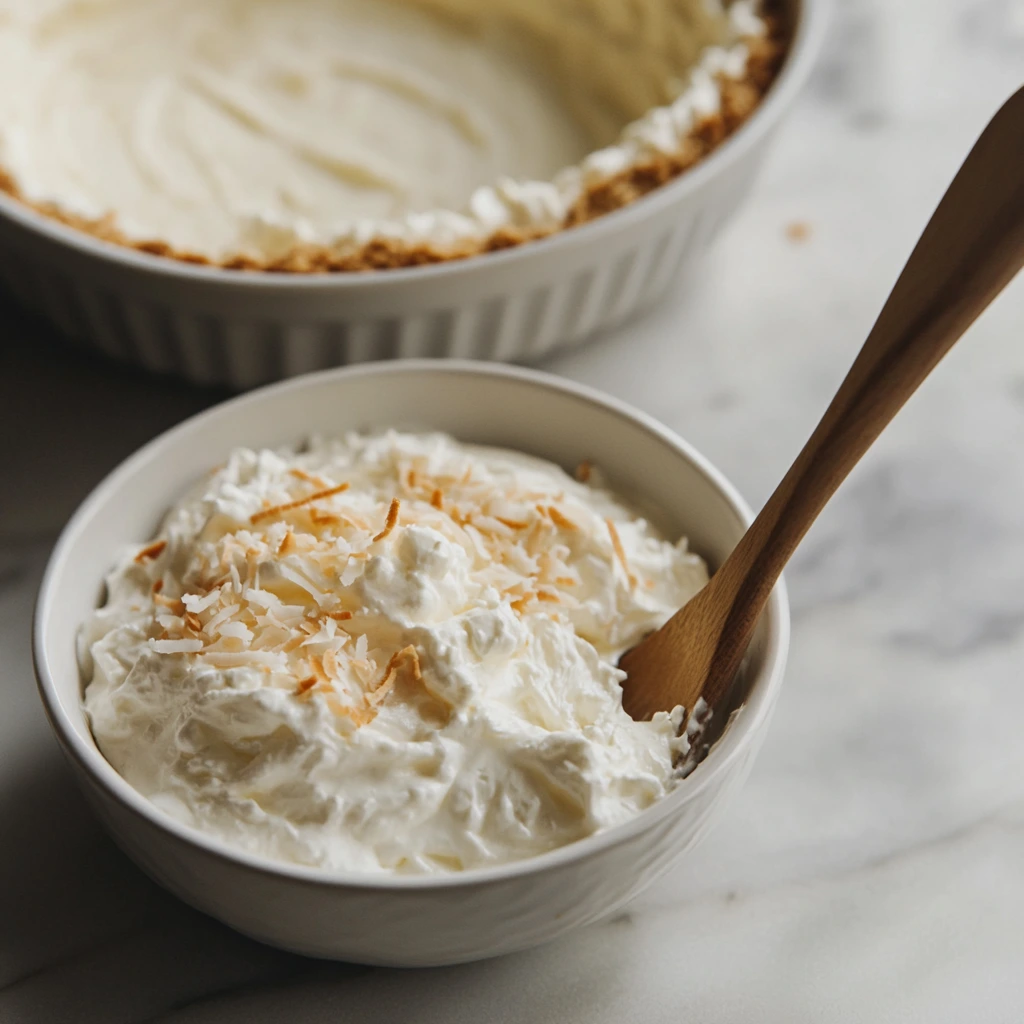
For best results, place your mixing bowl and beaters (or whisk attachment) in the freezer for 10-15 minutes before whipping the cream. Cold tools help the cream whip faster and hold its shape better.Whip the cream
Pour the cold heavy whipping cream into your chilled bowl. Using an electric mixer, beat on medium-high speed until soft peaks form. You’ll know it’s ready when the cream holds its shape but still looks smooth—not grainy or over-whipped.Fold into the custard
Gently fold the whipped cream into the cooled coconut custard mixture using a spatula. This step should be done slowly and carefully to keep all that air you just whipped in.Add toasted coconut
Sprinkle in the ½ cup of toasted shredded coconut and fold it into the mixture until everything is evenly combined.
You should now have a light, fluffy coconut filling that smells like a beach vacation in a bowl. Now let’s bring it all together.
Steps: Assemble and Chill the Pie
Fill the crust
Take your chilled graham cracker crust out of the fridge. Pour the coconut cream filling into the crust and use a spatula to smooth the top.Cover and chill
Cover the pie loosely with plastic wrap or foil and place it in the refrigerator. Let it chill for at least four hours, or until it’s fully set and firm to the touch. Overnight is even better if you’ve got the time.Garnish before serving
Right before serving, sprinkle the top of the pie with additional toasted coconut. It adds texture, flavor, and makes the whole thing look beautiful and finished.
Tips for Success
Toasting Coconut
If you’ve never toasted coconut before, don’t worry—it’s super easy. Just spread the sweetened shredded coconut in an even layer on a baking sheet and bake it at 350°F (175°C) for about 5–7 minutes. Stir once halfway through so it toasts evenly, and keep a close eye on it—it can go from golden to burnt fast.Substituting Gelatin
If you’re making this pie vegetarian, you can use agar agar in place of gelatin. Just be sure to follow the package instructions for the right ratio, as agar sets a bit more firmly.Boosting Coconut Flavor
Want an even more intense coconut flavor? Swap out part of the heavy cream for coconut cream (just make sure it’s unsweetened). It adds richness and really drives home that tropical vibe.Storage
This pie is best eaten within three days. Keep it covered in the fridge to maintain freshness. The crust will start to soften over time, but it’ll still taste amazing.
No Bake Coconut Cream Pie: A Cool & Creamy Tropical Dessert
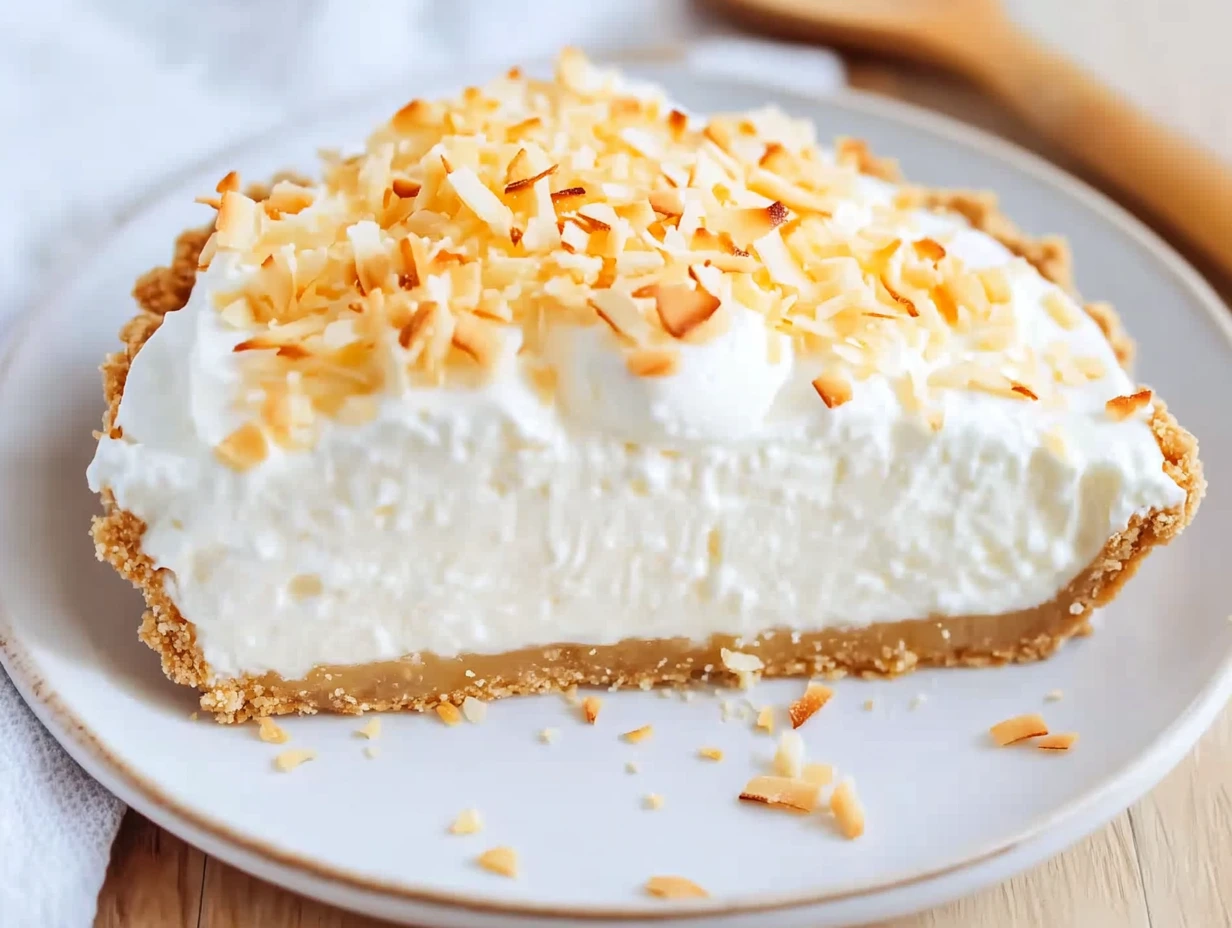
You’ve made it to the final stretch, and your kitchen is probably smelling like coconut heaven right about now. With a creamy coconut custard filling nestled in a graham cracker crust and that final sprinkle of toasted coconut on top, this no bake coconut cream pie is the kind of dessert that disappears quickly at gatherings—so consider yourself warned!
Before we wrap up, let’s go over a few of the most common questions people have about this recipe. Whether it’s your first time making a cream pie or you’re just looking for ways to tweak it to suit your preferences, I’ve got you covered.
FAQ: Common Questions About No Bake Coconut Cream Pie
1. Can I make this pie ahead of time?
Absolutely. In fact, it’s best made a day in advance so it has time to fully chill and set. Just keep it covered in the refrigerator until ready to serve.
2. What’s the best way to toast shredded coconut?
Spread it on a baking sheet and bake at 350°F (175°C) for 5–7 minutes, stirring halfway through. Watch closely—it can burn quickly once it starts to brown.
3. Can I use canned coconut milk or do I need fresh?
Canned coconut milk works great here. Just give it a good shake or stir before using, especially if it’s separated. Use full-fat for the best creamy texture.
4. What’s the difference between coconut milk and coconut cream?
Coconut cream is thicker and richer than coconut milk. If you want a stronger coconut flavor, you can replace part of the heavy whipping cream with coconut cream.
5. Can I make this without gelatin?
Yes! You can use agar agar as a vegetarian substitute. Just make sure to follow the package directions for proper setting amounts—it’s not a 1:1 swap with gelatin.
6. How do I know when the custard is thick enough?
The custard should coat the back of a spoon and leave a trail when you run your finger through it. Be sure not to boil it—gentle heat is key.
7. Can I freeze this pie?
It’s not recommended. The texture of the whipped cream and custard changes after freezing and thawing, which can make it watery or grainy. Stick to chilling in the fridge for the best results.
Final Thoughts: A No-Bake Dessert You’ll Make Again and Again
There’s just something about this pie that makes it feel like a little escape—maybe it’s the tropical coconut flavor or the fact that it doesn’t require turning on the oven. Either way, it’s a favorite in our house, and I love how easy it is to throw together when I want a dessert that feels special but doesn’t take hours to make.
Whether you serve it after a summer dinner party, bring it to a potluck, or just keep it in the fridge for a sweet treat during the week, this no bake coconut cream pie is sure to become a repeat recipe. It’s light, luscious, and just the right amount of indulgent.
Print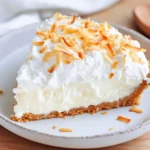
No Bake Coconut Cream Pie
- Author: David
Description
This luscious no bake coconut cream pie features a crisp graham cracker crust filled with a silky coconut custard made from coconut milk and whipped cream, crowned with toasted coconut for added texture and tropical flavor.
Ingredients
1 ½ cups graham cracker crumbs
⅓ cup granulated sugar
6 tablespoons unsalted butter, melted
Ingredients for filling
1 envelope unflavored gelatin
¼ cup cold coconut milk
1 cup coconut milk, divided
¾ cup granulated sugar
3 large egg yolks
1 teaspoon pure vanilla extract
1 cup heavy whipping cream, chilled
½ cup sweetened shredded coconut, toasted
Instructions
In a medium bowl combine graham cracker crumbs with sugar and melted butter until the mixture is evenly moistened. Press firmly into the bottom and up the sides of a 9-inch pie pan, then refrigerate for at least 30 minutes to set the crust.
Sprinkle gelatin over the cold ¼ cup of coconut milk in a small saucepan and let it soften for a few minutes. Gently heat over low heat, stirring until the gelatin fully dissolves. Remove from heat and whisk in the remaining coconut milk, sugar, and egg yolks. Return to low heat and stir constantly until the mixture thickens enough to coat the back of a spoon, taking care not to let it boil. Strain through a fine-mesh sieve into a bowl, stir in vanilla, and allow to cool to room temperature.
In a separate chilled bowl whip the heavy cream until soft peaks form. Gently fold the whipped cream and the toasted coconut into the cooled coconut mixture until uniform. Pour the filling into the prepared crust, smooth the top, cover, and refrigerate for at least four hours or until fully set. Before serving, garnish with additional toasted shredded coconut.
Notes
Agar agar can replace gelatin for a vegetarian alternative—follow the package instructions for the equivalent setting ratio. Substituting part of the heavy cream with coconut cream intensifies the coconut flavor. To toast shredded coconut evenly, spread it on a baking sheet and bake at 175 °C for 5–7 minutes, stirring once halfway through. Store the pie covered in the refrigerator for up to three days.


")

")


")
