

There’s just something about an old-school dessert that brings everyone to the table with a smile. If you’re anything like me, you’re always on the hunt for a sweet treat that’s low-effort but high reward. Well, you’re in for a real treat with this No-Bake Eclair Cake—a nostalgic, creamy, chocolatey crowd-pleaser that has stood the test of time in kitchens across America.
I still remember the first time I tried this dessert at a friend’s backyard BBQ. I took one bite and was completely hooked. Soft, cake-like layers that melt in your mouth, a rich chocolate topping, and a sweet vanilla filling that’s creamy without being too heavy? Yes, please! And when I found out there was no baking involved, it instantly became a staple in my dessert rotation.
This cake is ideal for potlucks, holiday gatherings, birthday parties, or even just when you need a quick dessert fix without turning on the oven. Plus, it’s even better the next day—so it’s perfect to make ahead of time. The secret to its magic? Time. As it chills in the fridge, the graham crackers soften, the pudding sets, and everything blends together into something that tastes like you spent hours on it.
So whether you’re new to this classic or already a fan, let’s walk through how to make this deliciously simple treat step-by-step.

Ingredients You’ll Need
2 (3.4 ounce) packages instant vanilla pudding mix
3 cups milk
1 (8 ounce) tub whipped topping, thawed (such as Cool Whip)
2 sleeves graham cracker squares (about 18 full sheets)
1 (16 ounce) container chocolate frosting
STEPS: Let’s Get Started with the Layers
Step 1: Make the Creamy Filling
Start by grabbing a medium-sized mixing bowl. Pour in your instant vanilla pudding mix and milk. Whisk it together until it starts to thicken—this will only take a couple of minutes. You want it nice and smooth, with no clumps.
Once the pudding has thickened, fold in your thawed whipped topping. Gently stir it in until the mixture is well blended. It should be light, fluffy, and smooth.
Tip: Be gentle when folding in the whipped topping so you don’t deflate it too much. The airiness is what gives the filling that lovely creamy texture.
Step 2: Build Your First Layer
Now, take out a 9×13-inch baking dish. Lay down your first layer of graham crackers across the bottom. You might need to break a few to get complete coverage, and that’s totally fine—it doesn’t need to look perfect, just make sure the base is covered.
Step 3: Add the First Layer of Filling
Spread half of your pudding mixture over the graham crackers. Use a spatula to smooth it out evenly, making sure to get into the corners of the dish. This is the first of your dreamy creamy layers, and it sets the tone for the rest of the cake.
![]()
Step 4: Another Layer of Crackers
Add a second layer of graham crackers on top of the pudding layer. Try to line them up roughly the same way you did the first time, again breaking pieces if needed to make sure everything is covered.
Step 5: More Creaminess
Now, spread the remaining pudding mixture over the second graham cracker layer. Use that spatula to smooth it out again, and try to keep the top as even as possible.
Step 6: Final Cracker Layer
Finish it off with one more layer of graham crackers. These will sit right on top and serve as the base for your chocolate frosting later on. Once that’s done, cover the dish with plastic wrap and pop it into the fridge for 30 minutes to an hour. This gives the pudding a chance to start setting and helps everything stay in place when you frost it.
Finishing Your No-Bake Eclair Cake: Chocolate Frosting and Easy Variations
Alright, now that the base layers of your No-Bake Eclair Cake are chilling and starting to come together, it’s time to add the rich, chocolatey topping that makes this dessert so irresistible. This final step is what ties everything together—and gives it that classic eclair vibe without ever touching the oven.
This part is super simple but makes all the difference. And after that, I’ll also share some easy ways to switch things up if you’re feeling adventurous. Because once you’ve nailed the basic version, there’s a whole world of no-bake fun to explore!
Step 7: Soften the Frosting
Take your can of chocolate frosting and remove both the lid and the foil seal. Pop it in the microwave for about 15 seconds. You don’t want it hot—just soft enough so it’s easy to spread. Stir it well after heating until it’s smooth and glossy.
Tip: Be careful not to overheat the frosting. You want it to be soft and spreadable, not runny or bubbling. If it’s still a little thick, give it another 5-second zap in the microwave.
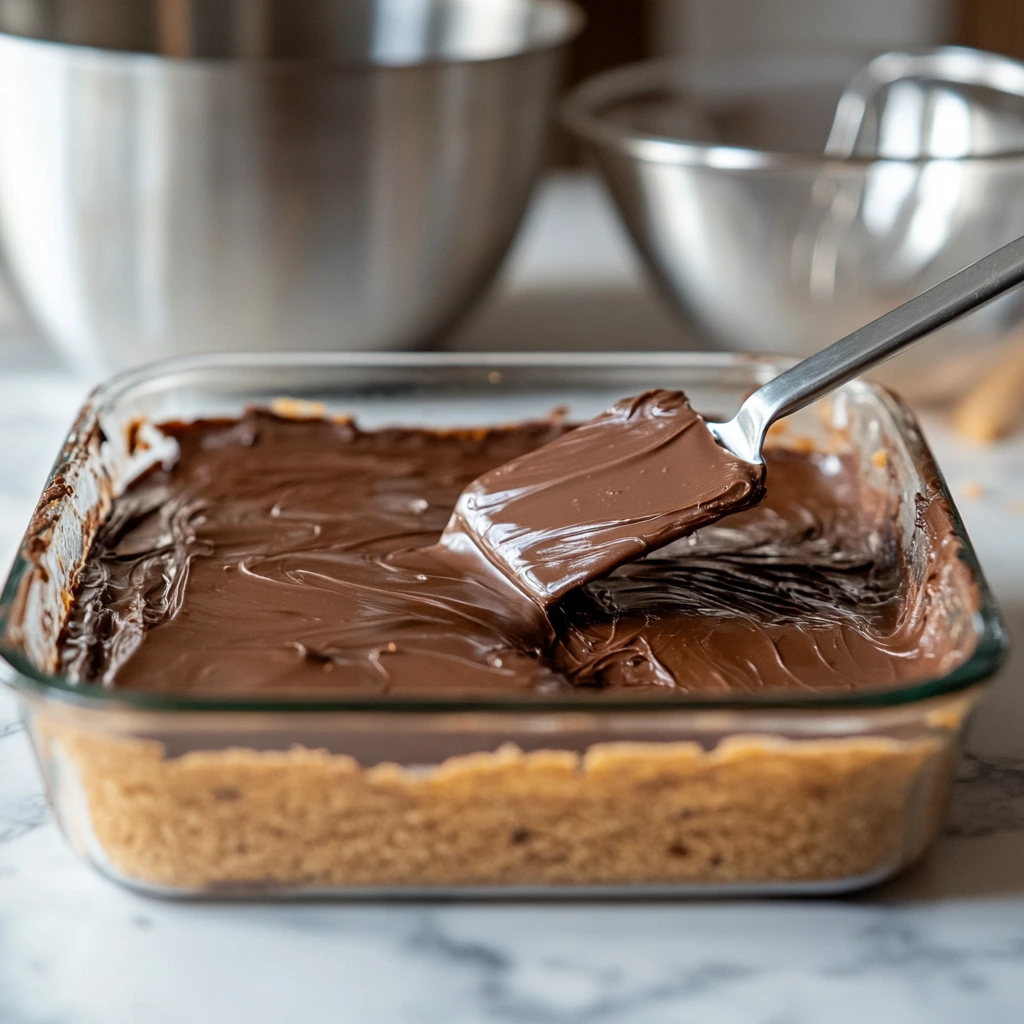
Step 8: Spread the Frosting
Take your chilled dish out of the fridge and remove the plastic wrap. Now gently spread the softened frosting across the top layer of graham crackers. I like to use an offset spatula or the back of a spoon to get a nice, even layer from corner to corner.
You don’t need to press hard—just glide it over the crackers. The frosting will firm up again as the cake chills, forming a delicious top layer that slices beautifully later on.
Step 9: Let It Chill Overnight
This is probably the hardest part: waiting.
Once the frosting is on, cover the dish again with plastic wrap and place it back in the fridge—overnight is best, or for at least 8 hours. This gives the graham crackers time to soften and take on a cake-like texture. The layers meld together, the pudding sets, and the flavor just deepens. It’s absolutely worth the wait.
Tips for the Perfect Eclair Cake
Now that you’ve got the base recipe down, here are a few tips to make sure it turns out just right every time:
Don’t skip the chill time. This cake really needs those hours in the fridge to develop its signature texture. If you cut into it too early, the graham crackers will still be crunchy, and the layers may slide around.
Use full-fat pudding mix and real whipped topping (like Cool Whip) for best results. Sugar-free versions may not set the same way, and homemade whipped cream can break down too quickly.
Cut with a sharp knife that’s been dipped in hot water and wiped dry. This helps you get clean slices, especially if you’re serving at a party.
Easy Recipe Variations You’ll Love
Once you’ve made this version a few times, try mixing things up! Here are some fun variations to keep it fresh:
Chocolate Eclair Cake: Use chocolate pudding instead of vanilla for an extra-rich dessert. You can even add chocolate chips between the layers.
French Vanilla Twist: Swap the vanilla pudding for French vanilla flavor for a more custard-like taste.
Banana Pudding Eclair Cake: Add a layer of sliced bananas between the pudding layers. It’s like a hybrid of banana pudding and eclair cake—so good!
Strawberry Layer: Add thinly sliced strawberries for a fruity surprise. Just be sure to pat them dry so they don’t water down the filling.
Homemade Frosting Option: Want to skip the canned frosting? You can make a quick chocolate ganache with chocolate chips and heavy cream for a more decadent topping.
Tip: Just melt 1 cup of chocolate chips with 1/2 cup of warm heavy cream. Stir until smooth and pour over the top graham cracker layer before chilling overnight.
No-Bake Eclair Cake: FAQs and Final Thoughts
By now, you’ve got all the steps to make this classic No-Bake Eclair Cake come to life—from the creamy pudding layers to that rich chocolate frosting. But if you’re like most home bakers (myself included), you probably still have a few questions before you slice into your masterpiece. That’s where this next section comes in handy.
I’ve gathered some of the most frequently asked questions about this recipe to help make sure your dessert is as foolproof as it is delicious. Let’s dive into those before wrapping things up!
![]()
FAQ: Your Eclair Cake Questions Answered
1. Can I make this cake gluten-free?
Yes! Simply swap the graham crackers for a gluten-free version (there are quite a few available now in most grocery stores). Everything else in the recipe should already be gluten-free, but always double-check the pudding mix and whipped topping to be sure.
2. How far in advance can I make this?
This dessert is perfect for making ahead. It actually gets better with time! You can make it up to 2 days in advance, and it will still hold up beautifully. Just keep it tightly covered in the fridge.
3. Can I freeze eclair cake?
Technically, yes—but I don’t recommend it. Freezing can change the texture of the pudding and whipped topping, making it a bit grainy when thawed. For best results, stick with refrigerating.
4. What can I use instead of Cool Whip?
If you prefer not to use store-bought whipped topping, you can use homemade stabilized whipped cream. Just keep in mind that it might not hold up as long as Cool Whip, especially if you’re storing the cake for more than a day or two.
5. Is there a way to make this less sweet?
Yes! You can reduce the sweetness a bit by using sugar-free pudding mix and a lighter whipped topping. You can also try a homemade ganache on top instead of canned frosting—it’s rich but not overly sweet.
6. What’s the best way to cut and serve this cake?
Let the cake chill fully overnight. When ready to serve, run a sharp knife under hot water, wipe it dry, and slice. This helps get clean, neat squares without pulling up the top layer.
7. Can I add fruit to this recipe?
Definitely! Sliced bananas or strawberries between the pudding layers add a fresh twist. Just be sure to use firm, ripe fruit and pat it dry to avoid extra moisture.
Final Thoughts: A Dessert Worth Making Again and Again
This No-Bake Eclair Cake really checks all the boxes—easy, budget-friendly, make-ahead, and wildly delicious. It’s the kind of dessert that never goes out of style, and once you’ve made it once, I can pretty much guarantee you’ll be adding it to your regular rotation.
Whether you’re pulling it together the night before a big event or just whipping up something sweet for your family to enjoy after dinner, this recipe always delivers. And the best part? It’s completely customizable. Want to change up the pudding flavor? Go for it. Add a fruity twist? Absolutely. Top it with nuts or a drizzle of caramel? Don’t mind if I do.
PrintNo-Bake Eclair Cake
- Author: David
Description
This No-Bake Eclair Cake is a classic, crowd-pleasing dessert that layers creamy vanilla pudding with graham crackers and rich chocolate frosting. It’s a simple, fuss-free treat that comes together quickly and only gets better the longer it chills. Perfect for potlucks, parties, or an easy make-ahead dessert.
Ingredients
2 (3.4 ounce) packages instant vanilla pudding mix
3 cups milk
1 (8 ounce) tub whipped topping, thawed (such as Cool Whip)
2 sleeves graham cracker squares (about 18 full sheets)
1 (16 ounce) container chocolate frosting
Instructions
1️⃣ In a medium bowl, whisk together the vanilla pudding mix and milk until thickened. Fold in the thawed whipped topping until well blended.
2️⃣ In a 9×13-inch baking dish, arrange a single layer of graham cracker squares on the bottom, breaking pieces if needed to completely cover the base.
3️⃣ Spread half of the pudding mixture over the graham crackers, smoothing it into an even layer.
4️⃣ Add a second layer of graham crackers on top of the pudding.
5️⃣ Spread the remaining pudding mixture over the second cracker layer.
6️⃣ Finish with a final layer of graham crackers on top.
7️⃣ Cover the dish with plastic wrap and refrigerate for 30 minutes to 1 hour to allow the pudding to begin setting.
8️⃣ Microwave the container of chocolate frosting (with lid and foil seal removed) for about 15 seconds to soften. Stir until smooth and easily spreadable.
9️⃣ Remove the plastic wrap and spread the frosting evenly over the top layer of graham crackers.
🔟 Cover again with plastic wrap and refrigerate overnight. This allows the graham crackers to soften and the flavors to meld.
Notes
Letting the cake chill overnight is essential for achieving the perfect soft, cake-like texture. This dessert can be made up to two days in advance. For a twist, try using chocolate or French vanilla pudding, or adding a layer of sliced bananas between the pudding layers.


")

")


")
