

There’s something magical about chicken wings that just brings people together. Whether it’s game day, a casual get-together, or even a quiet weeknight when you’re craving something crave-worthy, wings never let you down. These oven-baked chicken wings are about to become your new go-to recipe—crispy on the outside, juicy on the inside, and packed with flavor in every bite. Best of all? You don’t need a deep fryer to get that golden, crunchy exterior.
I’ve made countless batches of wings over the years, and while I used to rely on messy frying methods or pre-packaged sauces, I finally cracked the code with this easy oven method. What really seals the deal here is the dry rub—a smoky-sweet-spicy blend that caramelizes beautifully in the oven. It’s bold without being overpowering, and if you’re like me, you might end up licking your fingers clean before even grabbing a napkin.
Let’s dive into what makes these wings so good—and how easy they are to whip up!
Why You’ll Love These Oven-Baked Wings
No frying needed: Save yourself the mess and cleanup.
Perfectly crispy: The secret’s in drying the wings thoroughly and using a wire rack for even cooking.
Big flavor: A dry rub made with pantry spices gives the wings a smoky-sweet kick.
Customizable heat: You control the spice level, from mild to hot.
This recipe yields enough for 2 to 3 people, but it’s easily doubled if you’re feeding a crowd—or if you’re just really hungry.
Ingredients You’ll Need
Here’s everything you need to make these oven-baked wings:
1 pound chicken wing portions
1 tablespoon olive oil
1 tablespoon brown sugar
1 teaspoon garlic powder
½ teaspoon onion powder
½ teaspoon ground mustard
½ teaspoon paprika
½ teaspoon salt
¼ teaspoon chili powder
¼ teaspoon red pepper flakes (optional, for heat)
Pro Tip: If you’re working with whole wings, make sure to cut them into drumettes and wingettes. Discard the tips or save them for making chicken stock later!
STEP 1: Prep Your Oven and Pan
First things first, preheat your oven to 400°F. You’ll want it nice and hot to help crisp up the skin. Set a wire baking rack on top of a rimmed sheet pan, and line the pan with aluminum foil or parchment paper. Trust me—this step makes cleanup so much easier.
Using a wire rack is key here because it lets hot air circulate around the wings, giving you that evenly crispy texture without having to flip them in oil.

STEP 2: Dry Those Wings
This step might seem small, but it’s absolutely crucial. Use paper towels to pat the chicken wings as dry as possible. Moisture is the enemy of crispiness, so take your time with this. The drier the skin, the crispier your wings will come out.
If you want to go the extra mile, you can even let the wings air dry in the fridge for 30 minutes after patting them down. Just place them on a plate or rack uncovered and let them chill. This step helps render the fat more effectively in the oven.

STEP 3: Coat with Olive Oil
Once your wings are nice and dry, toss them in a large mixing bowl with 1 tablespoon of olive oil. This helps the seasoning stick and encourages browning during baking.
You want every piece lightly coated—not drenched.
STEP 4: Mix Up Your Dry Rub
In a small bowl, combine:
1 tablespoon brown sugar
1 teaspoon garlic powder
½ teaspoon onion powder
½ teaspoon ground mustard
½ teaspoon paprika
½ teaspoon salt
¼ teaspoon chili powder
¼ teaspoon red pepper flakes (optional)
Mix it all together until it’s fully combined. The brown sugar adds a touch of caramelization, while the mustard and chili powders give the wings that deep, savory complexity.
If you’re making a bigger batch, go ahead and double this spice mix—it scales beautifully.

STEP 5: Season the Wings
Sprinkle the dry rub over the wings in the bowl, tossing until each piece is evenly coated. Don’t be shy—make sure every wing gets its fair share of that flavorful rub.
Use your hands or a spatula to really mix things up. This is where the magic starts to happen!
How to Bake Chicken Wings to Crispy Perfection (Without Frying!)
Alright, so we’ve prepped the wings, coated them in that bold dry rub, and now it’s time for the oven to work its magic. This next part is all about technique—because baking wings is one thing, but baking them crispy is what we’re going for here.
If you’ve ever been disappointed by soggy skin or under-seasoned wings, this method is going to be a game-changer. Using a wire rack not only promotes even airflow, but it helps the fat render down and drip away, leaving you with wings that are crispy, caramelized, and full of flavor.
Let’s finish what we started!

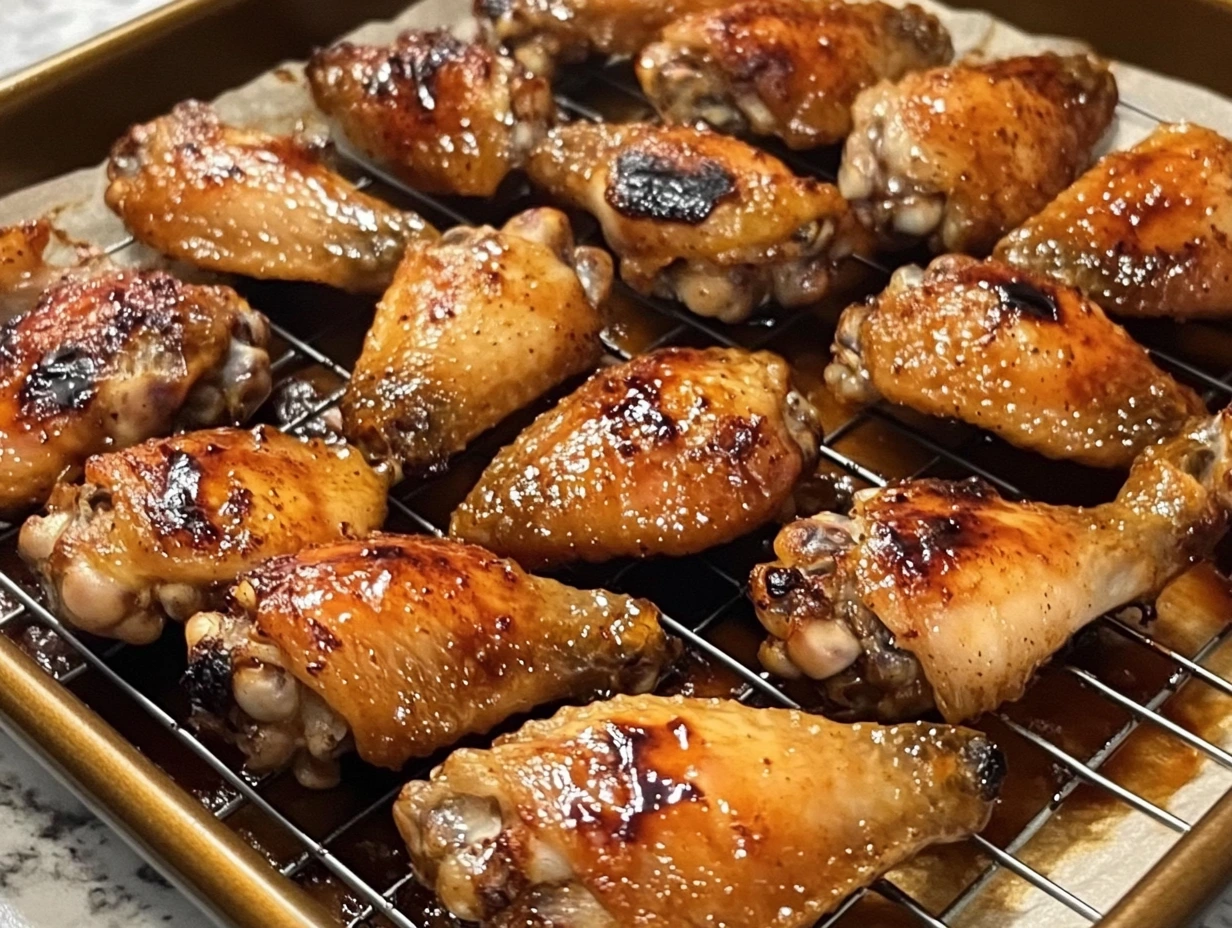
STEP 6: Arrange the Wings on the Rack
Now that your wings are seasoned to perfection, arrange them in a single layer, skin side up, on your prepared wire rack. Make sure they aren’t touching or overlapping—this is one of those small details that makes a big difference.
Spacing them out helps the hot air circulate around each piece, allowing the skin to crisp up on all sides. If they’re too close together, they’ll steam instead of bake, and you’ll lose that crunch we’re after.
STEP 7: Bake the Wings
Place the tray in the center of your preheated 400°F oven and bake for 20 minutes. Then, carefully flip each wing over using tongs and bake for another 15 minutes.
After about 35 minutes total, your wings should be golden brown with edges that are crispy and caramelized. If you like your wings extra crispy (who doesn’t?), you can add 2 to 3 minutes under the broiler at the end—just keep a close eye on them so they don’t burn.
If you’re using an oven thermometer, you’re looking for an internal temperature of at least 165°F, but I usually aim closer to 175°F for wings because the texture improves with a slightly higher cook.
STEP 8: Serve Hot and Fresh
Once they’re out of the oven, let the wings rest for 3 to 5 minutes. This helps the juices settle and gives the rub a chance to cool into that irresistible crispy coating.
Serve immediately with your favorite dipping sauces—ranch or blue cheese dressing are classics, but don’t be afraid to try something different like honey mustard or a smoky chipotle aioli. These wings also pair well with celery sticks or a simple coleslaw to balance the heat.

Helpful Tips for Success
Want to take your wing game to the next level? Here are a few extra pointers to keep in your back pocket:
Dry = Crispy: Seriously, don’t skip the drying step. It’s the #1 secret to crispy wings in the oven.
Let them air dry: If you’ve got the time, place the wings on a rack in the fridge for 30 minutes before seasoning. This helps dehydrate the skin just enough to give it that crackly finish.
Customize the heat: The red pepper flakes add a nice little kick, but you can turn it up with a pinch of cayenne or tone it down by leaving them out altogether.
Double the batch: Feeding a crowd? This recipe doubles easily—just make sure to use two pans and rotate them halfway through for even cooking.
Reheating tip: Leftover wings reheat beautifully in the oven or air fryer at 375°F for about 5–7 minutes. They’ll crisp back up like they were just baked.
Variations You Can Try
These dry-rub wings are a flavor bomb as-is, but they’re also a great canvas for customization. Here are a few fun ways to switch things up:
Buffalo Style: Toss the baked wings in a mix of melted butter and hot sauce for that classic tangy heat.
Honey Garlic Glaze: After baking, brush the wings with a sticky glaze made from honey, soy sauce, and minced garlic.
Lemon Pepper Finish: Add a quick toss of lemon zest and cracked pepper just before serving for a zesty twist.
Asian-Inspired: Try adding five-spice powder to the dry rub and serve with a soy-ginger dipping sauce.
These variations are a great way to adapt the recipe to your taste—or to whatever you’ve got in your pantry.
Oven-Baked Chicken Wings: Your Questions Answered + Final Thoughts
You’ve made it to the final stretch! By now, your kitchen probably smells amazing and you’re just a few minutes away from diving into the most flavorful, crispy chicken wings—without ever touching a deep fryer.
Before we wrap things up, I want to take a moment to answer some of the most common questions readers have about baking chicken wings at home. Whether it’s your first time making them or you’re looking to troubleshoot a few things, this FAQ section should have you covered.
FAQ: Your Chicken Wing Questions, Answered
1. Why aren’t my wings getting crispy in the oven?
Crispy wings start with dry skin. If your wings are wet or too close together on the tray, they’ll steam instead of bake. Make sure to pat them dry thoroughly and give them space on the rack.
2. Do I really need a wire rack?
It’s highly recommended. A wire rack lifts the wings off the tray, allowing hot air to circulate underneath and around them. If you bake directly on the tray, the bottoms may stay soggy.
3. Can I make these ahead of time?
Absolutely. You can season the wings and store them in the fridge for a few hours (or even overnight) before baking. Once baked, leftovers can be stored in the fridge and reheated in the oven or air fryer.
4. How spicy are these wings?
With the listed amount of red pepper flakes, the heat level is moderate—enough to feel it, but not overwhelming. If you’re sensitive to spice, simply leave out the red pepper flakes. Want more kick? Add cayenne pepper or extra chili powder.
5. Can I use frozen wings?
Yes, but be sure to thaw them completely before starting. Frozen wings hold a lot of moisture, and starting from frozen will prevent them from getting crispy.
6. What’s the best way to store and reheat leftovers?
Store cooked wings in an airtight container in the refrigerator for up to 3–4 days. Reheat in a 375°F oven or air fryer for 5–7 minutes to bring back that crispy texture.
7. Can I use a different spice blend?
Of course! This dry rub is super versatile, but feel free to experiment with other flavors—like Cajun seasoning, taco spice blends, or even BBQ rubs. Just keep the sugar-to-spice ratio balanced to avoid burning.
Final Thoughts: Crispy Oven-Baked Chicken Wings That Everyone Will Love
Whether you’re hosting a party, planning your next game-day snack lineup, or just craving something comforting for dinner, these crispy oven-baked chicken wings are a total winner. They’ve got all the flavor and crunch of fried wings, with none of the mess or hassle—and you can tweak the spice level to suit everyone at the table.
The dry rub packs serious punch with just a handful of pantry ingredients, and that crispy skin? Pure perfection, thanks to a few simple tricks like drying the wings and baking them on a wire rack. Once you try this method, it’s hard to go back.
I love how versatile this recipe is—serve them plain, pair with your favorite dip, or toss them in a glaze if you’re feeling adventurous. However you make them, don’t be surprised if they disappear fast.
If you give these wings a try, I’d love to hear how they turned out! Leave a comment, share your favorite variations, or let me know which dipping sauce is your go-to. And if you’ve got any questions I didn’t cover in the FAQ, drop those too—I’m happy to help.
Print
Oven-Baked Chicken Wings
- Author: David
Description
These oven-baked chicken wings come out irresistibly crispy without the need for deep frying. Coated in a bold and flavorful dry rub, they strike a perfect balance of sweetness, smokiness, and heat. Ideal for game days, casual dinners, or party appetizers, these wings are a guaranteed crowd favorite.
Ingredients
1 pound chicken wing portions
1 tablespoon olive oil
1 tablespoon brown sugar
1 teaspoon garlic powder
½ teaspoon onion powder
½ teaspoon ground mustard
½ teaspoon paprika
½ teaspoon salt
¼ teaspoon chili powder
¼ teaspoon red pepper flakes (optional)
Instructions
1️⃣ Preheat the oven to 400°F and set a wire baking rack over a rimmed sheet pan lined with aluminum foil or parchment paper for easy cleanup.
2️⃣ Pat the chicken wings thoroughly dry with paper towels. This step ensures maximum crispiness in the oven.
3️⃣ Place the wings in a large bowl, add the olive oil, and toss to coat evenly.
4️⃣ In a separate small bowl, combine the brown sugar, garlic powder, onion powder, ground mustard, paprika, salt, chili powder, and red pepper flakes. Mix well.
5️⃣ Sprinkle the dry rub mixture over the chicken wings and toss until all pieces are well coated with the spice blend.
6️⃣ Arrange the wings in a single layer, skin side up, on the prepared wire rack. This setup allows air to circulate for even cooking and crisp skin.
7️⃣ Bake for 20 minutes, then flip the wings and bake for an additional 15 minutes until they are golden brown and fully cooked through.
8️⃣ Serve hot with ranch or blue cheese dressing on the side for dipping.
Notes
For extra crispiness, let the wings air dry in the refrigerator for 30 minutes before seasoning. You can double the spice mix if using more wings. To make them spicier, increase the red pepper flakes or add a dash of cayenne. These wings also reheat well in the oven or air fryer.


")

")


")
