

Peanut Butter Spider Cookies are a festive and fun treat, perfect for Halloween parties or any themed event. These spooky cookies combine two classic flavors—rich peanut butter and indulgent chocolate—in a way that’s sure to impress both kids and adults. With their creepy yet cute design, featuring a Reese’s Peanut Butter Cup “spider” perched atop each cookie, these cookies are as visually delightful as they are delicious.
One of the best aspects of this recipe is its simplicity. Whether you’re a seasoned baker or just starting out, the clear step-by-step instructions ensure that you’ll achieve delicious results every time. These cookies are made from pantry staples and require just a bit of creative flair when it comes to decorating, making them an approachable and enjoyable baking project. Best of all, the combination of chewy peanut butter cookies and chocolate creates an irresistible flavor that’s bound to be a crowd-pleaser.

Ingredients Breakdown
Each ingredient in this recipe plays a specific role in achieving the perfect texture and flavor for these spider cookies. Here’s a breakdown of what makes each one essential:
- Butter and Sugars: The base of the dough starts with unsalted butter and a mix of brown sugar and granulated sugar. Creaming these ingredients together creates a light and fluffy dough, which gives the cookies their soft, chewy texture. Brown sugar adds moisture and a slight molasses flavor, while granulated sugar provides crispness on the edges.
- Peanut Butter: Creamy peanut butter (not natural) is key to getting the right consistency. Natural peanut butter tends to be too oily and separates easily, which can lead to greasy, uneven cookies. The creamy, shelf-stable variety blends smoothly into the dough, enhancing both flavor and texture.
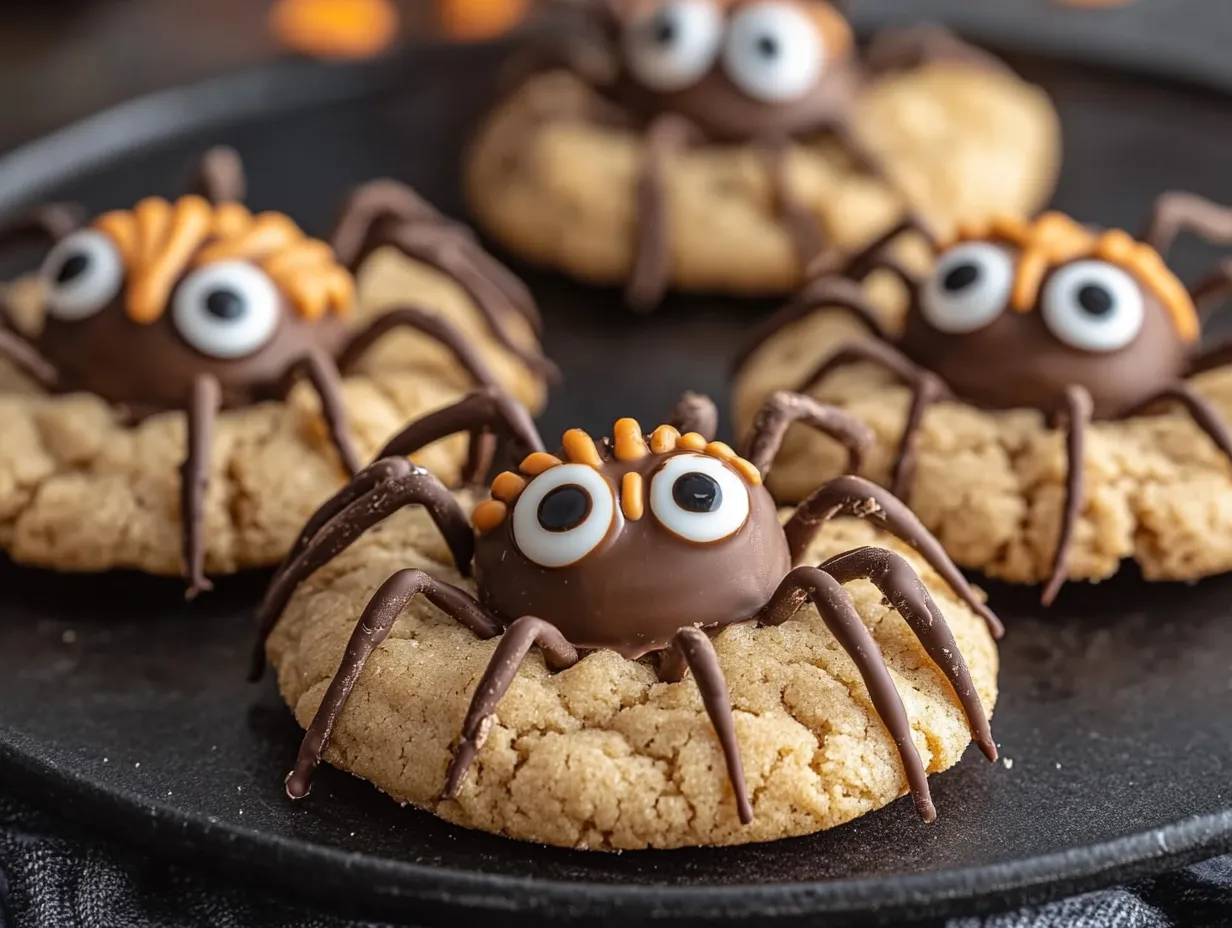
- Mini Reese’s Peanut Butter Cups: Freezing these little cups before baking ensures that they hold their shape when pressed into the hot cookies. Their rich chocolate and peanut butter centers complement the cookie base, turning each one into a delicious bite-sized treat.
- Candy Eyeballs: These fun, edible candy decorations bring the “spider” to life, making your cookies perfect for themed events. You can find them in most baking aisles or online, and if they’re unavailable, alternatives like icing dots or mini chocolate chips work as well.
Tips for Substitutions
- If you don’t have mini Reese’s cups, other chocolates like Rolos or Hershey’s Kisses can be used.
- For candy eyes, try making your own with icing, or simply use chocolate chips as a creative substitute.
Step-by-Step Instructions
Step 1: Prepare the Reese’s Cups
Before starting the cookie dough, unwrap about 24 mini Reese’s Peanut Butter Cups and place them in the freezer. Freezing these candies helps them maintain their shape when pressed into the freshly baked, warm cookies. Mini Reese’s Cups are the perfect size for these cookies, and freezing them ensures that they won’t melt too quickly from the residual heat of the cookie dough. This step also makes it easier to handle the candies when it’s time to press them into the cookies, giving you a neat, polished look for your spider bodies.
Step 2: Preheat the Oven and Prepare the Baking Sheet
Preheat your oven to 350°F (175°C) to ensure it’s at the right temperature when the cookies are ready to bake. Line your baking sheet with either parchment paper or silicone mats. These liners help prevent the cookies from sticking to the baking sheet and make cleanup much easier. Silicone mats, in particular, provide a nonstick surface that promotes even baking and reduces the risk of burning the bottoms of the cookies.
Step 3: Making the Cookie Dough
Start by creaming the butter, brown sugar, and granulated sugar together in a large mixing bowl. Use an electric mixer on medium speed for about 1 minute until the mixture is light and fluffy. This step is crucial for creating the right texture in your cookies, as it incorporates air into the dough, making the cookies soft and tender.
Next, add the creamy peanut butter, egg, and vanilla extract to the mixture, and beat again until everything is fully combined, about 30 seconds. The peanut butter should be smooth and well-blended with the butter and sugars to create a cohesive dough.
In a separate bowl, whisk together the dry ingredients: all-purpose flour, baking soda, baking powder, and salt. Gradually add the dry mixture to the wet ingredients, mixing on low speed or stirring by hand until just combined. Be careful not to overmix, as this can make the cookies tough. The dough should be soft, but not sticky, and it should hold its shape when scooped.
- Tips for Creaming Ingredients – Achieving a Fluffy Dough: Ensure your butter is at room temperature before starting. Cold butter won’t cream properly, and melted butter can make the dough too runny, preventing it from holding its shape.
- Common Dough Issues and How to Fix Them: If the dough seems too dry, add a small amount of milk or peanut butter to soften it. If it’s too wet, sprinkle in a bit more flour to help firm it up.
Step 4: Shaping and Baking the Cookies
Using a small cookie scoop or tablespoon, scoop out tablespoon-sized portions of dough and roll them into smooth balls between your hands. For an extra crisp texture, roll each ball in granulated sugar before placing it on the prepared baking sheet. This sugar coating adds a light crunch to the cookie exterior while keeping the inside soft and chewy.
Space the cookies about 2 to 3 inches apart on the baking sheet to allow room for spreading during baking. Bake the cookies for 8 to 11 minutes, or until the edges are slightly golden and the tops are set but still soft. Avoid overbaking to maintain a chewy texture.
- Tips for Rolling and Shaping Perfect Cookies: Keep your hands lightly floured or dampened with water if the dough is sticking to them. Consistent ball sizes will ensure even baking, so try to scoop equal amounts of dough for each cookie.
Step 5: Adding the Reese’s Cups
As soon as you remove the cookies from the oven, immediately press a frozen mini Reese’s Peanut Butter Cup into the center of each cookie while they’re still warm and soft. The heat from the cookies will slightly melt the base of the peanut butter cup, helping it to stick without losing its shape. Let the cookies cool on the baking sheet for 15 to 20 minutes, allowing the Reese’s cups to firm up and the cookies to fully set before transferring them to a wire rack to cool completely.
Step 6: Melting the Chocolate and Creating Spider Legs
In a microwave-safe bowl, melt ½ cup of semi-sweet chocolate chips. Heat the chocolate in the microwave at 50% power for 30-second intervals, stirring between each interval, until the chocolate is completely smooth and melted. This process should take about 2 to 3 minutes, depending on your microwave. Be careful not to overheat the chocolate, as it can seize and become grainy.
Once the chocolate is melted, transfer it to a squeeze bottle, piping bag, or a small sandwich bag with a tiny corner cut off. Use the melted chocolate to pipe 4 legs on each side of the Reese’s cup, creating the appearance of spider legs. Work quickly, as the chocolate will start to harden as it cools.
- Tips for Melting Chocolate – Preventing Seizing or Overheating: Stirring frequently and heating the chocolate slowly is key to avoiding seizing, where the chocolate turns thick and grainy. If this happens, you can try adding a small amount of vegetable oil or shortening to smooth it out.
- Alternatives to a Squeeze Bottle: If you don’t have a squeeze bottle, you can make a simple piping bag by filling a plastic sandwich bag and snipping off a small corner. A parchment paper cone can also be used for more control over the chocolate piping.
Step 7: Attaching the Candy Eyes
Once the spider legs are complete, it’s time to bring your spiders to life by adding candy eyeballs. Dab a small amount of melted chocolate onto the back of each candy eye, and stick them onto the top of the Reese’s cup to form the spider’s face. If candy eyeballs aren’t available, you can use small dots of icing or mini chocolate chips as a substitute. Allow the chocolate legs and eyes to fully set before moving the cookies to a serving platter. Your peanut butter spider cookies are now ready to serve!
Serving and Presentation
Cooling and Storing the Cookies
Properly cooling your peanut butter spider cookies is essential to ensure that the Reese’s cups and chocolate decorations set without melting. After pressing the frozen Reese’s cups into the warm cookies, allow them to cool on the baking sheet for 15 to 20 minutes. This step gives the peanut butter cups time to firm up while the cookies settle. Once they’ve cooled on the sheet, transfer the cookies to a wire rack to finish cooling completely. Avoid moving the cookies too soon, as this can cause the Reese’s cups to shift or melt.
For optimal freshness, store the cooled cookies in an airtight container at room temperature. They will stay fresh for up to 4-5 days. If you’d like to make them in advance, you can also freeze the cookies in an airtight container or freezer bag for up to 2 months. When you’re ready to serve, let them thaw at room temperature.
Presentation and Themed Events
To make your peanut butter spider cookies the star of the party, consider presenting them on a Halloween-themed platter. Arrange the cookies on a tray with spooky decorations like spider webs, mini pumpkins, or fake spiders to enhance the festive vibe. You can even place the cookies on black or orange napkins for added Halloween flair.
For other themed events, you can adapt the decoration by changing the candy eyes or spider legs. For instance, use colorful candy eyes or different chocolate drizzle patterns for birthday parties, or add edible glitter for a fun twist at kid-friendly events.
FAQs (Frequently Asked Questions)
How do you keep Reese’s cups from melting on cookies?
To prevent the Reese’s cups from melting when placed on the hot cookies, it’s essential to freeze them before baking. Place about 24 mini Reese’s Peanut Butter Cups in the freezer while you prepare the dough. Freezing helps them hold their shape when pressed into the warm cookies after baking. Once the cookies are baked and still hot, immediately press a frozen Reese’s cup into the center of each one. The brief exposure to heat will soften the base enough to stick, but the frozen interior will keep the candy from melting or losing its shape.
Can I use natural peanut butter in this recipe?
It’s not recommended to use natural peanut butter for this recipe. Natural peanut butter tends to have an oily texture and separates more easily, which can result in greasy or uneven cookies. The creamy, shelf-stable peanut butter has a more consistent texture, which ensures the dough holds together properly and produces soft, chewy cookies. If you only have natural peanut butter on hand, you may need to adjust the recipe by reducing some of the oil content or adding more dry ingredients to achieve the right consistency.
Can these cookies be made ahead of time?
Yes, these cookies can be made ahead of time. Once baked and fully cooled, store the cookies in an airtight container at room temperature for up to 4-5 days. If you want to prepare them even further in advance, you can freeze the baked cookies for up to 2 months. When freezing, layer the cookies between sheets of wax or parchment paper to prevent them from sticking together. Thaw the cookies at room temperature before serving, and they’ll be just as delicious as fresh-baked.
What can I use instead of candy eyeballs?
If you don’t have candy eyeballs, there are several fun alternatives you can use to create the spider’s eyes. Small chocolate chips can be placed upside down to create little black eyes, or you can pipe small dots of white icing and add mini chocolate chips or black sprinkles for pupils. Another option is using colored candies like M&M’s or Skittles to give your spiders a more colorful or playful appearance. These substitutes work just as well and still give the cookies their adorable spider look.
Can I freeze the cookie dough?
Yes, you can freeze the cookie dough to save time for later. Once you’ve made the dough, form it into individual cookie dough balls, then place them on a baking sheet and freeze until firm. Once the dough balls are frozen, transfer them to a freezer-safe bag or container. When you’re ready to bake, simply place the frozen dough balls directly onto a lined baking sheet and bake as usual, adding an extra 1-2 minutes to the baking time. This makes it easy to have fresh-baked cookies whenever you need them, without the hassle of mixing up the dough each time.
Conclusion and Final Thoughts
Peanut Butter Spider Cookies are a simple, yet creative way to celebrate Halloween or any spooky-themed event. With basic ingredients and easy-to-follow instructions, this recipe is perfect for both beginner bakers and experienced dessert enthusiasts. The combination of chewy peanut butter cookies, Reese’s Peanut Butter Cups, and playful spider decorations makes these cookies a festive treat that’s sure to impress.
What makes this recipe even more fun is the opportunity to get creative with the decorating. Whether you’re making them for a Halloween party or just a fun family activity, you can experiment with different types of candy eyes or spider leg designs. So, give this recipe a try, and don’t hesitate to put your own unique spin on it! You’re sure to have a sweet success.
Print
Peanut Butter Spider Cookies
- Author: Christophe
Description
These fun and spooky Peanut Butter Spider Cookies are a perfect Halloween treat! Soft, chewy peanut butter cookies are topped with a mini Reese’s Peanut Butter Cup, then decorated with chocolate legs and candy eyes to create a cute, edible spider. They’re easy to make and will be a hit at any party!
Ingredients
- 1 stick unsalted butter (½ cup), room temperature
- ½ cup brown sugar
- ⅓ cup granulated sugar
- ¾ cup creamy peanut butter (not natural)
- 1 large egg
- 1 teaspoon vanilla extract
- 1 ½ cups all-purpose flour
- 1 teaspoon baking soda
- ½ teaspoon baking powder
- ½ teaspoon salt
- Granulated sugar (for rolling the cookies)
- 24 mini Reese’s Peanut Butter Cups, frozen
- ½ cup semi-sweet chocolate chips, for melting
- Candy eyeballs
Instructions
1️⃣ Prepare the Reese’s Cups:
Unwrap about 24 mini Reese’s Peanut Butter Cups and place them in the freezer. This helps them maintain their shape when pressed into the hot cookies.
2️⃣ Preheat the oven:
Preheat your oven to 350°F (175°C). Line a baking sheet with silicone mats or parchment paper.
3️⃣ Make the cookie dough:
In a mixing bowl, cream together the butter, brown sugar, and granulated sugar using an electric mixer for about 1 minute, until smooth and fluffy.
Add the peanut butter, egg, and vanilla extract, and beat again until combined, about 30 seconds.
4️⃣ Add the dry ingredients:
Gradually mix in the flour, baking soda, baking powder, and salt. Stir on low speed or by hand with a spatula until just combined. Be careful not to overmix the dough.
5️⃣ Shape and bake the cookies:
Using a small cookie scoop or tablespoon, form tablespoon-sized balls from the dough. Roll each ball between your hands to smooth it out, then roll it in granulated sugar.
Place the cookies on the prepared baking sheet, spaced 2-3 inches apart, and bake for 8-11 minutes or until the edges start to crack and turn golden.
6️⃣ Add the Reese’s cups:
Remove the cookies from the oven and immediately press a frozen mini Reese’s Peanut Butter Cup into the center of each cookie. Let the cookies cool on the baking sheet for 15-20 minutes to allow the Reese’s cups to firm up.
7️⃣ Create spider legs:
In a microwave-safe bowl, melt the semi-sweet chocolate chips in the microwave at 50% power, stirring every minute until fully melted (about 3 minutes).
Transfer the melted chocolate to a squeeze bottle or a small sandwich bag with a corner cut off. Pipe 4 legs on each side of the Reese’s cup to create the spider legs.
8️⃣ Attach the candy eyes:
Use a small dab of melted chocolate on the back of each candy eyeball to stick them onto the top of the Reese’s cup. Allow the chocolate to fully set before moving the cookies to a serving platter.
Notes
- Refrigerate the cookies: To speed up the cooling process and help the Reese’s cups maintain their shape, you can refrigerate the cookies for 5-10 minutes after adding the chocolate cups.
- Decorate creatively: Add extra spooky details like mini chocolate sprinkles or drizzles for extra fun!


")

")


")
