

Sometimes, you just need a dessert that does the most with the absolute least amount of effort—and that’s exactly what these Two-Ingredient Lemon Bars are all about. Light, airy, and perfectly citrusy, they come together in a single bowl with just two pantry-friendly ingredients. Yes, two!
I actually stumbled across this recipe years ago when I needed something quick for a church potluck. I was low on time, even lower on groceries, and desperate for a solution that didn’t involve a late-night grocery run. I remembered that box of angel food cake mix hiding in the back of the pantry, and the lemon pie filling that had been waiting patiently for its moment. One quick mix later, and these fluffy, golden bars were born. And let me tell you—everyone asked for the recipe.

Why You’ll Love These Lemon Bars
What’s not to love? This recipe checks all the boxes for a fast, foolproof dessert:
Only two ingredients – No eggs, no oil, no fuss.
Quick to make – You can be slicing into these bars in just about 30 minutes.
Light and refreshing – Thanks to the lemon pie filling, each bite is citrusy and bright, with a naturally airy texture from the angel food cake.
Perfect for any occasion – Great for potlucks, summer BBQs, or when you’re just craving something sweet and simple.
They’re like sunshine in dessert form—perfectly sweet with just the right amount of tang.
Ingredients You’ll Need
1 box angel food cake mix (1-step, about 16 oz)
Make sure you’re using the kind that only requires water—often labeled as “just add water” or “1-step.” It contains egg whites and all necessary components, so you won’t need to add anything else.1 can lemon pie filling (about 21 oz)
This gives the bars that fresh, tangy lemon flavor and keeps everything moist and soft.
That’s it! No oil, no butter, no eggs. It’s basically magic.
How to Make Two-Ingredient Lemon Bars
STEP 1: Preheat and Prepare
Start by preheating your oven to 350°F. Lightly grease a 9×13-inch baking dish or line it with parchment paper. I love using parchment because it makes cleanup a breeze—and makes lifting the cooled bars out of the pan super easy for cutting.
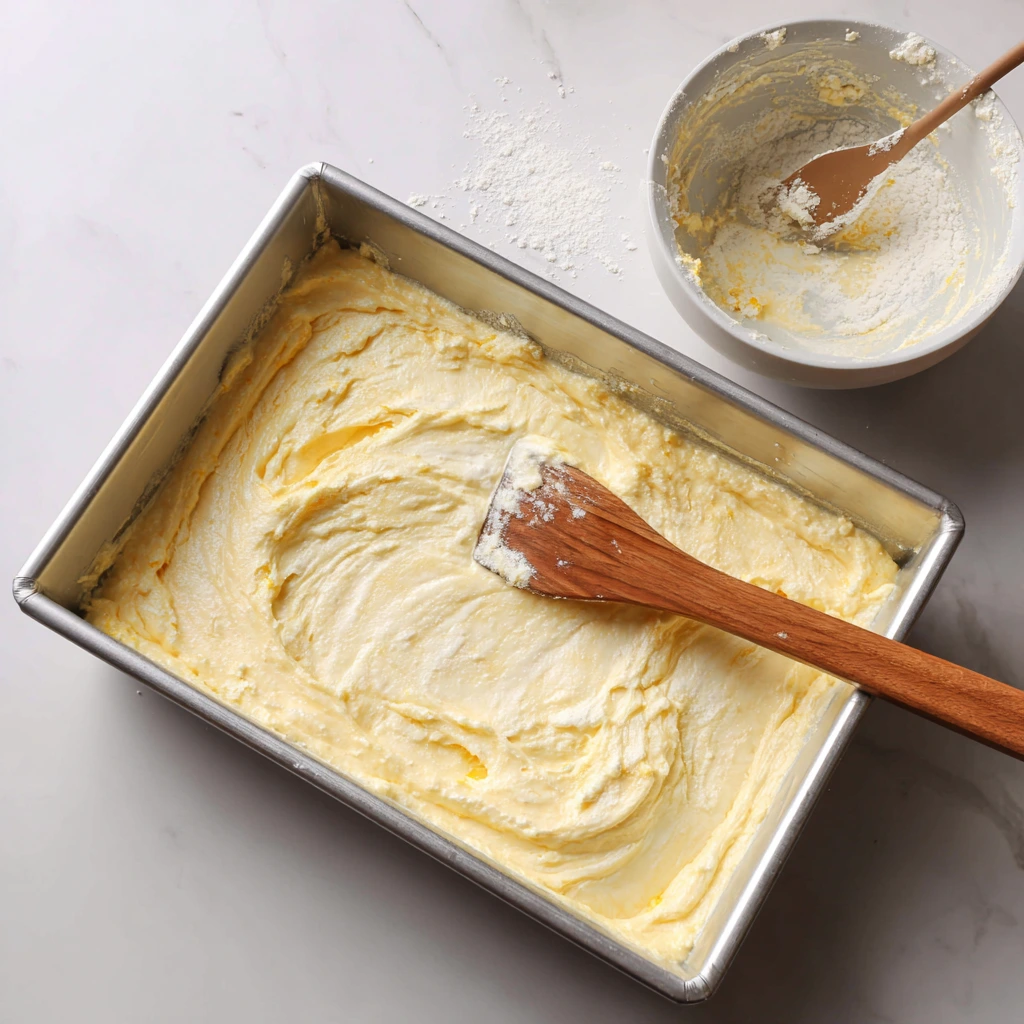
STEP 2: Mix the Ingredients
In a large mixing bowl, dump in the entire box of angel food cake mix and the whole can of lemon pie filling. Stir everything together until it’s fully combined. The mixture will get nice and fluffy as you stir, but resist the urge to overmix. Just blend until everything is incorporated and smooth.
Tip: Don’t use a mixer here—just a spoon or spatula. Overmixing can deflate the batter and give you dense bars, which totally defeats the purpose of this light and airy treat.
STEP 3: Pour and Spread
Once your batter is ready, pour it into the prepared baking dish. Use a spatula to spread it out evenly—it will be fluffy and a bit sticky, but don’t worry, it spreads just fine with a little patience.

STEP 4: Bake
Pop the pan into your preheated oven and bake for 25 to 30 minutes, or until the top is a beautiful golden brown and the center is set. You’ll know it’s ready when a toothpick inserted into the center comes out mostly clean (a few moist crumbs are fine).
As the bars bake, your kitchen will fill with the most delicious lemony aroma—like a slice of summer right from the oven.
How to Finish and Serve Your Two-Ingredient Lemon Bars (Plus Easy Tips!)
Alright, your kitchen smells amazing, and your lemon bars are golden and puffed up in the pan. You’re almost there! In this part, we’ll go over how to properly cool, slice, and store your lemon bars—and I’ll throw in a few helpful tips and variations you can try if you’re feeling creative.
One of my favorite things about these bars is how little effort they require after baking. There’s no need for fancy glazes or layering. Once they’ve cooled, they’re ready to serve—though a sprinkle of powdered sugar never hurts.
Let’s get into the final steps and some simple ways you can make these bars your own.
Finishing the Lemon Bars Like a Pro
STEP 5: Cool Completely
This part is important: Let the bars cool completely in the pan before you try to cut into them. Right out of the oven, they’re still setting and can be a little delicate. Give them time—at least an hour at room temperature—to firm up and develop that soft, cake-like texture we’re after.
Tip: If you lined your baking dish with parchment, you can lift the whole block out once it’s cooled. Makes slicing and storing so much easier!
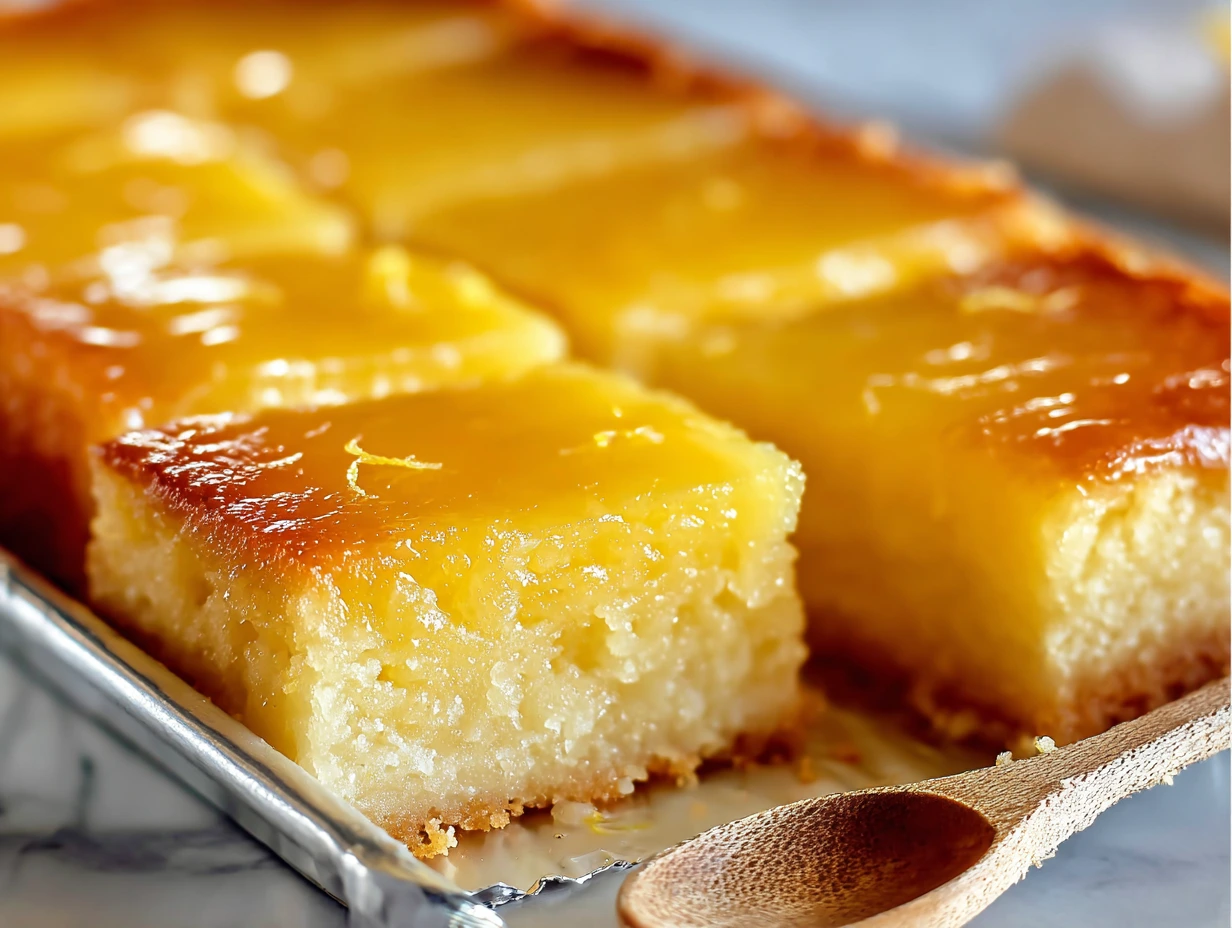
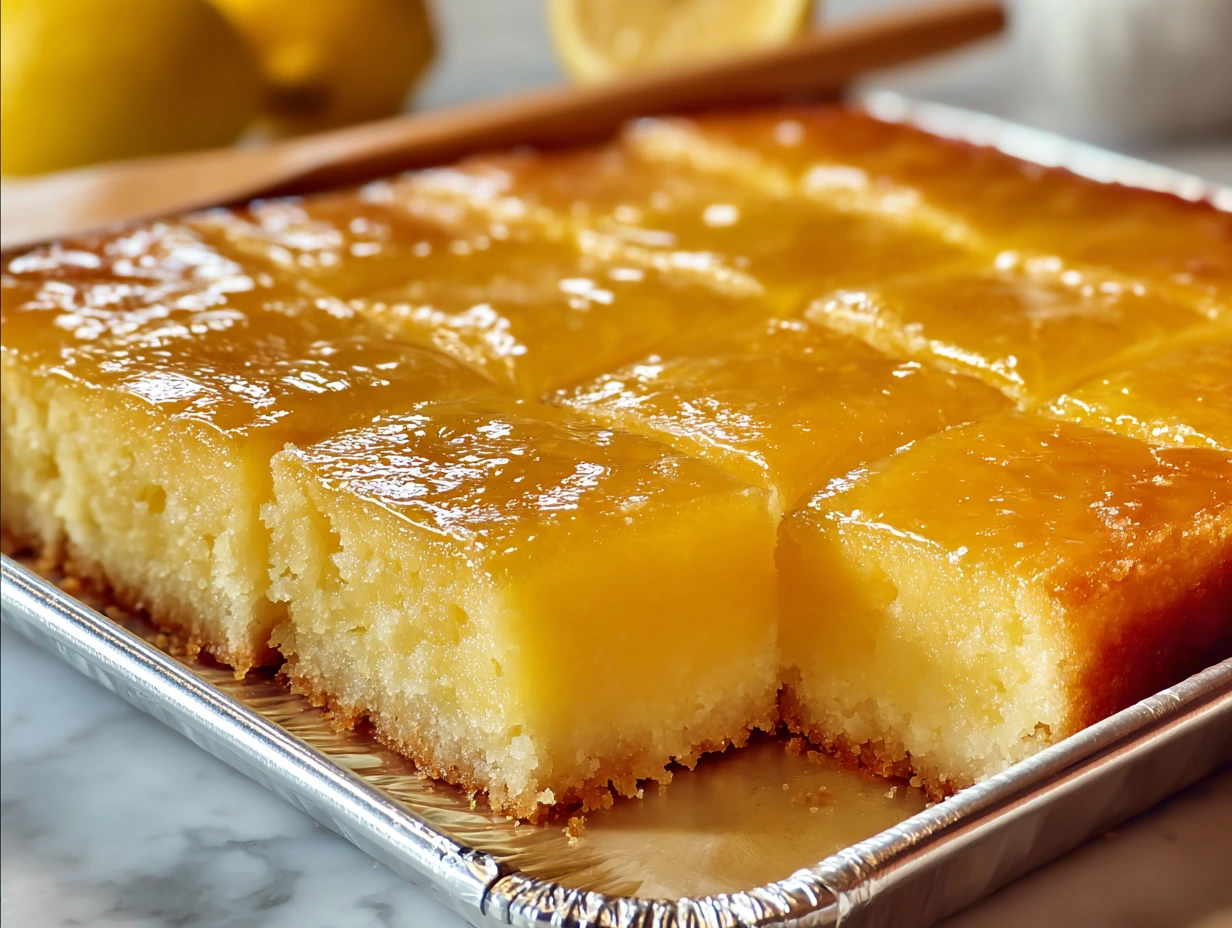
STEP 6: Slice and Serve
Once cooled, use a sharp knife to slice the bars into squares. I usually cut mine into 12 generous pieces, but you can get up to 16 if you prefer smaller servings.
If you want to dress them up a bit, dust the tops with powdered sugar. It adds just a touch of sweetness and gives them a lovely, bakery-style finish.
How to Store Lemon Bars
These bars are best enjoyed within a few days, but they store well if you have leftovers.
Fridge: Store the bars in an airtight container in the refrigerator for up to 3 days. They actually taste even better chilled!
Freezer: If you want to freeze them, wrap individual slices in plastic wrap and place them in a freezer-safe bag or container. They’ll keep for up to a month. Just thaw in the fridge overnight or at room temp for a few hours.
Note: Because they’re made with pie filling and cake mix, the bars will remain soft and moist. That’s totally normal and part of their charm.
Easy Twists and Variations
If you’re anything like me, you’ll want to make these again and again. The great news is, they’re super versatile! Here are a few ways to mix things up without overcomplicating the recipe:
Swap the Pie Filling
Try cherry, blueberry, or strawberry pie filling for a different fruity twist.
Apple pie filling gives a soft, spiced flavor—great for fall!
Add a Citrus Zing
Stir in 1 tablespoon of fresh lemon zest with the batter for extra brightness.
Or drizzle with a simple lemon glaze (powdered sugar + lemon juice) if you want something a little sweeter on top.
Make it Mini
Pour the batter into mini muffin tins for bite-sized treats. Just reduce the baking time to around 15-18 minutes and keep an eye on them.
Top with Coconut or White Chocolate
A sprinkle of toasted coconut or white chocolate chips before baking adds a little texture and flavor variation.
These bars are a blank canvas in the best way. The core recipe is so simple, it really invites you to get creative without the risk of ruining it.
Your Questions Answered: Two-Ingredient Lemon Bars FAQ
Before we wrap up, let’s tackle some of the most common questions that come up when making these bars. Even though this recipe is super straightforward, a few tips and clarifications can help make sure your lemon bars turn out perfect every time.
FAQ: Two-Ingredient Lemon Bars
1. Can I use a different kind of cake mix?
The short answer: no. This recipe works specifically with a 1-step angel food cake mix. Other cake mixes (like yellow or white cake) don’t have the right structure and won’t give you the same fluffy texture. Stick with the one-step kind that says “just add water.”
2. Is it okay to use homemade lemon curd or pie filling instead of canned?
Yes, but with a little caution. If you’re using homemade lemon filling, make sure it has a similar consistency to canned pie filling—not too runny or too thick. Anything too loose might affect the rise and texture of the bars.
3. My bars came out sticky or gummy in the center. What went wrong?
This usually means they were underbaked or didn’t cool long enough before slicing. Make sure the center is set and a toothpick comes out mostly clean before removing from the oven. Also, give them a full hour (or more) to cool before cutting.
4. Can I make these gluten-free?
You can try using a gluten-free angel food cake mix, and pair it with a gluten-free lemon pie filling. Results may vary slightly in texture, but many readers have had success with that substitution.
5. How long will these bars keep?
Stored in an airtight container in the fridge, they’ll stay fresh for about 3 days. You can also freeze them for up to a month—just make sure to wrap them well to prevent freezer burn.
6. Can I double the recipe for a crowd?
Definitely! You can double the recipe and bake it in a large sheet pan (like a jelly roll pan), but you’ll want to watch the bake time closely—it may need a few more minutes depending on your oven.
7. Do these bars need to be refrigerated?
Yes. Because of the lemon pie filling and moisture level, it’s best to store them in the refrigerator to keep them fresh and prevent spoilage.
Final Thoughts: Give These Bars a Try!
There’s something magical about recipes that are so simple yet deliver so much flavor—and these Two-Ingredient Lemon Bars are a perfect example. Whether you’re a busy parent looking for an easy treat, a beginner baker trying your hand in the kitchen, or just someone with a serious lemon craving, this recipe has your back.
They’re bright, fluffy, sweet, and just the right amount of tangy. And best of all? No complicated steps or long ingredient lists.
Print
Two-Ingredient Lemon Bars
- Author: David
Description
These Two-Ingredient Lemon Bars are the ultimate in quick and easy desserts. With just lemon pie filling and angel food cake mix, you can whip up a bright, fluffy, and sweet treat that’s perfect for potlucks, last-minute gatherings, or when you’re simply craving something citrusy and light.
Ingredients
1 box angel food cake mix (1-step, about 16 oz)
1 can lemon pie filling (about 21 oz)
Instructions
1 Preheat your oven to 350°F. Lightly grease or line a 9×13-inch baking dish with parchment paper.
2 In a large mixing bowl, combine the entire box of angel food cake mix with the can of lemon pie filling. Stir until fully combined and fluffy—do not overmix.
3 Pour the mixture into the prepared baking dish and spread evenly.
4 Bake for 25-30 minutes, or until the top is golden and the center is set. A toothpick inserted should come out mostly clean.
5 Let the bars cool completely in the pan. Once cooled, slice into squares and serve. Optionally, dust with powdered sugar for a finishing touch.
Notes
Make sure to use a 1-step angel food cake mix, not the kind that requires separating eggs. These bars are naturally airy and moist, with a light tang from the lemon. Store leftovers in an airtight container in the refrigerator for up to 3 days.


")

")


")
